Want to delete backup files in Windows 10?
If yes, then you are in the right place.
Creating backups is one of the best things which you can do to save your important data files.
Because if something wrong happens, then only these backup files can help you in recovering your data.
But the worst part of these backups is that they consume lots of space on your hard drive.
And most of the space is consumed by App backup files, Windows update files, and Restore points. ( which are not that important )
Although, we always recommend you to keep a backup of your files. But this running out of disk space problem can trouble you anytime.
So in that case, you must learn how to remove those old backup files which are not necessary & manage your disk space.
So let’s see how it works…
Table of Contents
How to Delete Backup Files in Windows 10 [5 Methods]
But before we dive in further, I want to tell you something.
Although, the backup features like Backup & Restore, Restore Points, and File History really helps in saving your Windows OS from data loss.
But if you don’t manage these backup files regularly, then after a specific period of time they will start taking up more space.
And eventually, this will lead to a shortage of disk space and you won’t be able to update new backup files.
And to solve this issue, just follow these steps.
So let’s get started.
1. Delete Windows System Restore Points
Windows System Restore Points is one of the best feature to store & create a backup of current windows installation files and updates.
But it takes up huge amount of hard drive space.
Although, we already know that windows 10 backup delete old backups automatically but we can’t rely on this.
And that’s why I always prefer manually removing old backup files like Restore Points & File of previous versions.
And to do so just follow the steps:-
Step 1: Click on the search bar & type “SystemPropertiesProtection” and then press Enter.

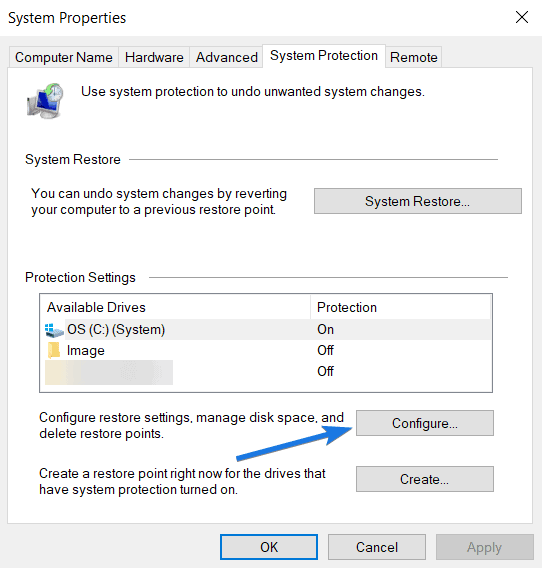
Step 2: Now this will open up System Properties, so click on the System Protection tab and then click on Configure button.
Step 3: Now under the Disk Space Usage, click on the Delete button and then Apply & Click OK. This will delete all your System Restore Points.
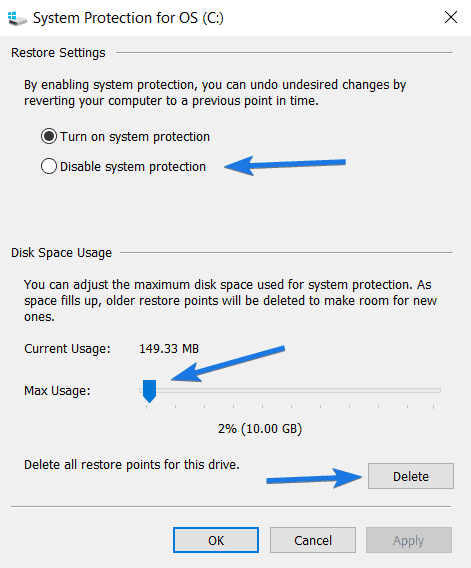
Note:- Here you can also Disable system protection feature if you don’t want to use it. Also, you can adjust the Max Usage slider for the maximum amount of disk space used for system protection.
And done! let’s move to the next method.
2. Use Disk Cleanup Utility
Although deleting system restore points will clear up most of the space but if it doesn’t work for you, then you can try this.
Disk Cleanup is one of the best Windows utilities for cleaning up all the temporary files and junk files stored on your hard disk.
And the best part is that using this utility you can easily delete the Windows.old folder. (Temporary update files)
And to do so just follow the steps:-
Step 1: Go to search bar & type “DiskCleanup” and then press Enter.

Step 2: After that Disk Cleanup will open up and then click on Clean up system files to view more advanced options.
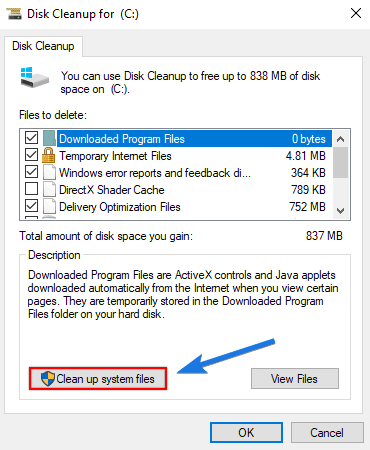
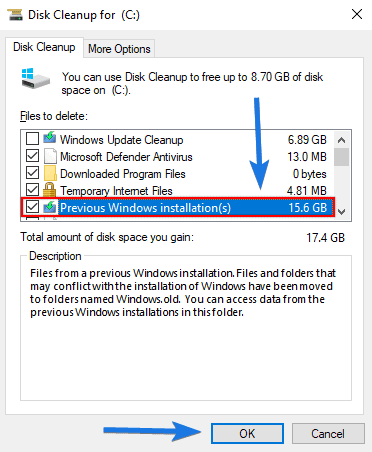
Step 3: Now locate and select the Previous Windows installation(s) checkbox & other Temporary files and then click OK.
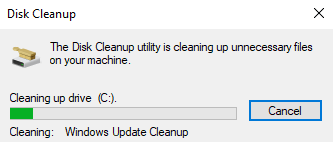
Now it will start cleaning up the C:\ drive, so wait for few minutes.
Note:- Before deleting these installation files please make sure your updated Windows 10 version is working fine. Because after that you won’t be able to undo this process.
And done! let’s move to the next method.
3. Remove Windows Backup Image
In the above methods, I have already shown you how to remove restore points and also about cleaning disk space. But if you want to delete windows backup image files, then this method is for you.
Backup and Restore is another nifty utility that is used to create system images of your Windows Operating System and files present on your hard drive.
And for backup purposes, all the image files are stored on some external hard disk or USB Flash Drives.
Also, I have seen many users struggling and searching for “how to delete backup files from external hard drives in Windows 10?” ( especially for the WD My Passport)
And for them the answer is just right here.
And to do so just follow the steps:-
Step 1: First, click on the Start button and then click on Settings icon.
![]()
Step 2: Once you are in Windows 10 settings, click on Update & security.

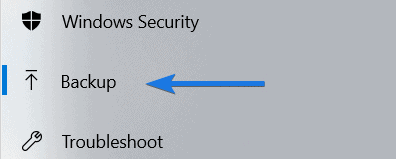
Step 3: Now on the left hand side section, click on the Backup option.
Step 4: Now under the “Looking for an older backup?” section, click on Go to Backup and Restore (Windows 7).

Step 5: Here under the “back up or restore your files” section you will find your previously backed up files, so click on Manage space.
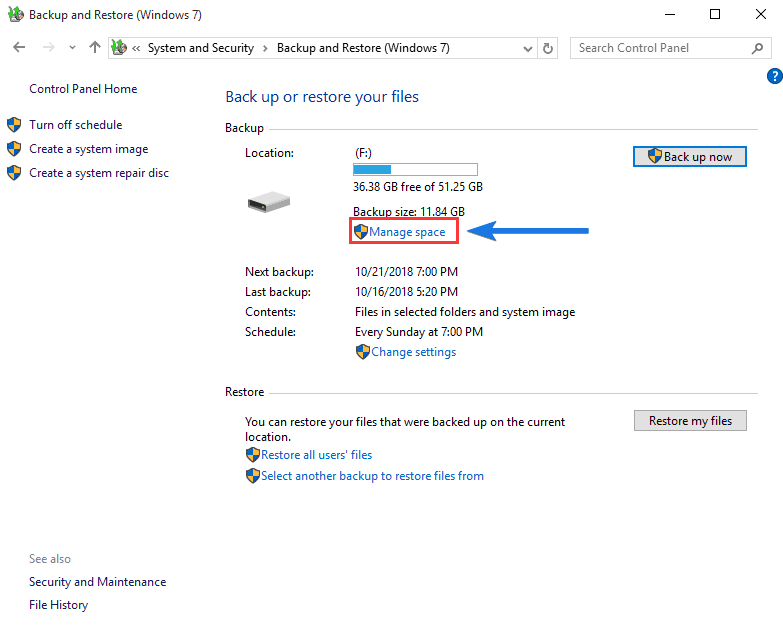
Step 6: After that the “Manage Windows Backup disk space” will open up showing all the space usage summary and how disk space is used by Windows backup.
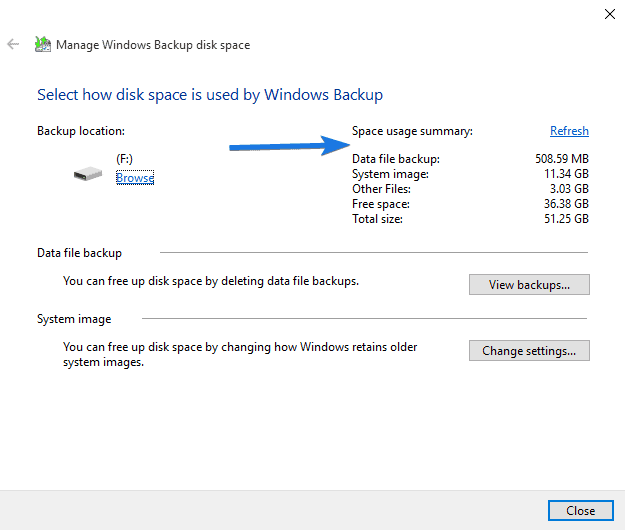
Under that section you will find two options, one is View backups… and another one is Change settings…
Step 7: Now under the “Data file backup” section, click on the “View backups…” option. (This will help you to free up disk space by deleting data file backups from Windows 10.)

Step 8: After that a popup window “Select a backup period to delete” will open up, so now select the backup period and then click on Delete.
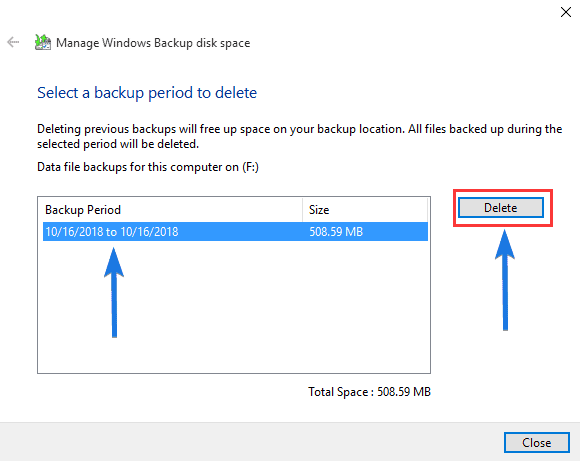
Note:- Please make sure that before deleting the previous backups you don’t need them. Because after that, all your backup files will be removed from Windows 10 of that selected period of time. So be careful while selecting the backup period and you are safe.
Although, you have successfully deleted the windows backup image files to free up some disk space. But if you want them to be automatically managed then Step 9 & 10 is for you.
Step 9: Now under the “System image” section, click on the “Change settings…” option. (This will help you to free up disk space by changing how Windows retains older system images.)

Step 10: After that a popup window “Select how Windows retains older system images” will open up, so now you have two options…
- Let Windows manage the space used for backup history (maximum 150.00 GB)
- Keep only the latest system image and minimize space used by backup
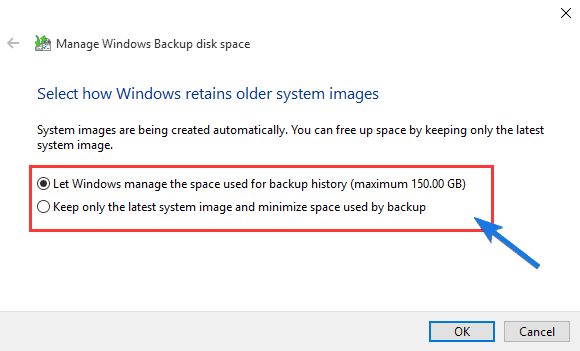
Now it’s totally up to you, if you have always had some free space then you can go for the 1st option. And if you don’t have much space and only want to keep only the latest backup files then 2nd option is best for you.
And done! let’s move to the next method.
4. Delete Windows Old File History Backups
Although, you can free up most of the space by deleting above mentioned backup files but using this method can also help you.
File History is another great utility available in Windows OS that is used to back up your data files like documents, pictures, music, video, downloads, and other essential application files.
But one thing which is annoying is that after a specific period of time the File History backups start taking up so much space on your hard drive.
And to overcome this you need to do delete those old backup files.
Also, I have seen many users struggling and searching for “how to delete app backup files in Windows 10 using File History?“.
And for them the answer is just right here.
And to do so just follow the steps:-
Step 1: Go to search bar & type “Control Panel” and then press Enter.

Step 2: Now Go to “System and Security” section.

After that click on the “File History” option which is above the Backup and Restore (Windows 7) section.

Step 3: Now on the left hand side section click on “Advanced Settings“.
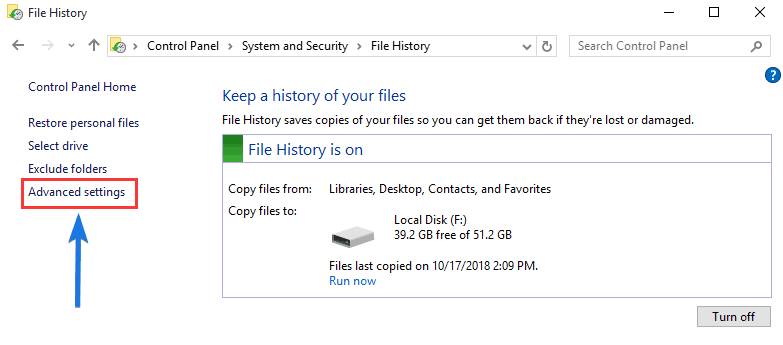
Step 4: After that, a pop-up window will open up showing all the Advanced Settings like how often you want to save copies of copies of your files and how long you want to keep saved versions.

Step 5: At last, click on the “Clean up versions” and then a “File History Cleanup” pop-up will open. Now select the specific time like “Older than 1 month” for you which you want to Delete older versions of files and folders and then click on the Clean up button.
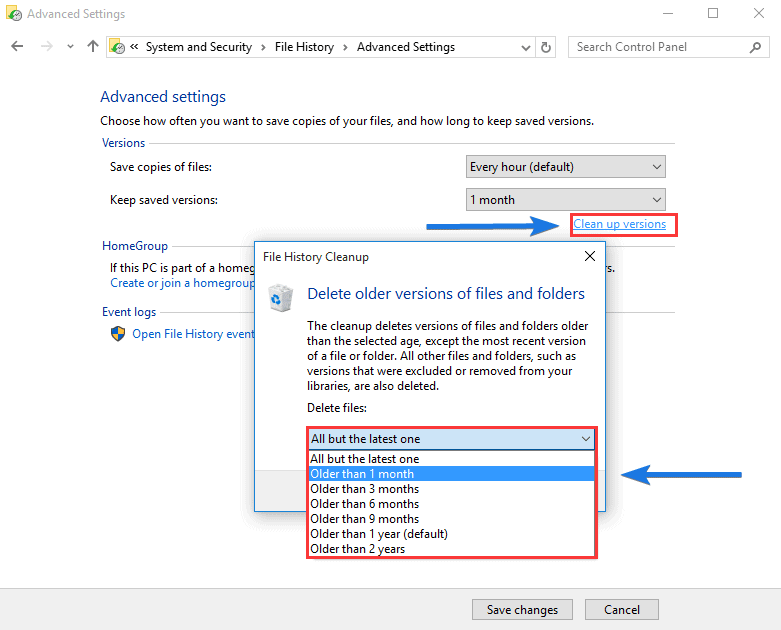
And done! or And this is how you can save your data by deleting app backup files using File History in Windows 10.
And done! let’s move to the next method.
Bonus Tips: Save & Manage Windows Backup Space in Windows 10
Although this is not directly related to this, but still you can use these quick tips to save and manage Windows backup space consumed by these small app data files and other documents. (Which are not necessary)
So let’s move to the quick tips…
Remove & Delete Unused Application
This is one of my favorite tips because by doing this you will be able to remove all those files from your computer or laptop which are not required. Not only this helps you in getting free space but also makes your Windows run faster.
And to do this, just follow this step…
- Just Go to Control Panel > Uninstall a Program and then delete all those applications which you don’t use anymore and are not required.

Delete Temporary Files in Windows 10
Although, this quick tip won’t help you in saving your disk that much but can help you in deleting all the junk files which are not required. Mostly all these files are created by the Applications we use but not required when the job is done.
And to do this, just follow this step…
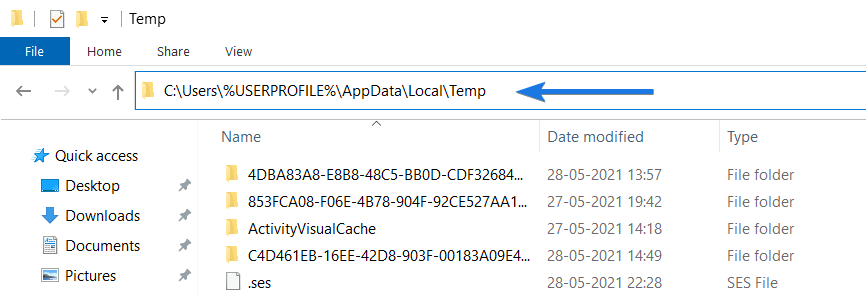
- Just navigate to the given path and then select all files. After that press “Shift + Delete” and then hit Enter.
Path: “C:\Users\%USERPROFILE%\AppData\Local\Temp“
Clear your Downloads Folder
If you want to save some of your disk space then this quick tip can help you. Recently a week ago my PC’s C: Drive was going to full. And then I started deleting the files which are not required and you won’t believe that around 35 GB was covered by the Downloads Folder.
And to do so, just follow these steps:-
- Just Go to your Downloads folder and then delete all the files which are not required. You can also follow the given path.
Path: “C:\Users\%USERPROFILE%\Downloads“

And don’t forget to empty your Recycle Bin also. 🙂
Note:- In the above procedure if somehow you have lost your data, then you can check out this guide on how to recover deleted files.
Some FAQs
How do I delete Windows backup files?
To delete Windows backup files, just go to Settings > Update & Security > Backup > Go to Backup and Restore (Windows 7) > Manage Space and then select the specific backup to delete.
How do I delete backup history files?
To delete backup history files, just go to File History > Advanced settings > Clean up versions and then select the older versions of files and folder to delete.
Can I delete system backup?
Yes, you can easily delete the system backup files by going to Backup and Restore (Windows 7) settings and then clicking on the Manage Space option to delete backups.
How do I delete backup settings in Windows 10?
It’s pretty easy to delete backup settings, just go to Backup settings > View backups and then select the settings of Windows 10 backup to delete them.
That’s it for now…
Conclusion
So that’s how you can easily delete or remove your old windows app backup files from your laptop, computer, or PC. All the above methods are easy to use and effective in saving your data and can be also used on Windows 7 & 8.
Stay tuned for the next post.
Feel free to share your thoughts via comments and also tell us if you any better way on How to Delete Backup Files in Windows 10.
If you liked this post, Don’t forget to share this post with your friend and family member who really need this.
