How to Recover Deleted Photos in Windows 10?
If you are searching for this, then you are in the right place.
Photos are like memories that everyone wants to collect for later use.
And for that, the first thing which comes to our mind is to save them on our personal Laptop, PC, or Computer.
But what if they are accidentally deleted or lost someday.
I can imagine that situation as it usually happens with everyone.
And if you act quickly and follow the below-mentioned ways then you can easily restore or retrieve them.
So without further ado, let’s get started…
Also Read:- Windows 10 Photo App Showing Deleted Pictures.
Table of Contents
How to Recover Deleted Photos in Windows 10 [ 2022 ]

But before we dive in further, let’s get some more info.
Although, all the methods given below are pretty easy to follow in Windows 10. But I have seen many users who still think this is impossible and to clear this misconception I will give a quick answer to this question.
Is it possible to recover deleted photos?
Yes, it is possible to recover or retrieve photos, images, or pictures if they are accidentally lost or missing from any of your devices.
And if you are confused and want to know how this happens then here are some most common reasons behind photo loss or deletion.
- Accidental deletion or format.
- Issues with devices like a hard drive or SSDs.
- Physical damage or photo corruption.
- Software compatibility issues.
- Recycle bin storage limits.
Now let’s directly move to the methods and see how they work…
1. From Recycle Bin
One of the most common ways in Windows 10 is to recover deleted photos from recycle bin. Everyone knows that Microsoft Windows OS, stores deleted files in the Recycle Bin by default, so you can usually find them there if you have just removed them. But if you have used the “Shift + Delete” shortcut keys then this method will not work for you because they are permanently deleted from your PC.
Note:- If you have recently removed any photos then you can easily undelete them by pressing the “Ctrl + Z” shortcut keys or if this doesn’t work you can follow the below-mentioned steps.
Here’s how to do it:-
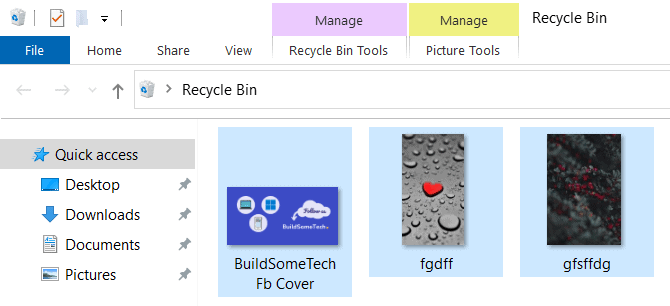
1. First, go to Desktop and then double-click on the Recycle Bin icon. ( You can also press the “Windows + D” shortcut keys to quickly navigate to the desktop screen )
![]()
2. Now locate the deleted photos which you want to recover and then right-click on them.
3. At last, select the Restore option from the dropdown menu.
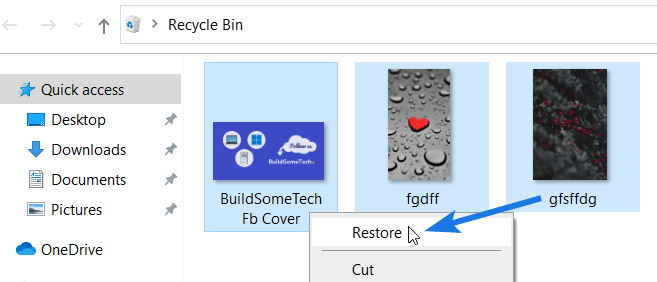
And Done! Your file will be restored to its original folder and location. But what if you emptied your recycle bin then in that case you can use the second method using third-party tools.
2. Using Third-Party Tools
If you have accidentally deleted your photos and have no backup, then using a third-party app or tool is a great choice. Whether it’s a picture, video, or any other multimedia file, you can easily recover them all.
Recuva
One tool which I personally use and recommend is Recuva, it is one of the best photo recovery software out there. Using this tool you can easily recover permanently deleted photos in any format ( JPG, JPEG, BMP, PNG, GIF, TIFF ). And the best part is that it is totally free and also compatible with almost all versions of Windows 10, 8, 7, XP, and more.
And here’s how to do it:-
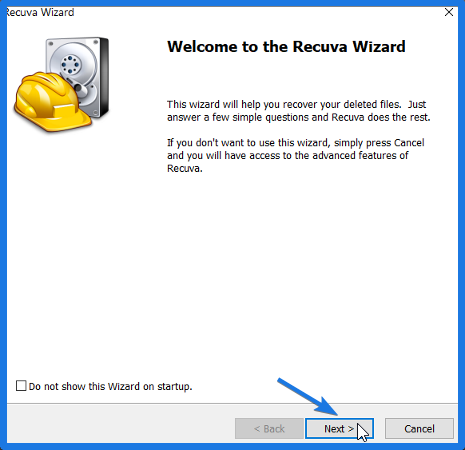
1. First, Download and install Recuva from the given link. Once installation is completed, Open the Recuva Wizard and then click on Next.
Note:- I highly recommend using the Recuva portable version because installing new software may overwrite files on the computer.
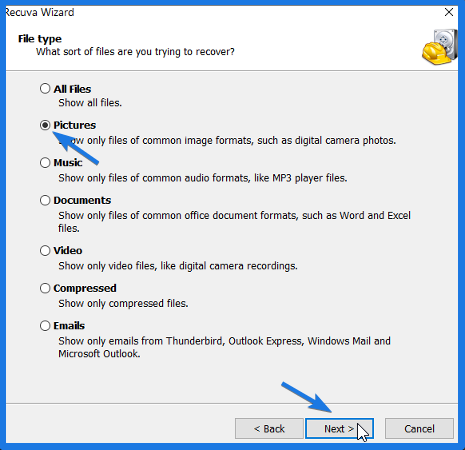
2. Now select the desired file type which you want to recover. As for common image formats, such as digital camera photos choose Pictures and then click on the Next button.
3. After that, select the file location where the deleted files were present. For example, if the files were present in Recycle Bin then choose In the Recycle Bin option and then click on the Next button.
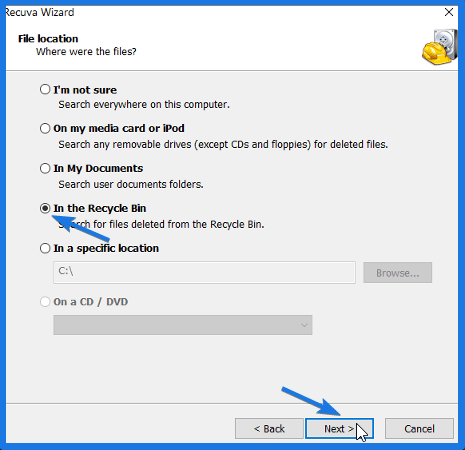
4. Now select Enable Deep Scan option and then click on the Start button. Now, wait for a few minutes as Recuva is scanning for deleted photos.
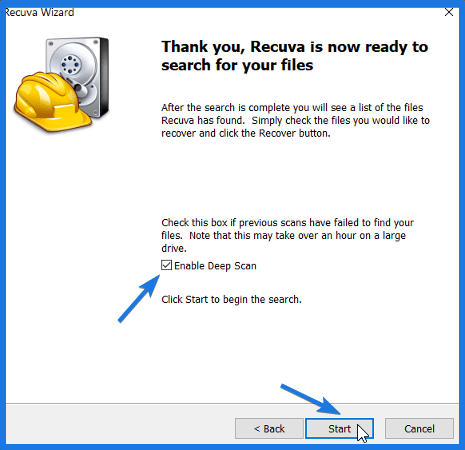
Note:- Deep Scan helps in scanning deeply buried files and it can also be used to restore hidden photos.
5. Once the scan is completed, it will show a large number of pictures that can be recovered easily. After that select, the desired pictures & location where you want to store the recovered photos, and then click on the Recover button.
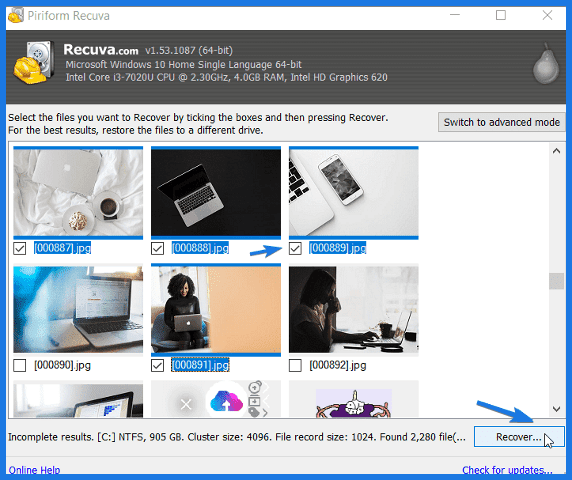
Note:- Please make sure that you don’t restore the photos to the same location from where they were deleted earlier.
Yodot Photo Recovery
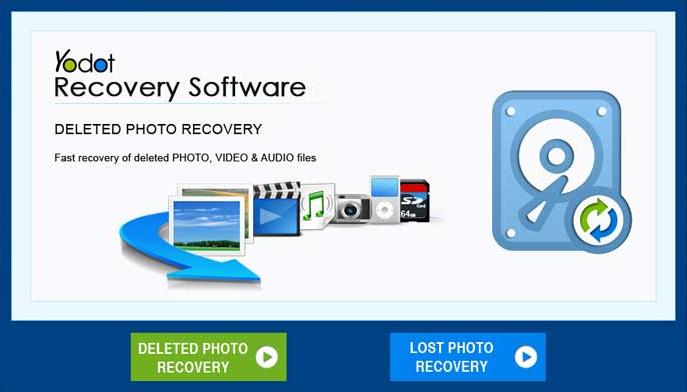
Yodot is also a great software company that is getting more popular day by day. However, they provide all kinds of file repair, data recovery, and other backup software but they are popular for their photo recovery application. Apart from that, it works very smartly and helps in recognizing all file types even before recovering them. Moreover, it supports all devices like memory cards, hard drives, and other media cards.
And here is a quick guide that you can follow:-
- First, download & install Yodot photo recovery from the given link.
- Now open the software and then select Deleted or Lost option according to your preference.
- After that, select the Drive Location from where you want to recover the images or photos.
- Now it will start scanning the directory and then will give you a list of files to preview them.
- At last, select the photos to recover and then save them.
And Done! You can also use the official Windows File Recovery tool developed by Microsoft. But I haven’t shown the full process because it’s a command-line tool which I personally don’t like much.
3. Using System Registry
If an image file is deleted by mistake and the Recycle Bin icon on the desktop is also missing, you have some other less well-known methods to try and regain access or recover deleted pictures. One of them involves working with the Windows registry, a massive database where Windows 10 stores various low-level settings.
Note:- Please make sure to follow the exact steps mentioned below otherwise changing some wrong System Registry files can cause problems like crashing your PC.
And here’s how to do it:-
1. Go to the Start menu, search for Regedit, and hit Enter.

2. Now Registry Editor will open up, so navigate to the given path location.
Path location:- HKEY_LOCAL_MACHINESOFTWAREMicrosoftWindowsCurrentVersionexplorerDesktopNameSpace

3. Now right-click on the right window pane and then go to New & select the Key option.

4. After that, rename this new key to {645FF040-5081-101B-9F08-00AA002F954E} and then hit Enter.

5. At last, close the Registry Editor & then Reboot your PC so that changes may take effect.
And Done! Now you may see the Recycle Bin icon visible and restored on your desktop or home screen.
Now let’s move to the next method…
4. File history Option
If you use Windows File History to create regular backups then it’s pretty easy to restore deleted photos from the backup. But if you haven’t created any backup earlier, then this method will not work for you.
And if you don’t know much about File History then, it is a backup tool specially developed for Windows 10 which allows you to backup your photos, documents, videos, and other files automatically. And the best part is that you can easily restore your data using these backups.
And here’s how to do it:-
1. Go to the Start Menu, search for File History & then click on the “Restore your files with File History” option.

2. After that, navigate to the exact folder from where the photos were deleted or removed.
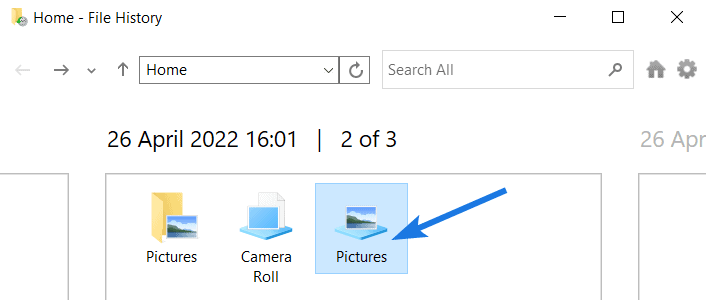
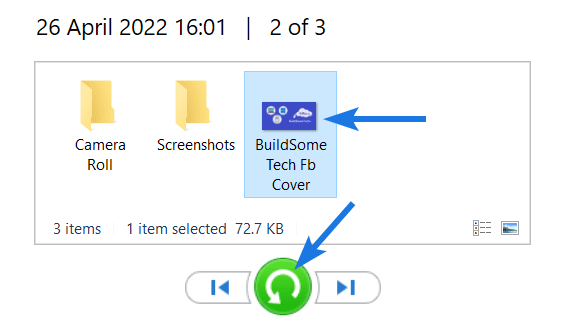
3. Now select the specific file or photo which you want to recover and then click on the green “Restore” button.
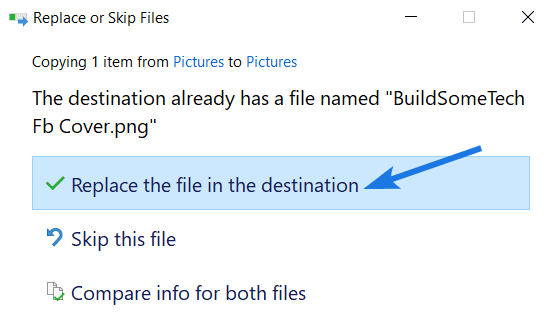
4. At last, if the photo is hidden or already present at the same location then it will ask to “Replace the file in the destination“, so click on that option and it will restore the photo at the original location.
Quick Tip:- I personally recommend you to backup your important files and if you don’t know how to do it using File History then check here.
Now let’s move to the next method…
5. Windows 10 Backup
This method is almost similar to the File History but in this Windows creates backup images of your files on a specific drive. And if you use the Backup and Restore feature to back up your files then you can easily retrieve deleted photos from your Windows 10 even if you accidentally deleted or lost them.
Moreover, this type of backup is almost similar to the manual backup which anyone can copy-paste their data to the Removable devices. You can also use the third-party backup software to do this but I prefer doing it manually.
And here’s how to do it:-
1. First, go to Control Panel and then open the “System and Security” settings.
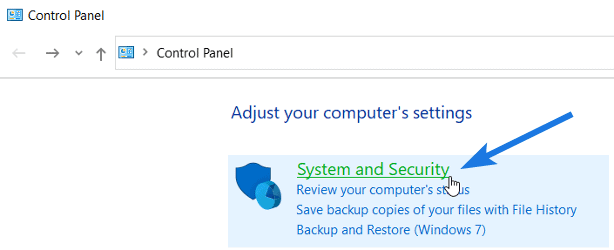
2. Now click on the “Backup and Restore (Windows 7)” option.

3. After that, click on the “Restore my files” button.

4. Now click on the “Browse for folders” button and then go to the folder where the backup image was stored & double-click on it.
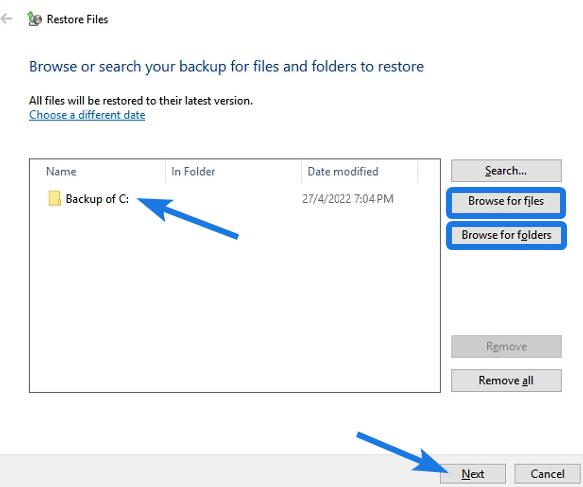
5. At last, select “Backup of C:” and then click on the Next button. Now it will ask “Where do you want to restore your files”, so select In the original location option and finally, click on the Restore button.
Now let’s move to the next method…
6. Restore Previous Version
Using Previous Version is a great way to restore deleted pictures on your Windows 10. If sometimes you accidentally lost files for some reason then you can easily use “Restore Points” to recover them. And if you don’t know much about this feature then, all Windows PC creates system copies of files and folders that are present on your desktop and backup them automatically for later use.
I don’t know if this feature is enabled on your PC but you can still try this option by following the below-mentioned steps.
Note:- This doesn’t work if you have formatted your hard drive.
And here’s how to do it:-
1. First, go to the folder from where the files or photos were deleted or located earlier.
2. Now, right-click on a folder and then select the “Restore previous versions” option.
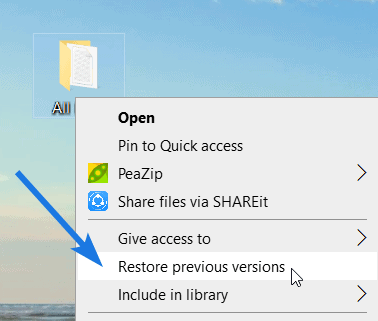
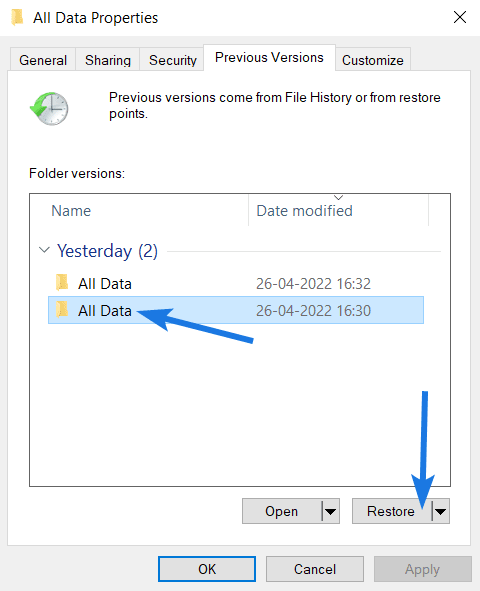
3. After that, select the “Folder version” according to the Date modified and then click on the Restore button.
4. At last, it will ask for the confirmation so click on Restore.
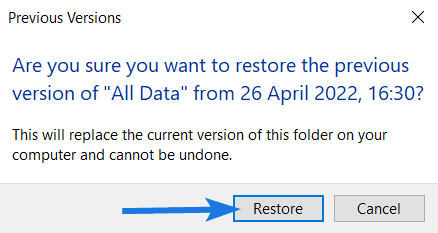
And Done! Now your photos will reappear in the same location of the folder from where it was deleted or lost.
Now let’s move to the next method…
7. Photo / Data Recovery Services

The process of restoring deleted photos is an easy one, and with the right set of instructions, it’s something we can all perform. However, if you’re not tech-savvy enough to attempt the process yourself or if your photo files have been deleted for a considerable amount of time, hiring a professional might be better.
Data recovery companies employ highly skilled engineers with advanced testing equipment who are familiar with repairing physical damages, corrupted hard drives, and recreating lost files using techniques like deep scan, data carving, and dynamic data recovery.
Note:- Data recovery services by a professional can be expensive. A good tip is to fire up one last scan before taking the machine to a data recovery specialist. Here is the list of the best free data recovery software for Windows 10 which you can try last time and can save you a few bucks.
Now let’s get some more tips.
Tips to Improve Photo Recovery Process in Windows 10

Data recovery is never guaranteed. If you want to maximize your chance of recovering deleted photos from Windows 10, pay attention to the following factors. They are likely common sense to many but are essential for maximizing your chance of a successful recovery.
- Create a Backup: The first thing you should do to avoid lost data is to regularly back up your essential data. There are many ways to backup data, such as burning files to disc, backing up files to an external hard drive, or making complete system images by using backup software.
- Avoid Defragmentation: This second tip is very crucial and also helpful in case of how to recover permanently deleted files in Windows 10. If your hard drive is fragmented, it will be more difficult for you to get back the deleted photos scattered all over the hard drive. So, it is advised not to defragment your drive immediately.
- Avoid Overwriting Data: In addition, if you have lost some important data on your Windows PC, never write new data to the space from where the photos were deleted. Otherwise, it will be nearly impossible for you to recover lost files using any recovery tool.
That’s it for now…
Conclusion
So, that’s how you can easily restore your permanently deleted photos from Windows 10. Whether you accidentally deleted your files or lost them due to software or hardware issues, “luckily,” these methods can effortlessly help you.
Moreover, all the above-mentioned methods are applicable for different devices like SD Card, USB drives, & Hard drives, and talking about the compatibility they also work well with Windows 7, 8, XP, and more.
Stay tuned for the next posts…
Feel free to share your thoughts via comments and also tell us about this post on How to Recover Deleted Photos in Windows 10 [ 2022 ].
If you liked this post, don’t forget to share it.


I like the efforts you have put into this, regards to all the great content.