Want to know How to Boot From USB on Windows 11?
If yes, then you are definitely going to love this post.
Apart from that, if you are looking for a way to upgrade your computer to the latest version of Windows OS, it will also help you out.
Maybe because you want to try out Android app support or the redesigned new look you get with Windows 11.
Well, there is no better way to do this than installing it from a USB drive.
But before you can take the Windows 11 plunge, you need to check that your computer meets the system requirements.
In general, a compatible TPM 2.0 Chip and secure boot enabled on your system are essential twos that are required to boot from it.
So, without further delay, let’s get started…
Table of Contents
How to Boot From USB on Windows 11 [ 3+ Quick Methods ]
But before we dive in further, here is a quick overview.
Although, it’s pretty obvious to have an installation device with you if you are moving further. Because this is the only device that will help you to recover the OS or if you want to reset Windows due to some major issues.
But if you are a basic user then I would like to remind some more prerequisites that you should be having. Like, as a Windows 11 bootable USB and if you don’t have it then you can use this guide which shows the full process on how to create it using Rufus.
So, let’s get started…
1. Using Windows 11 Settings
This is the easiest and safest way to boot Windows 11 from a USB drive if you don’t want to mess around with the BIOS or UEFI settings. You just need to make sure that the device contains the operating system that you want to install, otherwise, it won’t work.
Note:- It’s very rare to see systems having no BIOS but if you want to boot without BIOS, then these steps are definitely for you.
And here are the steps to follow:-
1. First, plug in the USB flash drive and wait to get detected.
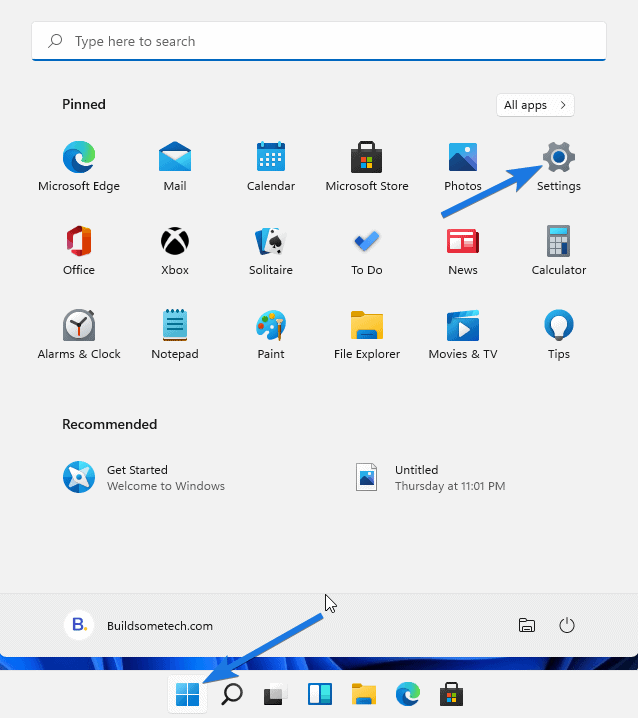
2. Now click on Start menu and then click on the Settings icon.
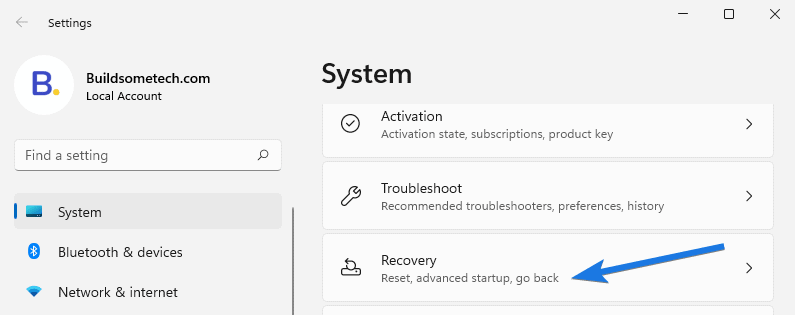
3. After that, go to System section & then click on the Recovery tab.
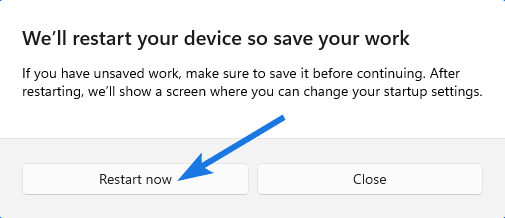
4. Now under the Recovery options section, navigate to Advanced startup and then click on the Restart now button.
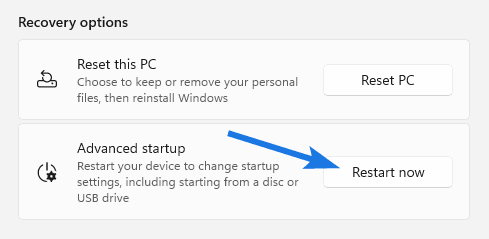
After that, it will ask for confirmation, and to save your work, now click on Restart now button.
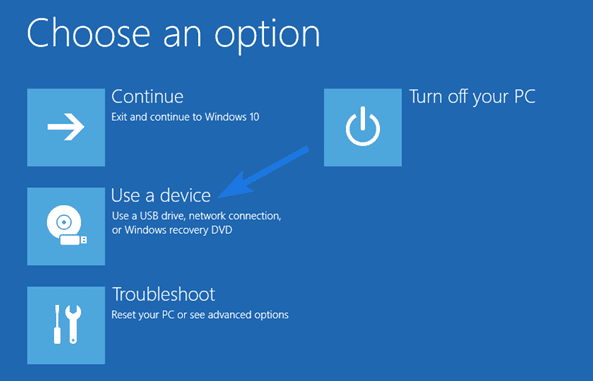
5. Now your system will restart and will boot in the “Windows 11 Recovery Mode“. And then from the given options, click on the Use a device option because we want to boot from the USB drive.
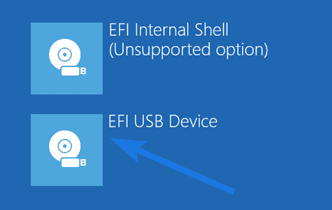
At last, click on the “EFI USB Device” option and then you will see the operating system booting from the USB that you have plugged in.
Now let’s move to the next method…
2. Using Boot Menu Key
Although, the above method works really fine but if you are locked out from your PC then you might not be able to perform those steps. In that case, you must know how to boot directly without logging in by using the Boot Menu key. And if this is not the case, then it might be some different problem like Windows 11 not booting from USB or more.
And here are the steps to follow:-
1. First, insert the bootable USB drive into your computer.
2. Now restart your PC and once the startup screen appears, press the Boot Menu Key to get into the menu.
Note:- Typically, the majority of manufacturers like Lenovo, Hp, and Dell have F2 or DEL as default keys but you can also try ( F9, F10, F11, F12 ).
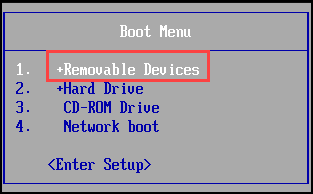
3. After that the Boot Menu will open up, so now select the “Removable Devices” option and then hit Enter.
4. Now your system will reboot and you will be prompted to “Press any key to boot from CD or DVD” screen, so now press any key to boot from the device that you have inserted in Step 1.

Now let’s move to the next method…
3. Using UEFI or BIOS Settings
Nowadays, it’s very rare to see systems without boot menu but what if it’s true or someone is using an old machine? In that situation, you can easily boot from USB without it and even when the Boot Menu is not working.
And you can do all this using UEFI or BIOS settings which are almost similar to the 2 method. Please make sure the USB drive is plugged in and if it shows the USB drive is not recognized then try restarting the computer or manually eject and re-insert it properly.
And here are the steps to follow:-
1. Restart your Laptop, Computer, or PC.
2. Now when the system is restarting, press the BIOS Key. ( Generally, it opens with the DELETE or F2 button )
3. Once you are in the “BIOS SETUP UTILITY“, go to the Boot tab.

4. After that, change the “Boot Device Priority” and set the “1st Boot Device” as a Removable Device. And then press the F10 button to Save and Exit.
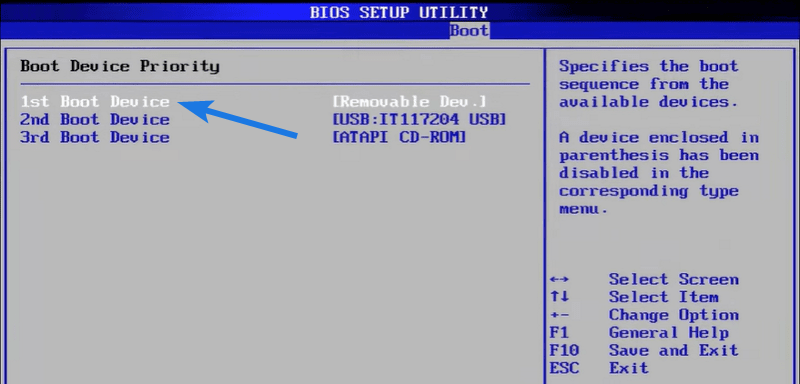
5. Now your PC will be restarted and you will see a “Press any key to boot from CD or DVD” screen, so any of the keys to continue the boot process.

Once it’s done, you can follow our post on how to install Windows 11 for the full installation steps and easier navigation.
Now let’s move to the bonus method…
Bonus:- How to Boot a Surface From USB Drive
If you have a Surface device, such as the Surface Pro then you can use it to boot from a USB drive. The Surface line of devices does not have an optical drive. so you are forced to use a USB stick. The process is slightly different from a typical desktop computer, but it’s still pretty straightforward.
And here are the steps to follow:-
- Make sure your surface device is shut down & fully charged.
- Insert the bootable USB flash drive into the surface device.
- Now press & hold the volume-down button, then press and release the power button while holding it.
- After that, continue holding the volume-down button until the Surface logo appears on the screen.
- And then, follow the on-screen steps to boot from the device.
That’s it for now…
Conclusion
So, that’s all about how to boot Windows 11 from a USB flash drive using 3 different methods. Although all of them are very easy to follow, I recommend you to opt for the first one. Since it doesn’t require you to go through complex processes and works quickly, you can use it often.
And the best part is that all these methods also work for Windows 10 and supports a variety of laptop, computer, PC, or other devices from companies like Dell, HP, Asus, Lenovo, and more.
Stay tuned for the latest posts…
Feel free to share your thoughts via comments and also tell us about this post on How to Boot From USB on Windows 11.
If you liked this post, don’t forget to share it.
