How to Enable Secure Boot For Windows 11?
If you are searching for this, then you are in the right place.
Although, this latest Windows OS version has lots of new features and upgrades.
But apart from them, there were certain requirements that need to be fulfilled if anybody wants to install Windows 11 on their PC.
And these requirements include the Secure Boot, TPM 2.0, GPT Disk, and UEFI Boot.
However, the majority of modern PCs are compatible with these requirements. But sometimes, some settings can cause the computer to be incompatible with Secure Boot.
And in that case, changing some BIOS settings can easily fix it. If you don’t know about BIOS ( Basic Input/Output System ), then it is software that starts up before Windows while you initially turn on your PC.
In this article, I will show you how to enable or check Secure boot on Windows 10 using different ways like BIOS or firmware settings.
So without further delay, let’s get started…
Table of Contents
What is Secure Boot?

Secure Boot is a security feature implemented on the majority of devices having modern hardware and UEFI firmware. It presents a safe environment to boot Windows and stops malware from hijacking the system all through the boot process. Essentially, Secure Boot enables the computer to boot only with reliable software belonging from the Original Equipment Manufacturer ( OEM ).
This feature facilitates a more secure experience. This is one of the reasons why Microsoft is presenting it as a mandatory requirement to install Windows 11. Keep in mind that enabling this option stops you from executing other operating systems. For example, Linux is not supported. Moreover, Secure Boot works as a security tool that avoids malware from taking over the PC during boot time.
How to Check Secure Boot Status on Windows 10 PC
Although, it’s pretty easy to check the status of Secure Boot, TPM, and compatibility of Windows 11 using the PC Health Check App. But what if it’s not working then below mentioned steps can easily help you in this.
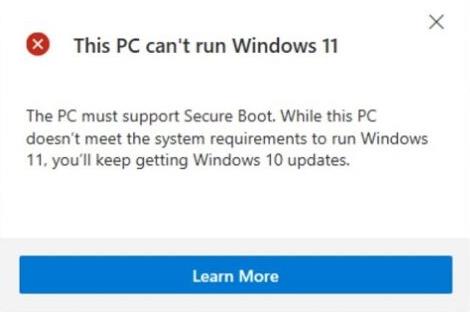
And if you have already checked the Status using the app and got a message like Secure Boot State Unsupported then enabling it can help you in this. Moreover, one more issue comes with this problem like “This PC can’t run Windows 11” which can easily be fixed.
And here are the steps to manually check it:-
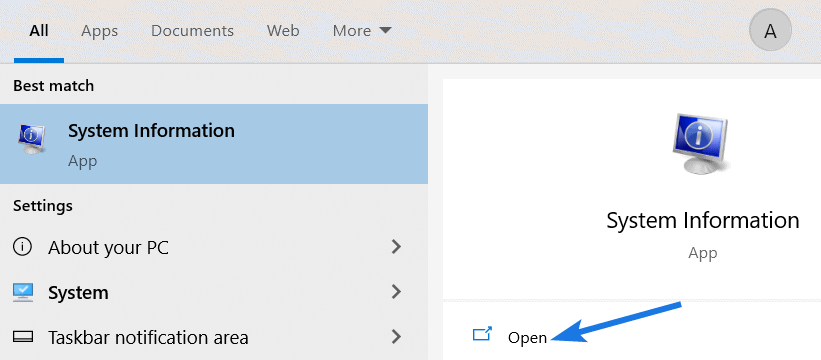
1. First, go to the Start menu and then search for “System Information” & hit Enter.
2. Now from the left-hand side section, click on “System Summary“.

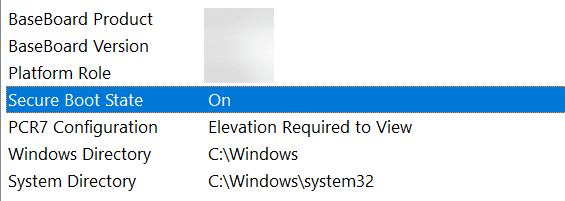
3. After that, scroll down and check for the “Secure Boot State” value. If it shows “On” then it means, it’s enabled. And if it shows “Off” then it is either disabled or not available.
4. At last, check for the “BIOS Mode” value and if it shows “UEFI” then Secure Boot can be enabled. Otherwise, if it shows “Legacy (BIOS)” then you can still enable it but you need to change the partition from MBR to GPT disk.

Additional Steps:- Now if you have changed the partition type of your disk then I would suggest you to check for the “BIOS Mode” value.
And here are the steps to follow:-
- First, press “Windows+R” shortcut keys.
- Now type “msinfo32” and then press Enter.
- After that, the “System Information” will open up & now check for “BIOS Mode” value. And If it shows “UEFI” value then you are ready to go.
But if this doesn’t work for you then you can follow this post to bypass secure boot for installing Win 11.
Now let’s move to the next part…
How to Enable Secure Boot for Windows 11
Now I hope that your computer’s BIOS Mode is set to UEFI because having a UEFI boot type is very necessary for enabling the secure boot. And if you are not a computer expert then don’t be afraid, you can easily enable the Secure Boot for Windows 11 by following the below-mentioned steps.
Note:- Please only follow the below-mentioned steps because changing incorrect firmware settings can harm your PC.
And here are the steps to follow:-
1. Go to the Start Menu and then search for “Advanced Startup” & press Enter.

2. Now under the “Advanced Startup” section, click on the “Restart now” button.
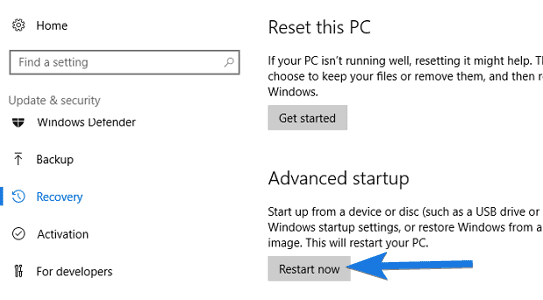
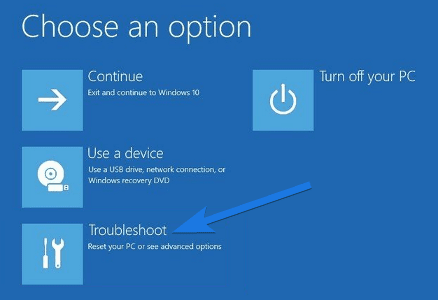
3. After that, your PC will boot in Recovery Mode and then the “Choose an option” dialog box will open up, now click on the “Troubleshoot” option.
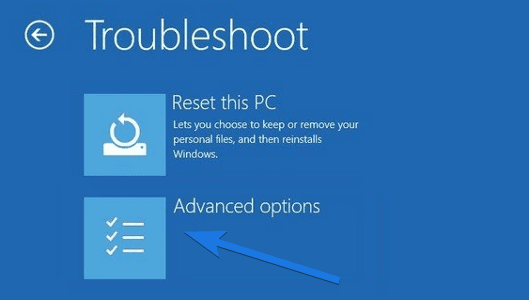
4. Now in the “Troubleshoot” dialog box, choose “Advanced options“.
5. After that, in the “Advanced options” dialog box, choose the “UEFI Firmware Settings” option.
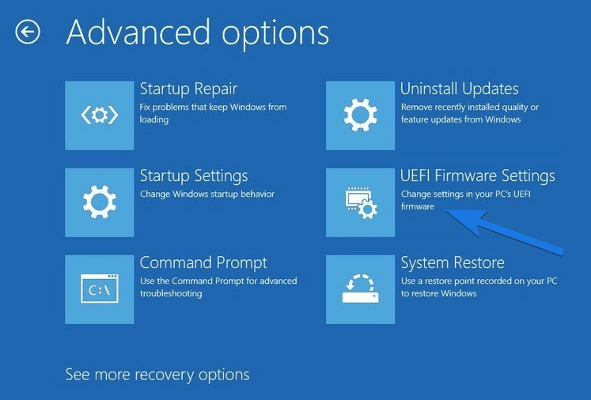
6. Now click on the “Restart” button to change UEFI firmware settings.

7. After that, your PC will restart again & BIOS settings will open up. Now go to the “Security” settings page.
8. At last, search for the “Secure Boot” option and then Enable it. Now press the “F10 key” to save settings and Exit.
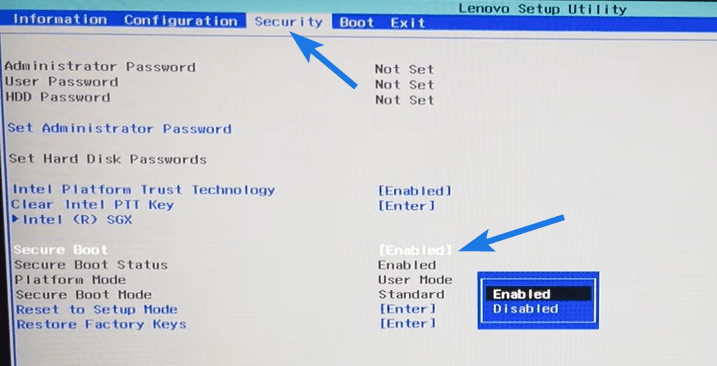
And Done! You have successfully enabled the Secure Boot and now you can easily upgrade from Windows 10 to 11 without any issue.
Now let’s move to the next part…
How to Turn On Secure Boot during Startup
However, the above method works really great but sometimes if your Windows is not working properly then you can use this as an alternative method. In this method, we will directly go to the BIOS settings and then turn on the secure boot settings during the boot process.
And here are the steps to change the device firmware settings during the startup process:-
- First, turn on your PC or laptop.
- Now repeadtly press the Boot key to open BIOS settings. ( You can try these boot keys –> Esc, Delete, F1, F2, F10 )
- After that, BIOS settings page will open and then go to Security tab.
- Now search for Secure Boot option & then Turn On or Enable it.
- At last, press F10 key to save settings and Exit.

And done! After that, your PC will restart but if you are still facing issues then I would suggest you to check out how to bypass windows 11 requirements.
That’s it for now…
Conclusion
So that’s how you can easily check if secure boot is enabled or not. And if it is disabled then you can follow the above guide to enable it for installing Windows 11 on your PC or laptop. Moreover, the above steps are applicable for all motherboards like Gigabyte, MSI, Asus, etc.
Also, we have tried to cover each and everything related to this and soon we will be updating it accordingly.
Stay tuned for the next post…
Feel free to share your thoughts via comments and also tell us about this post on How to Enable Secure Boot for Windows 11 [ Ultimate Guide ].
If you liked this post, don’t forget to share it…
