How to Create Windows 11 Bootable USB?
If you are searching for this, you are in the right place.
Microsoft officially released its new Windows OS on 24 June 2021.
And now recently they have given the first insider preview update of Windows 11.
And every Windows user is amazed by the new Start Menu. They have created a whole new round corner design & shifted it to the center which makes it more appealing.
Although, Microsoft has officially given a new update for Windows 10 users so that they can also experience it too.
But I have seen many users who really want to do a clean installation of Windows 11 on their laptop, computer, or PC.
And in this case, they will definitely need a Windows 11 USB to install it.
So, let’s see how it works…
Table of Contents
How to Create Windows 11 Bootable USB From ISO File [ Full Guide ]
But before we dive in further…
Please check if your PC can run Windows 11 or not.
Also, make sure you have all the mentioned things which are required.
- A Pen Drive: At least 8GB size or more
- Windows 11 ISO ( Download Link )
- USB Tool ( Which will help you to convert ISO file to USB )
In this tutorial, I am going to show you two different methods. First, we will be using the official “Media Creation Tool” provided by Microsoft and then using the Rufus.
Also, if you are an apple user then you can easily create windows 11 bootable USB on mac using this step-by-step guide and if not, then follow the below-mentioned steps.
So, let’s get started…
1. Using Media Creation Tool
1. First, go to the official Windows 11 download page.
2. Now scroll down and under the “Create Windows 11 Installation Media” section, click on the Download Now.

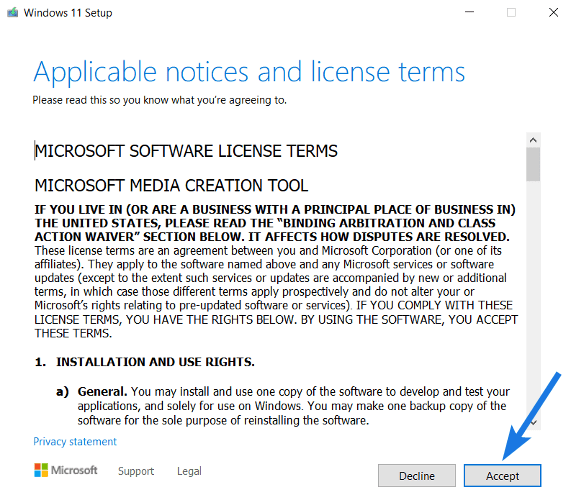
3. Once the file is downloaded, double-click on it and then Accept the applicable notices and license terms by clicking on the button.
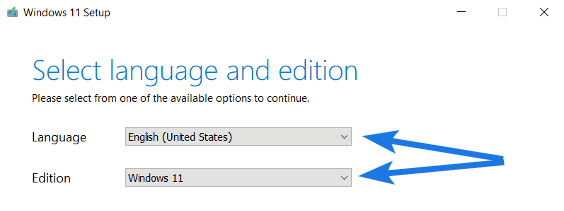
4. Now select the language and edition of the operating system and then click on the Next button.
5. After that the “Choose which media to use” dialog box, so select the USB flash drive option, and then click on Next.
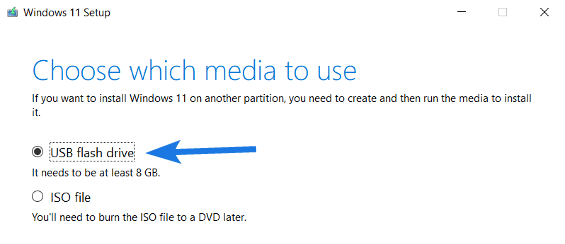
Note:- If you want to create and install Windows 11 from a USB then this option is good enough and if you want to use DVD then choose the ISO file option.
6. Now select the USB from the Removable drives section and then click on the Next button.
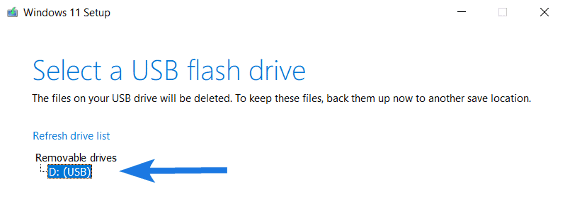
Note:- If you see the drives section empty then insert the USB Drive properly and then click on the Refresh drive list link.
7. After that, the setup will start “Creating Windows 11 media” and will get completed once the progress is reached 100%.

8. Once everything is done, you will see a message “Your USB flash drive is ready” and then click on Finish.

Now let’s move to the 2nd method…
2. Using Rufus
Although, we could have used the Windows USB/DVD Download Tool as we did for Windows 10 or 7 but since it is no longer available we will be using some other alternative like Rufus. It’s a great tool & getting very popular among users for USB creation and the best part is that it is a portable application that doesn’t require any installation.
Now let’s move to the steps…
1. First, download and Install the Rufus tool on your PC or Laptop.

2. Once the installation is done, open the Rufus USB tool and then insert the USB Drive into your PC.

3. Now under the Drive Properties section, click on the Device drop-down menu, and then select your inserted USB Flash Drive.

4. After that under the Boot Selection section, click on the SELECT button.

Now navigate to the Windows 11 ISO Image file stored on your computer and then click on Open.
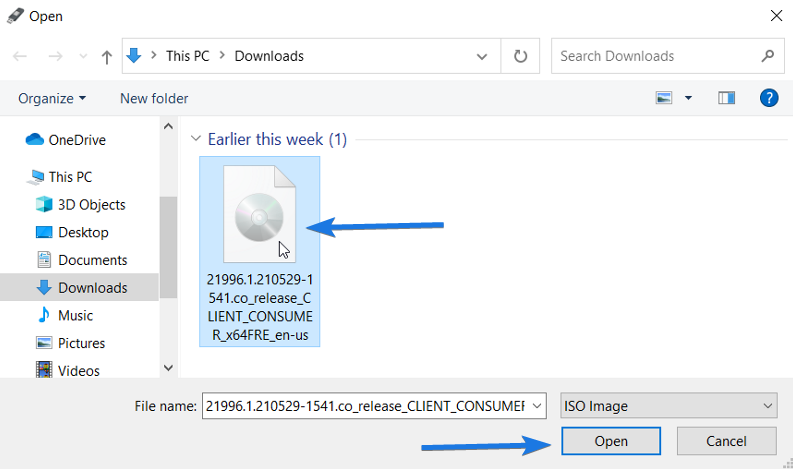
5. One thing which I really like about Rufus is that it automatically detects all the suitable settings according to your Windows OS. ( Which are necessary for booting a USB )
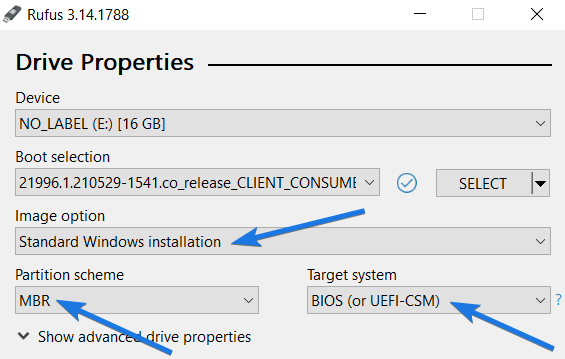
But sometimes you may need to configure all accordingly. And for Windows 11 OS the suitable settings will be like this.
Image option as Standard Windows installation
Partition Scheme as MBR
Target System as BIOS ( or UEFI-CSM )
And once you are done with all the settings, now click on START.
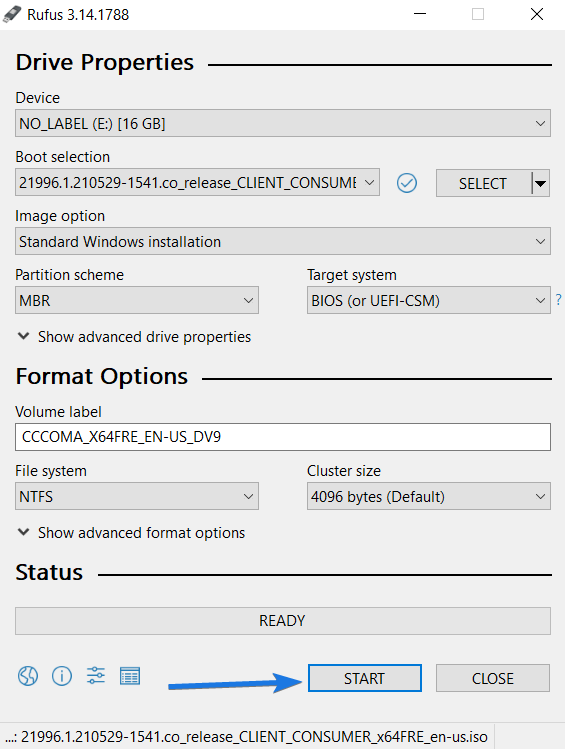
Note:- Please make sure that you have already backup all your data from a USB Disk because after that it will be formatted.
After that, it will show you a WARNING, so ignore it and then click on OK.
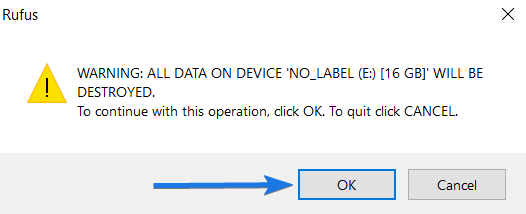
And done! You have successfully created a Windows 11 bootable USB drive from ISO file.
Important Tip:- Here I recommend you to please first try installing Win 11 on Virtualbox and then on your main computer.
Now let’s see how to boot it properly…
How to Boot Win 11 From USB Drive?
In the above section, I have already shown you how to make a USB bootable but in this part, I will show you how to boot it properly. Because I have seen many users struggling in the boot process and that’s why we have created a detailed guide on how to boot from USB on Windows 11 but for now you can also use this quick guide.
And here are the steps to follow:-
1. Insert the bootable USB drive into your PC or laptop & then Restart it.
2. Now your PC or Laptop will boot up showing your computer manufacturer logo and at that time press F2 or F12 repeatedly.
3. After that the Boot Menu will open up and then select the USB drive that you have created earlier. And now it will start loading the Windows OS files for installation.
And if this doesn’t work for you, then use Step 4.
4. Now again Restart your CPU and check for the BIOS settings key. ( You can also try for Esc and F10 other than F2 and F12 )
5. Once you are in the BIOS Settings, now search for the Boot Order option and then select USB Drive as 1st priority. After that save and exit.
And Done! You have successfully booted Windows 11 from USB Drive.
Also, if you are still facing any issues, then I would suggest you to check the system requirements below.
Windows 11 Minimum System Requirements
However, we have already talked so much about the system requirements in our recent posts. And according to me, there are no such system requirements that you need to fulfill. Also, Microsoft has said that if you are having a PC or laptop which is running windows 10 with good performance then you can also run Windows 11 on it.
Moreover, there is only one major change in the hardware requirements that is TPM 2.0 support and Secure Boot. And to check this, Microsoft has created a Windows 11 compatibility checker tool which is known as PC Health Check App. Using this application you can easily check if your PC can run Windows 11 or not.
Apart from this, you can also check out the given requirements below.
| CPU Processor | 1.5 – 2 GHz or faster with at least 2 core |
| RAM | 4 GB RAM ( Minimum Recommended ) |
| HHD or SSD | 64 GB ( Free Storage Space ) |
| Display | 1600×900 HD Resolution Display |
| System Firmware | Supports UEFI and Secure Boot |
| TPM | ( Trusted Platform Module ) TPM 2.0 |
| Graphics | Support Directx 12 Graphic with WDDM 2.x |
And for more information check out our detailed guide on necessary hardware requirements for Windows 11.
Some FAQs
-
How do you create a bootable iso file?
An ISO Image is a file that consists of all the Windows Installation files into a single file. And you can easily create a bootable ISO file using those Windows files again.
-
What do I need to make my USB drive bootable?
If you want to make a USB drive bootable, then you only require an ISO Image File, a USB Flash Drive of at least 8 GB & a tool to make a bootable USB from an ISO File.
-
How to install Windows USB / DVD download tool?
Installing Windows USB/DVD Download Tool is pretty easy, just follow these steps. 1. Download & install the Tool from Microsoft. 2. Now Open the tool & insert USB into PC 3. Now select the ISO Image File & Click on Start.
-
How do I download bootsect from Microsoft Store?
You can easily download bootsect from Microsoft Store, Just you have to follow these steps. 1. Login to Microsoft Store. 2. Now Go to Windows purchase. 3. Now you will find an Additional File Download Option. 4. Now select the 64-bit or 32-bit version. It will start downloading.
That’s it for now…
Conclusion
So, that’s how you can easily create a bootable USB for Windows 11 using Rufus and other official tools. Also, we have tried to cover everything related to this and you can perform all these steps on the laptop, computer or PC. Doesn’t matter if it’s HP, Dell, Lenovo, Asus, or more.
Moreover, all these devices are created the same for Win 11 Pro ( Professional ), Home, Basic, Premium, or any other.
Stay tuned for the next posts…
Feel free to share your thoughts via comments and also tell us about this post on How to Create Windows 11 Bootable USB From ISO File.
If you liked this post, don’t forget to share it.

Thank you! Great information that is simple to understand and easy to follow and execute!!