Want a bootable USB with antivirus?
If yes then check out this post on How to make a bootable antivirus USB Flash Drive in Windows 10.
Malware attacks can be disastrous for a system, especially if your system contains a lot of essential files.
And to overcome this, most people use a robust security solution on their system.
But there are some malware programs or codes that can easily bypass these security solutions and can harm your system files.
Popup malware such as Nbryb does not directly harm your operating system and can be easily removed through an Antimalware Scan.
However, some malware such as Rootkits can easily hide deep into the system and can also easily harm your OS files.
And this is where a bootable USB antivirus or a Rescue Disk is required.
So let’s see how to create it and use it properly.
But before that, let’s see some more info about these terms.
Table of Contents
What is Rescue Disk or Bootable Antivirus?
Basically, a bootable Antivirus is that type of USB disk which is used to perform a scan and catch the malware without even loading the primary operating system. Because every malware program needs to load in the operating system for execution. And that why it is also known as Rescue Disk.
And now let’s see how beneficial is this…
How is Bootable USB Antivirus beneficial?
For instance, if your PC is severely damaged by malware programs and is unable to start. In that case, you need to remove those malware programs to recover your damaged device back. And this can be easily done by using this simple bootable USB with antivirus installed on it.
Because this is the only way to scan and remove those files from your hard drive without starting the Windows OS. As we all know that the Rootkits only become active when the operating system is loaded.
And in that situation, this is the best option to go with…
How to Make a Bootable Antivirus USB Drive in Windows 10 [Rescue Disk]
But before we begin, please make sure that you have all these things with you.
- A Working Windows 10, 7, 8 PC. (Virus Free System)
- A USB Flash Drive or a Pen drive. (Minimum 1Gb)
- A CD (Compact Disc). [ Only if you are having a very old PC that doesn’t support USB boot ]
Note:- Before making USB bootable, format it with the correct file system “FAT32” and check it must be not encrypted.
Once you have all these things you are ready to go…
Here we will be using the Avast Antivirus program to create a bootable antivirus USB drive or the Rescue disk.
So let’s get started & follow the steps…
Step 1: First, download the Avast Antivirus program from its official site. Once the file is downloaded, install it properly. (It’s free) 🙂

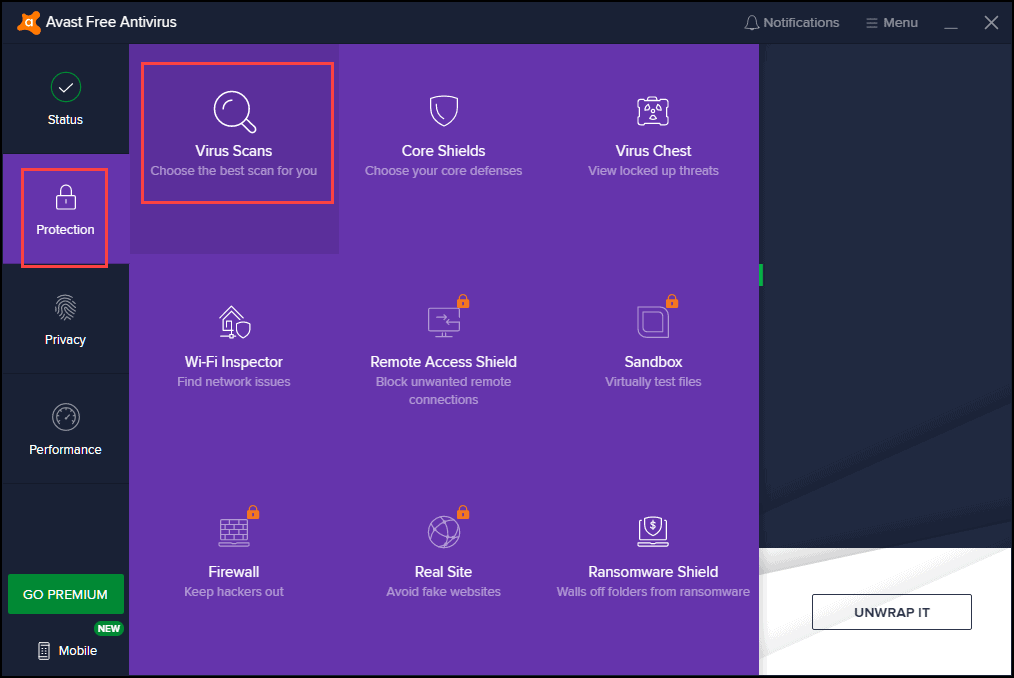
Step 2: Now launch the program, click on the Protection tab, and then choose Virus Scans.
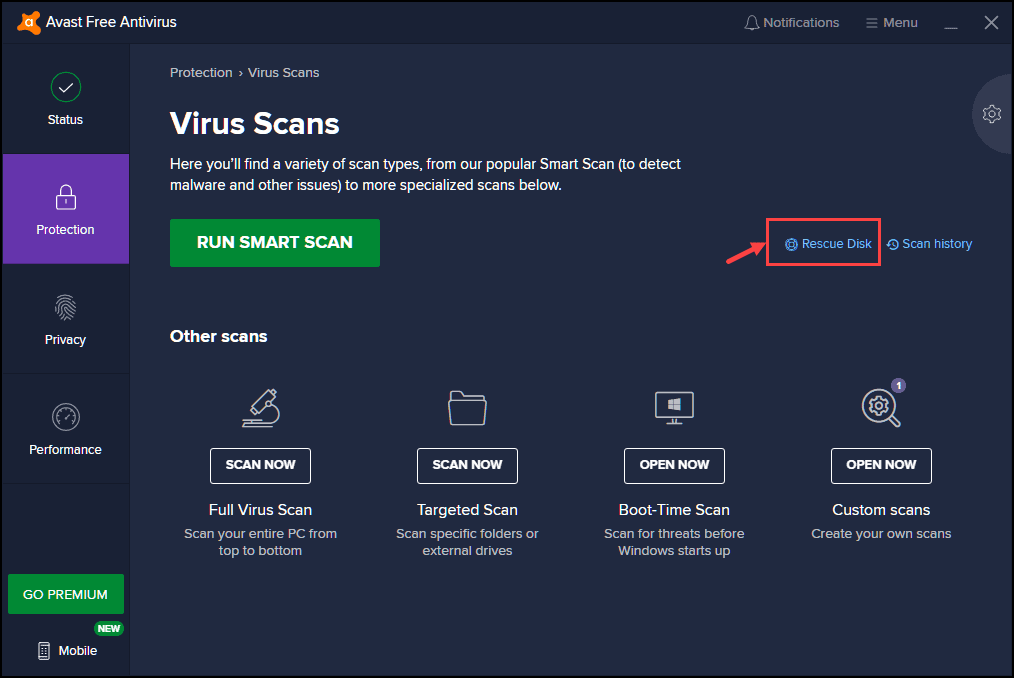
Step 3: After that select the Rescue Disk option from the right side.
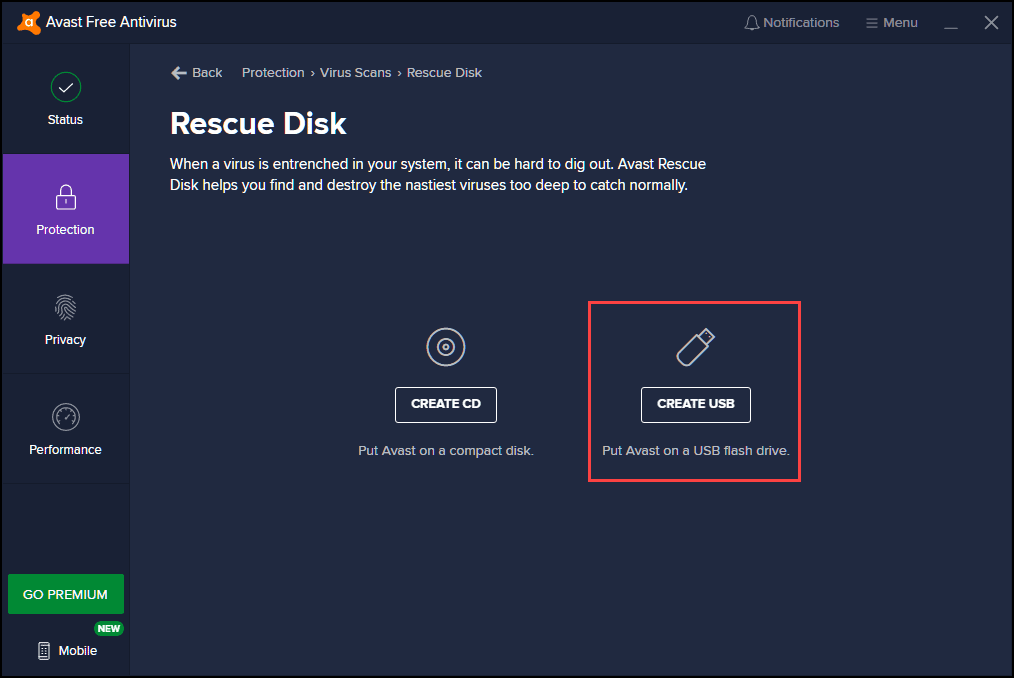
Step 4: Now insert the USB drive into your PC and then choose to CREATE USB or CD option from the Rescue Disk screen.
Note:- I have seen many users searching for “Avast Rescue Disk ISO Download” but there is no such file. So I want to advise you to please use the official Avast Antivirus program from the official site.
Step 5: Now select your USB Drive.
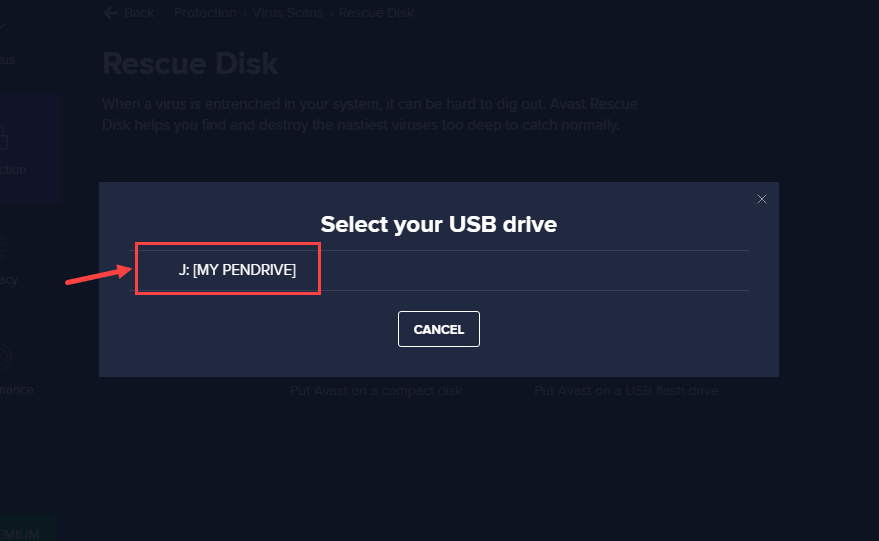
Note:- Please make sure that you have already back up your USB Flash Drive because after this all your data present on it will be deleted.
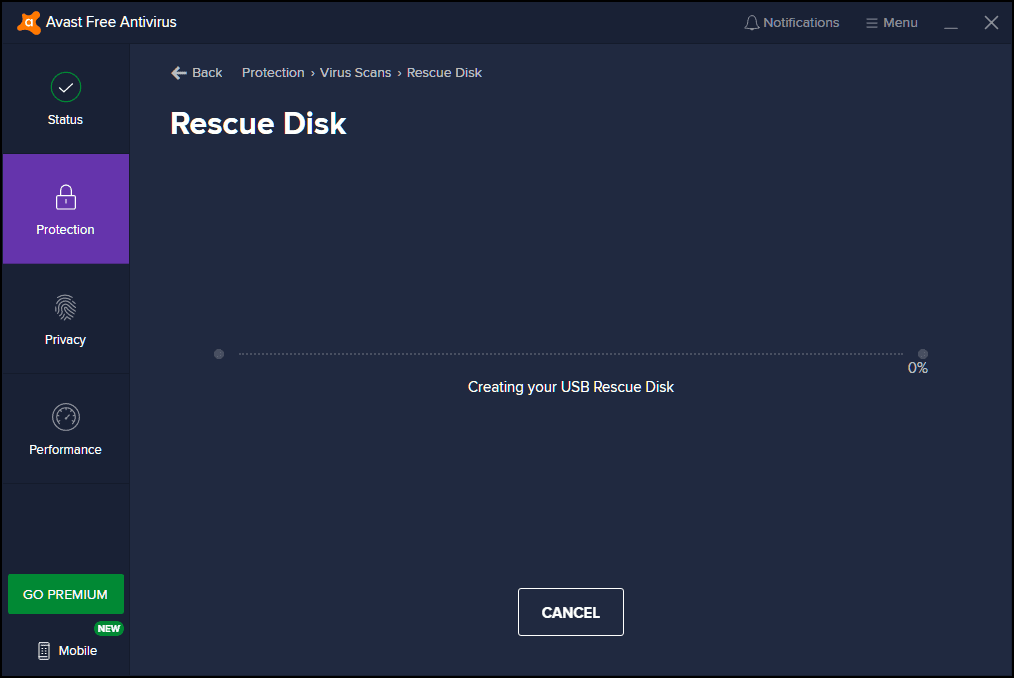
Step 6: After this, Avast will start creating your USB Rescue Disk and this will only take few minutes to complete.
Step 7: Once it is completed, you will see a message ” We’re done. You can find the Rescue disk on your USB drive” & then click OK.
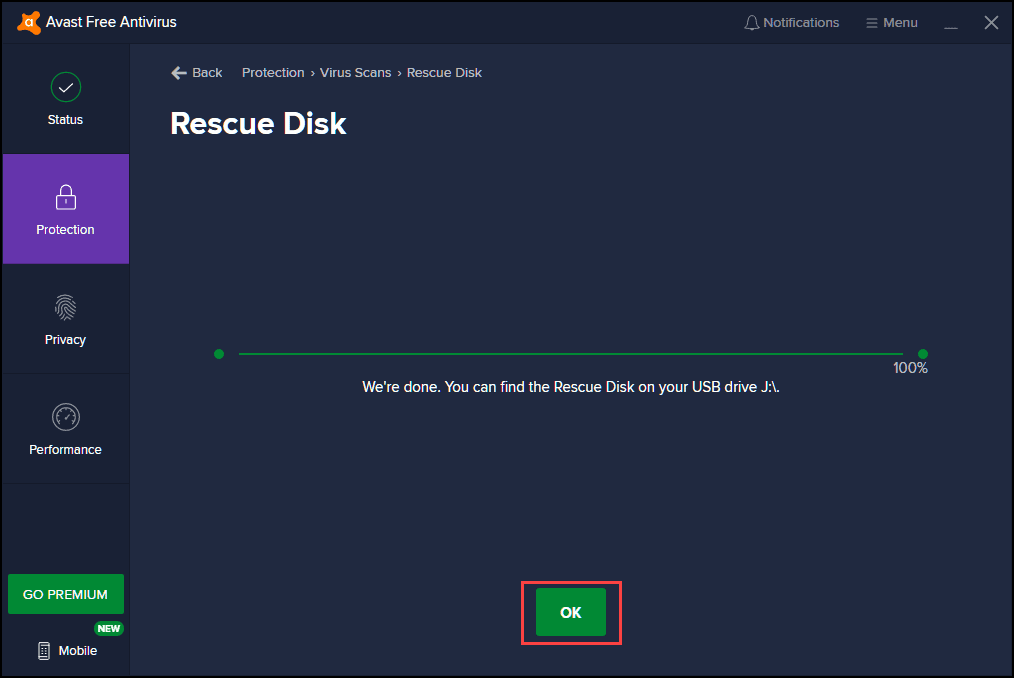
And you are done with the creation part, now let’s see how to boot it from your infected PC.
How to Boot up your PC using Antivirus Bootable USB
After creating the Rescue Disk, you can easily use this to boot up your infected PC. So, follow the below-given steps…
Step 1: If your infected PC is still running, then Shutdown it and insert the Bootable Antivirus Stick into the USB port.
Step 2: Now start your PC and as it starts booting, press the appropriate key to enter the Boot Menu. And this totally depends on your device manufacturer but you can give it a try to these keys “Esc, F9, F10, F11 or F12“.
Step 3: When the Boot Menu is on the screen, select the USB device that contains the Rescue Disk.
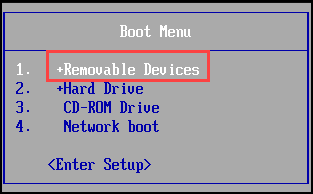
Step 4: Now “Press any key to boot from CD or DVD” and after that, it will start running the Antivirus from USB Flash Drive.

Now let’s move to the next step…
Scan your PC for Malware & Viruses
And now to perform the virus scan using bootable USB, just follow these steps…
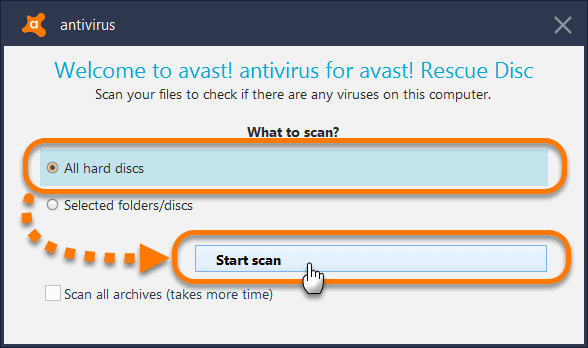
Step 1: Once you have booted the antivirus from Rescue Disk, you see options for “What to scan?“. One is All hard discs and the second one is Selected folders/discs and you can choose this according to your preferences and then click on Start.
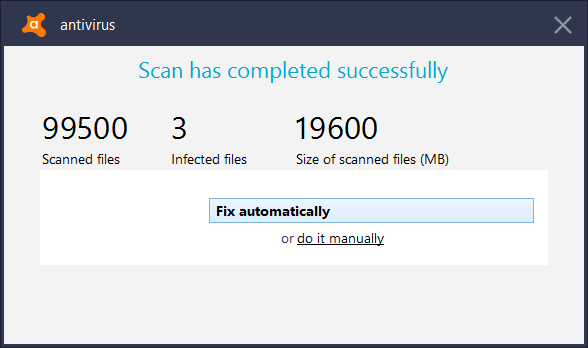
Step 2: After that when the scan is completed, you will see the review results including the number of Scanned files, Infected files, and the Size of scanned files. Now click on Fix automatically or you can manually delete all those infected files.
Some FAQs
Can I run antivirus from a flash drive?
Yes, you can easily run antivirus from your USB flash drive but for that, you need an antivirus boot disk or a tool that can create a rescue disk.
What is the best bootable antivirus?
Here are 5 best bootable antivirus programs:-
1. ESET SysRescue Live.
2. Avast Rescue Disk
3. Sophos Bootable Anti-virus
4. Kaspersky Rescue Disk
5. Avira Rescue System
How can I install antivirus in my pendrive?
Installing antivirus on a pendrive is very easy, just you have to follow the given steps:-
1. Download and install the antivirus program.
2. Insert the pen drive on your computer.
3. Open the antivirus app & search for Rescue Disk.
4. Now select the USB drive and then click on Install.
How can I make my USB virus free?
To make your USB free from viruses, you can use the command prompt or any anti-malware program. You can also check some best ways to use antivirus programs.
That’s it for now…
Conclusion
So that’s how you can easily run antivirus from a USB drive and can use this as a live virus scanner tool. Using this tool you can easily remove all your hidden malware, rootkits & also infected files from your PC. Other than Avast, there are so many programs like Kaspersky, Malwarebytes & Bitdefender which can be easily used to create a Rescue disk.
Stay tuned for the next post…
Feel free to share your thoughts in the comment section and also tell us if you know any better on How to Make a Bootable Antivirus USB Flash Drive in Windows 10 [Rescue Disk]
If you liked this post, Don’t forget to share it with your friends and family member.
