Want to create a windows 7 bootable USB drive? If yes then this post is definitely for you.
Gone are the days when we used to install our Windows Operating system on our PCs using Cd/Dvds.
And wait for at least 1 hour to complete the Windows 7 installation process.
But these days USB drives have completely vanished the use of Optical discs.
And also only very few companies are still manufacturing their new generation laptops which include Optical drive as standard hardware.
Although, laptops still have some scope of using these Cd/Dvds but what if you are having a small notebook, tablet or some other digital devices.
And want to install windows 7 on it.
In that case, you need a Windows 7 bootable USB drive and that’s why this post is really important for you.
But How would you create it?
Simply Copying/pasting from Windows 7 DVD to a USB flash drive won’t help you.
For this, you need to make a special bootable USB device and then safely copy all the Windows 7 installation files to it.
Let’s see How.
Here is our latest post on we created Windows 11 bootable USB.
Table of Contents
Create Windows 7 Bootable USB Drive From ISO File
But before we begin.
Please make sure that you have a USB drive of at least 4gb or greater, Windows 7 ISO File and a bootable USB software to convert windows 7 ISO to USB easily.
And If you don’t have an ISO File you can download it from here [Download Windows 7 Disc Images (ISO Files) ] or you can create your own ISO File.
In this tutorial, I will be using a tool called Windows USB/DVD Download Tool to make a bootable USB drive. Download Link…
So Let’s get started with this tool & follow this step by step Guide.
1. Download and Install USB tool
Download the bootable USB tool from the given link and Install it properly. And after installation is completed Open this tool.
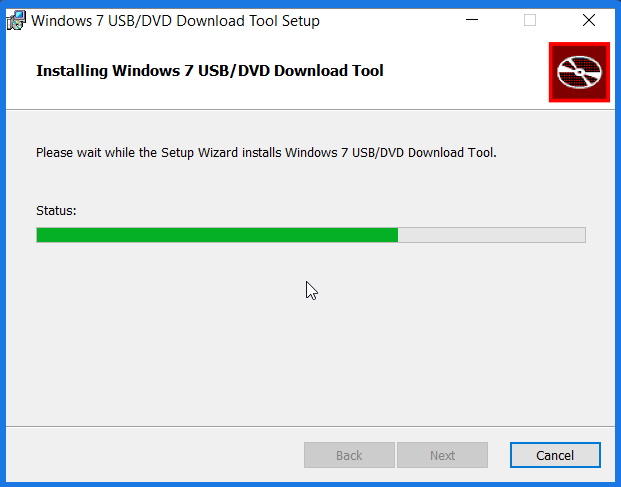
2. Choose Windows 7 ISO File
Now, Click on the Browse button and then select the ISO file from where you have stored & Click Next.
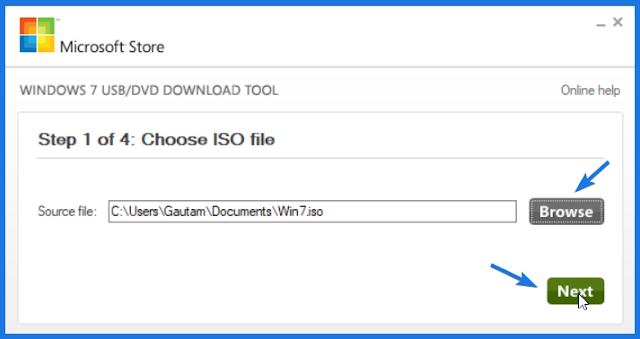
3. Choose media type
Now, Choose USB device as media type if you want to create Windows 7 bootable USB drive or you can also choose DVD for creating bootable dvd drive.
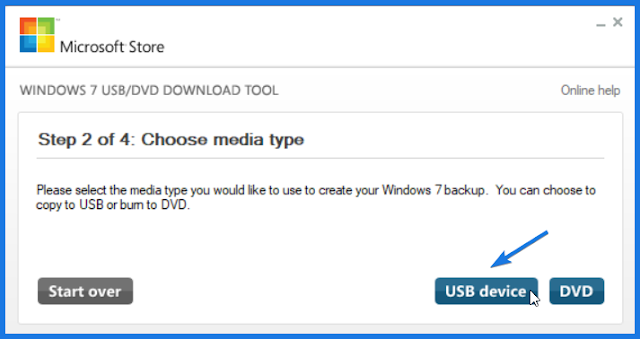
4. Insert USB device
Now, insert the USB device and Click on that Refresh Icon & then Click on Begin copying. And wait for 5-10 minutes for completion of this process.
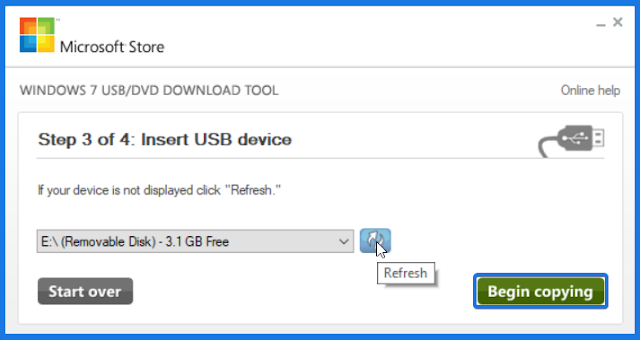
That’s it! You have successfully created a bootable USB drive.
Note:- Please make sure that before clicking on the Begin copying button you have backup all your important data stored in the USB device. Otherwise, you may need to recover deleted files from USB.
Now let’s move to the next method…
Method 2: UUByte ISO Editor
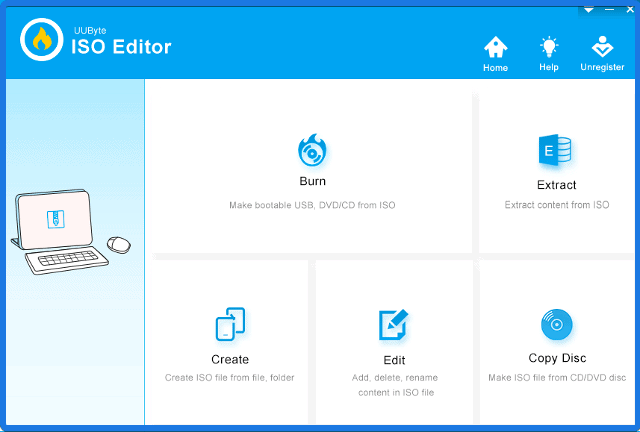
UUByte ISO Editor is one of the most simple bootable USB creator tool which has lots of useful features. And the best part is that it is available for both Windows and macOS versions. Using this utility you can easily perform tasks like Make, Burn, Extract, Create, Edit & Copy Disc within few clicks.
And to begin with, just follow the below steps:-
- Download & Install UUByte ISO Editor from the given link.
- Once the installation is done, open the tool.
- Now click on the Burn “Make bootable USB, DVD/CD from ISO” option.
- After that, click on the Browse button and then select the ISO image file from your computer.
- At last, select the “Create A Bootable USB” option and then select the USB Stick & click on Burn.
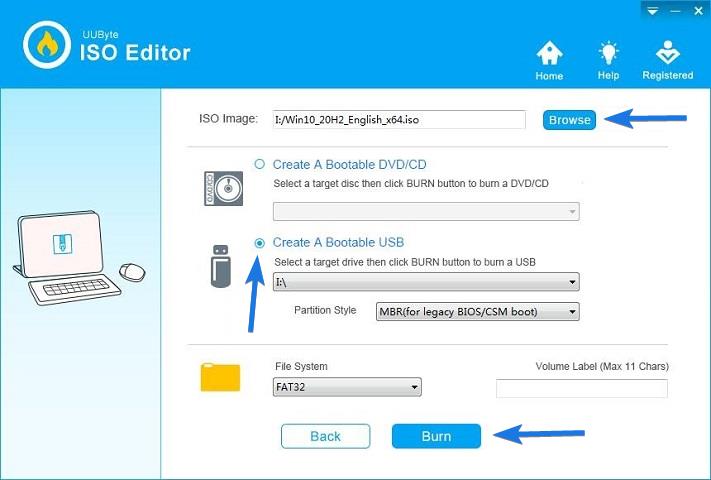
And Done! It will take few minutes to complete the burning process.
Note:- Please make sure that your USB stick is empty because after this it will be formatted and all your data will be lost.
Now let’s move to the next method…
Method 3: Using Rufus
Rufus is another simple plug and play tool with all advance features to make bootable USB drives. This tool is really awesome and much faster as compared to other bootable USB software.
Download and Install Rufus from the given link & Follow these steps:-
Download and Install Rufus from the given link & Follow these steps:-
- Open / Run the Rufus tool.
- Insert your USB flash drive into the USB Port.
- Now, Click on SELECT Option to make a Windows bootable disk.
- Choose the Windows 7 ISO file.
- Click on Start. And Done!
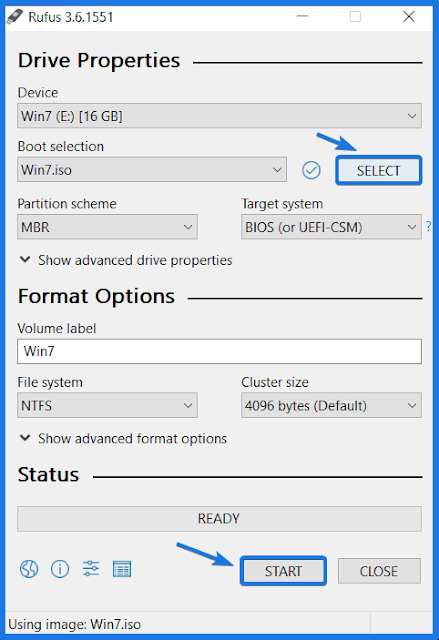
Note:- The Best part of this boot tool is that it automatically detects all suitable properties like Partition scheme, Target & File system according to the ISO file.
And Done! You have successfully created a windows 7 bootable usb flash drive. But how to boot from it.
Let’s see How.
How to Boot From USB Stick on PC / Laptop
For this, you have two methods. first, you can directly go to the boot menu and change the boot settings. And the second one is that, Go to Bios settings and then change the boot order.
I prefer the direct boot menu option because in that you don’t have to change the BIOS settings. For Lenovo laptop users there is a button called Novo button to directly go to the boot menu.
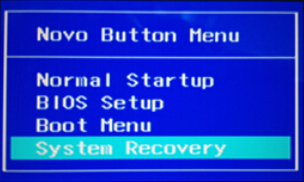
And for the other users like hp, Dell, Asus you have to change the BIOS settings. And for this follow these steps:-
- Insert USB disk in your computer or laptop.
- Now Turn on the laptop or CPU whatever you have.
- And in the starting, you will find the manufacturer logo & down below showing the shortcut keys for BIOS settings.
- Now repeatedly keep pressing the BIOS key button.
- Now when you are in the BIOS settings, Go to Boot Order and change it to USB flash drive as 1st priority.
Note:- Every manufacturer has its different shortcut BIOS key but you can easily configure it while your CPU boots & shows the company Logo.
Tip:- Esc, F2, F10, or F12 are the most common BIOS setting keys, you can give a try to them.
Some FAQs
How do I create a bootable USB drive for Windows 7?
Creating a bootable USB for Windows 7 is pretty easy, just download the USB Tool & ISO Image File and then follow the given steps in this article.
Is Rufus free?
Yes, Rufus is an open-source software application that is used to create bootable USBs for Windows operating system.
How do I make a Windows installer bootable USB?
If you want to make a Windows 7 installer bootable USB then there are two methods, one with Rufus and the second one without software using CMD or command prompt.
Is Rufus safe to install?
Yes, Rufus is absolutely safe to use and install on your Windows PC. It is a freeware application that can be used for personal as well as commercial use.
Conclusion
This is how you can easily create your own bootable USB device from an ISO file and use it to install windows 7 from USB instead of using CD/DVD. So what are you waiting for? Go ahead and use these awesome tools to make USB bootable & save your precious time.
Stay tuned for the next post on how to change windows 7 lock screen background.
Feel free to comment below and also tell us if you know any other better way to create or make windows 7 bootable USB drive.
If you liked this post, Don’t forget to share this with your friends on your favorite social media platform.

I have downloaded the disc image file of windows 7 and I want to boot it in my pc. so how do I open the boot menu to start the installation?
Okay! This totally depends on your motherboard or computer manufacturer. First, insert the USB and then while starting press Esc, F2, F10 or F12 any of the keys for starting Boot menu. Hope it helps!