Want to Download Snipping Tool for Windows 11?
If yes then you are in the right place.
Everyone knows that Microsoft released its latest Windows OS with lots of new features and upgrades.
One major upgrade that I really liked is changing the Classic Snipping Tool with the new updated Snip & Sketch app.
New updated interface with lots of new features like a ruler, annotate, protractor, crop, and screenshot to share are great.
But I have seen many users, reported that the new Snip and Sketch application is not working and also the shortcut is missing.
In that case, the easiest way to fix this issue is to manually reinstall the snipping tool on your Windows 11 PC.
In this article, I will provide you with free Snipping Tool download links from Microsoft Store and also tell you how to install it.
So without further ado, let’s get started…
Table of Contents
What is Snipping Tool?

Snipping Tool is a screenshot utility tool officially developed by Microsoft. It can take screenshots of any window of any shape, you can also take a screenshot of any particular area of a window. The screenshot is then saved as an image file and it also provides some basic editing tools for editing the shot. Microsoft introduced this tool in 2002 and after that, it has been getting regular updates with some new features. This year with the Windows 11 update, a new snipping tool is launched with amazing features known as Snip and Sketch.
Now let’s move to the next part…
Snipping Tool Windows 11 Download Link [ Official Microsoft ]

If you haven’t got the update or want to use the snipping tool right now, then don’t worry we are here for you. You can easily download this tool for Windows 11 from the official Microsoft website. Moreover, we have also provided the external link of the Msixbundle file.
So here are the download links:-
Now when you open the above link, click on the Get button and after logging in, you will be able to download it. The above link is completely authentic and it’s available on the official website of Microsoft. This new screenshot tool is listed with the new name Snip & Sketch which is free to download.
Now let’s move to the next part…
How to Download and Install Snipping Tool Windows 11?
However, there are some very easy steps for downloading and installing this new snipping tool on Windows 11. It comes pre-installed with the new update but I have also provided you the link for downloading this new tool, just open that link on your browser. Click on the Get button and once the download is finished, it will automatically get installed on your PC.
But if you have downloaded Microsoft.ScreenSketch_2021.2108.0.0_neutral___8wekyb3d8bbwe.Msixbundle file then you have to follow the given below steps:-
1. First, download the Snip & Sketch from the given link.
2. Once the file is downloaded, double-click on it.
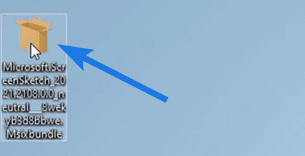
3. At last, follow the on-screen instruction to install.
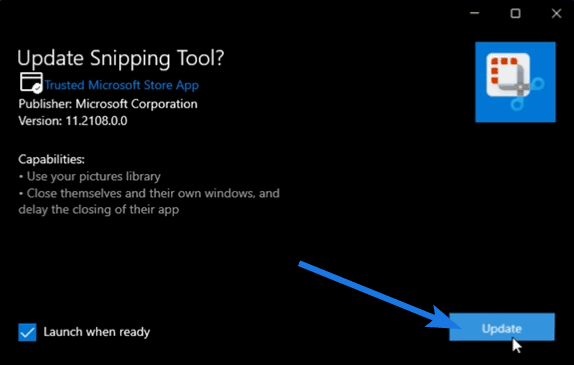
If the Snip and Sketch application is already installed on your Windows 11 then you will get an option to update it instead of installing it.
Note:- After installation if still Snipping tool is not working then I would suggest you to check our detailed guide on how to fix it.
Now let’s move to the next part…
How to Use Snipping Tool on Windows 11?
This new updated Snipping Tool or Snip & Sketch is not at all hard to use. You can take rectangular snips by dragging the cursor around any rectangular object, window snips, and free-form snips (any shape). Once you have taken the snip, you will see the snipping tool window, and then you can make your changes accordingly.
Although, we have already published a detailed guide on how to use windows 11 snipping tool but here is a quick guide for you…
So, let’s get started with the steps:-
1. First, open the Snipping Tool by pressing the ‘Windows+Shift+S‘ shortcut keys or you can also open it from the Start Menu.
2. Now, you will see 4 options on your screen, Free form Snip, Windows Snip, Rectangular Snip, and Fullscreen Snip.
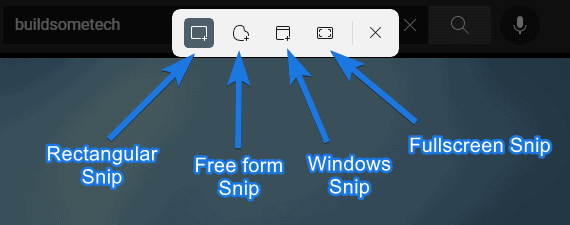
3. If you have opened it from Start Menu or Search then a window will open and you can choose the snip mode from the top left corner. Once you have selected the mode then click on the New button to click a new snip.
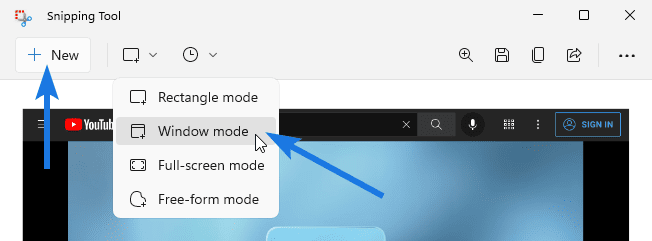
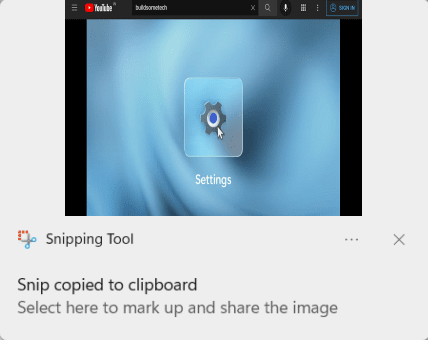
4. Once you have taken a screenshot, you will see a notification at the bottom-right of your screen. Now click on it and it will open the snipping editing tools, you can crop the image, highlight it or make some minor changes.
5. Now, click on the Save button for saving the snip or you can also directly press the Ctrl+S button. And you can also change file type while saving it.

6. You also have a Print and Share option on this tool. You can also set the timer for taking a screenshot. Go to the Timer option and set it accordingly, the maximum delay is for 10 secs only.
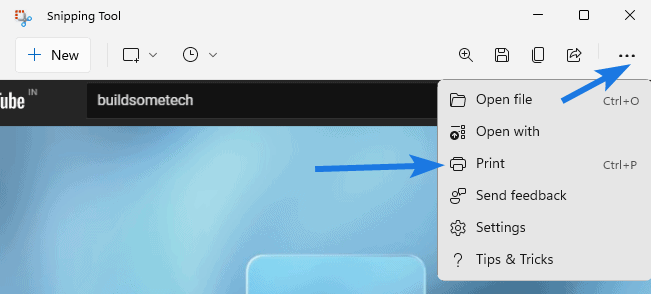
Now you are good to go with this tool. There are some minimum system requirements that your system should fulfill if you want to use this tool on your computer.
Now let’s move to the last part…
Some Minimum System Requirements
Installing and using this updated snipping tool is very easy but there are some minimum system requirements your PC should fulfill. If you think that you have nice specs and are still unable to use this tool, I would suggest you check the requirements again given below.
- PC should be running Windows 10 22000.0 version or higher.
- Processor you are using should be Core i5 ( 5th Gen & later ).
- Architecture should be ARM, ARM54, x86, x64.
- RAM should be at least 512 MB or bigger.
- Available space on your PC should be 1GB.
- You should have a decent internet connection.
- Graphics should be Geforce 1050 or higher.
If you think your system has all of the above requirements and you are still facing issues, then suggest you to check for updates.
That’s it for now…
Conclusion
So, that’s all about the Snipping Tool and how to download it and use it on your PC running on Windows 11. Moreover, you can this tool can also be downloaded and used on Windows 10 OS which is the older version.
Apart from that, if you are getting confused between these two tools then Snip & Sketch is the updated version with a new name.
Stay tuned for the next post…
Feel free to share your thoughts via comments and also tell us about this post on Snipping Tool Windows 11 Download [ Official Microsoft ].
If you liked this post, don’t forget to share it.
