How to Show Seconds on Windows 11 Clock?
If you are searching for this, then this post is for you.
This time Microsoft completely changed the design of its new operating system and also added lots of customization options.
But still, there are so many users who want to customize it more according to their personal preferences.
Like in one of our recent posts I shared about how you can change Windows 11 taskbar to transparent and other options too.
And similar to this, now users want to show seconds in taskbar clock. Earlier it was pretty easy to do that in Windows 10, just you have to create a registry file named “showsecondsinsystemclock” with some settings and you are done.
But now, this doesn’t work anymore because Microsoft has disabled it.
But don’t worry! We have got a solution that will make your clock display seconds in Windows 11 by just installing a third-party application.
So, without further delay, let’s get started…
Table of Contents
How to Show Seconds on Windows 11 Clock [ Quick Fix ]
But before we dive in further, let’s see why Microsoft did this.
Earlier most of the users were thinking that there is some error but then some Microsoft representative has given a statement that this is done manually. Apart from this, there are some other Registry File hacks that will not be working anymore on this OS.
But for now, we have got the fix to display or show seconds in system clock using the ElevenClock app. It is one of the best clock app for Windows 11 which is also available on the Microsoft Store. Moreover, I have also answered one quick question about this application.
Is eleven clock safe?
Yes, this app is totally safe to use and I am personally using this on my laptop and computer system.
So, let’s get started…
Install ElevenClock App
First, we will be installing this third-party application and then we will configure some clock settings for showing seconds in the taskbar of Windows 11. And then in the next part, we will customize it to display time on all taskbars, full-screen mode, colors, fonts, and more.
And here are the steps to follow:-
1. Download the ElevenClock application from here.
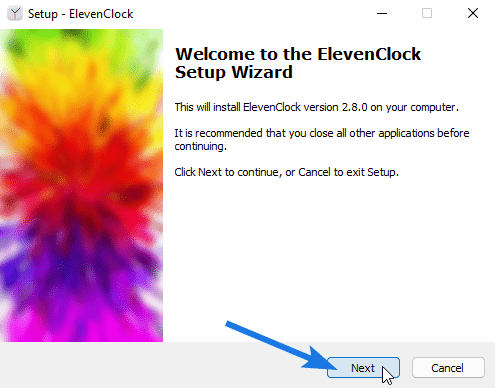
2. Now double-click on the installer file, click on Next, and then follow the on-screen instruction to install it properly.
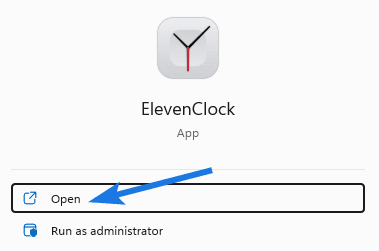
3. After that, open the ElevenClock app, and then you will see the default Windows 11 Clock is now replaced with the new one.
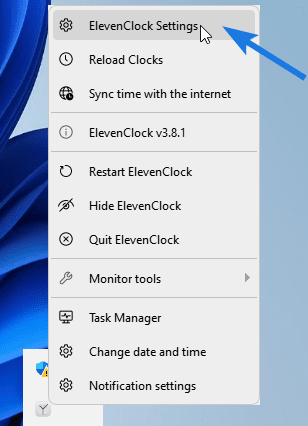
4. Now go to the taskbar and right-click on the system tray clock icon and then select the “ElevenClock Settings” option from the menu.
5. Now the Settings dialog box will open up, and then under the Date & Time Settings section, enable the “Show seconds on the clock” option.
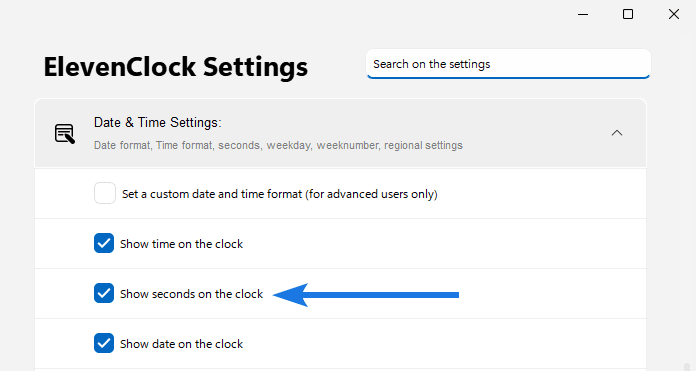
6. After that, you will see a new clock with seconds appearing on the right corner of the Windows 11 taskbar.

Now let’s explore some features of this app…
Customize Windows 11 Taskbar Clock
As we all know that Microsoft doesn’t provide any customized options for its default system clock but using this third-party ElevenClock application, we can easily do that.
In the very beginning, this application came out as an application that developed the functionality of showing seconds. But in the meantime, it gets more and more evolved and now you can add this as a full-time replacement of the system clock.
Some key features:-
- Getting started automatically.
- The date and time are fully customizable.
- Can change clock height and width.
- Moving clock left or right direction.
- Can display in full-screen mode.
- Hide the clock with simple clicks.
- Easy accessible and quick notifications.
- Synchronize or update time using the internet.
Now let’s see all the major features one by one…
1. Auto Startup For ElevenClock App
If you want your customized Windows 11 clock gets automatically start then you need to add this application to the startup apps or simply follow the below-mentioned steps:-
- Go to “ElevenClock Settings” & then click on General Settings.
- Now search for the “Change startup behaviour” option and then click on the Change button.
- And then Windows 11 “Startup apps” dialog box will open up, now look for ElevenClock and then enable it.

2. Add Clock on Second Display ( Dual-Monitors )
What if you work on a double-monitor setup? And still, expect to get the ElevenClock displayed on both screens or work as a dual-clock for the secondary screen taskbar. Well, it’s achievable too! Just follow the simple steps given below.
- Open ElevenClock Settings.
- After that, uncheck the “Do not show the clock on secondary monitors” option, and then it will display on both monitors.

3. Enable System Clock in Fullscreen Mode ( Gaming )
Want to keep the time tracking while lost inside gaming or crucial work? With the help of this customized clock app, you can see the time while running the full-screen mode in Windows 11.
Even if your game or other programs have already occupied the whole screen, ElevenClock can still run through this. And the best part, you can also see the taskbar clock even if you have enabled the automatic hiding option by just following these two steps.
- Open “Clock Settings“.
- Now, uncheck both the option mentioned below.
- Hide the clock in fullscreen mode
- Hide the clock when a program occupies all screens

4. Change Windows 11 Clock Position
By default, the application icons stay locked at the center and the clock on the right corner of the taskbar. And, there is much empty space on the left and also on the top of the screen. Wanna utilize it? You definitely have this privilege through ElevenClock.
To make these changes, follow these 3-steps:-
- Go to app Settings.
- Navigate to “Clock position and size“.
- Now, check these two boxes to change it.
- Show the clock at the left of the screen
- Force the clock to be at the top of the screen

5. Change Taskbar Clock Appearance
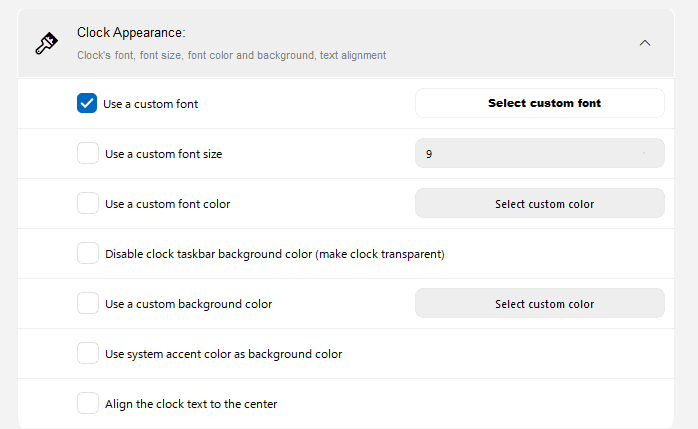
This clock app is capable of changing the overall look of the taskbar clock by customizing the font, variant, size, and much more. Moreover, if you want to make it transparent then you can also do that by simply going to the “Clock Appearance” settings.
6. Disable ElevenClock or Completely Uninstall
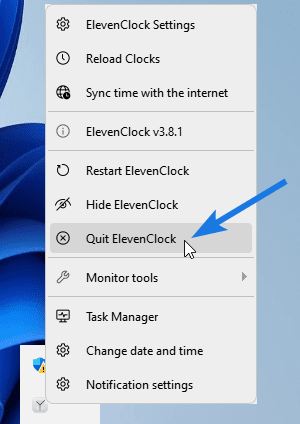
Just like its easy-to-go process in enabling the clock, you can easily disable it temporarily. Also note that, if you close the app then the display of the clock or seconds will automatically disappear but after the restart, it will be back again. Basically by disabling you are just hiding the clock and stopping it from running in the background.
And to disable it, first right-click on the clock and then select the “Quit ElevenClock” option.
Now let’s see how to uninstall it.
If you are done with this app or found some other way, then you can easily uninstall this app from your PC. Just you have to follow the couple of steps which are mentioned below.
- Go to main Windows 11 Settings.
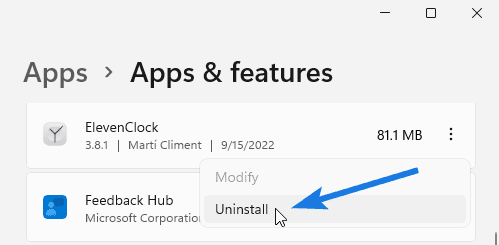
- Now navigate to Apps section and then to the “App & Features” tab.
- After that, search for the “ElevenClock” app, click on the 3-dot icon and then click on the Uninstall button.
That’s it for now…
Conclusion
So, that’s how you can make your clock show seconds in Windows 11 laptops, computers, or PC. Using this application you can customize lots of things like showing it during the full-screen mode, secondary monitor, and much more.
check for milliseconds.
Moreover, we will keep updating you if anything comes up or if any alternative way is found which is better than this.
Stay tuned for the latest posts…
Feel free to share your thoughts via comments and also tell us about this post on How to Show Seconds on Windows 11 Clock [ Quick Fix ].
If you liked this post, don’t forget to share it.
