Want to know how to use Windows 11 snipping tool?
If yes then you are in the right place
Microsoft recently presented a new updated tool that substitutes the “Snip and Sketch” and “Snipping Tool” apps found in Windows 11.
The mentioned two legacy apps were not completely removed but the finest functionalities of both of them are incorporated into a new revamped Snipping Tool with some more functionalities.
Screenshots are quite useful whenever you want to share essential information or troubleshoot an issue or use some specific information for projects.
And that’s why Microsoft has added lots of new features to it. But recently I have seen many users are facing a “Windows 11 Snipping Tool Not Working” issue while using it.
But here we will only talk about how to use it effectively.
So without further ado, let’s get started…
Table of Contents
What is Snipping Tool?

Snipping Tool is a screenshot utility by Windows that allows you to capture snapshots or screenshots of the whole screen. Not just the whole screen, you can also capture screenshots of a window, part of a window, or any specific portion of your display.
Sharing what your screen depicts can be now easily done with this tool. In addition to capturing screenshots, you can set a timer for screenshots and do many other edits as well.
Apart from this, one of my recent posts also talks about How To Take Screenshot in Windows 11 but here we will specifically talk about the Snipping Tool.
Now let’s explore how to use this tool…
How to Use Windows 11 Snipping Tool to Take a Screenshot [ 4 Ways ]
In the above section, I have already shared much about the benefits of using this screenshot tool. But here I will show you how easily you can use Snipping Tool in Windows 11 for taking screenshots. Also, we will discuss about different ways to launch, keyboard shortcuts, delay time, and other features like Zoom, share, copy and print.
So, let’s get started…
1. Using Keyboard Shortcut
The simple and quick approach to capture a screenshot in Windows 11 is through the snipping tool. This can be done by pressing the keyboard shortcut Windows key + Shift +S. After you press these shortcut keys, you can see the four snipping options as below. These snipping modes are shown at the upper portion of your screen.
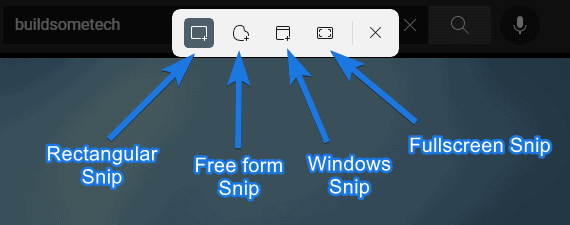
The following section describes these snipping modes:-
- Rectangular Snip: With this snipping mode, you can capture a screenshot in form of a rectangle portion of the screen. After you select this option, you just need to click and drag a rectangular portion of the screen that you want to snip.
- Freeform Snip: With this snipping mode, you can capture a screenshot in free-form. It is helpful to custom draw around the object that you want to snip.
- Window Snip: With this mode, you can easily capture the screenshot of a specific app window shown on the screen.
- Fullscreen Snip: It allows you to capture the whole screen of the display.

When you select ‘Freeform snip’ or ‘Rectangular snip’, you just need to click and drag the particular portion of the screen you want to snip. But if you choose the ‘Window snip’ mode, you can select any window over the screen to capture a snip. In the last mode i.e. ‘Fullscreen snip’ mode, you just need to select it to capture the fullscreen screenshot.
And to cancel the snipping procedure, you need to click the ‘X‘ icon present at the last of tools or simply hit Esc.
![]()
After you capture the screenshot, you will see a notification at the bottom-right part of the screen. Now click on the notification if you want to open the screenshot in the window of the Snipping Tool.
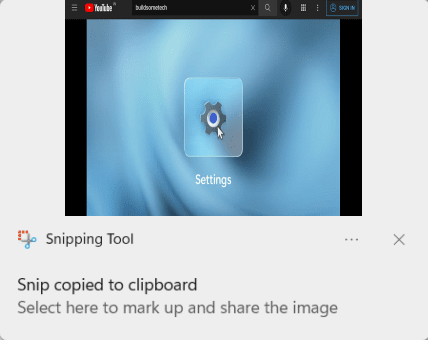
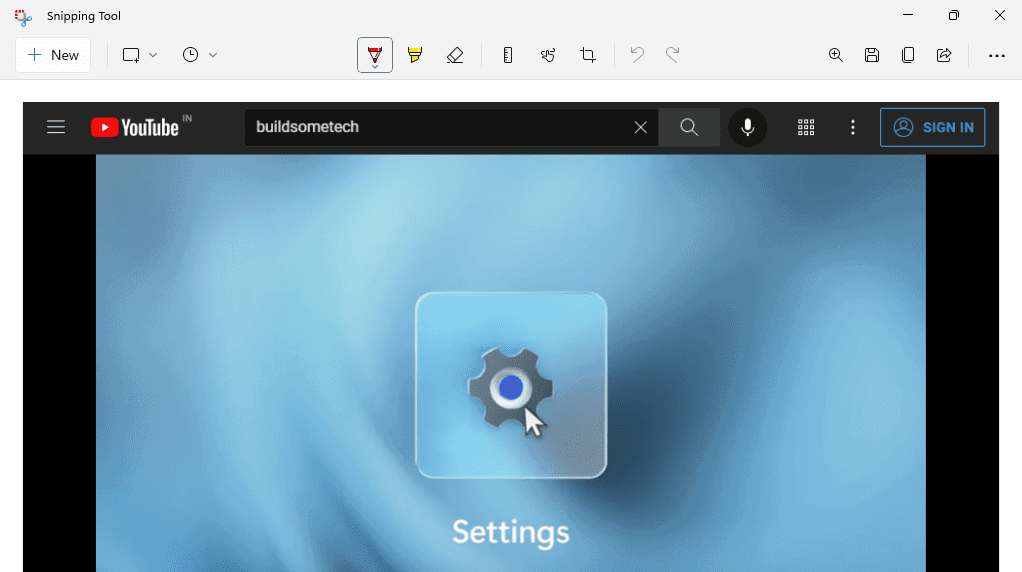
Once you click the notification, it opens the snapshot in a fresh Snipping Tool window. In that window, you can see different tools and options for saving, editing, annotating, sharing, and print the screenshot.
Also when capturing a screenshot, the corresponding image gets automatically copied to the clipboard. Hence, you can instantly paste the screenshot into photo editing tools or websites, or other apps.
2. Launching Snipping Tool from Start Menu
An alternate method to capture screenshots through this tool is by first launching the app from Start Menu and utilizing the options to capture a screen.
Now let’s follow the given steps:-
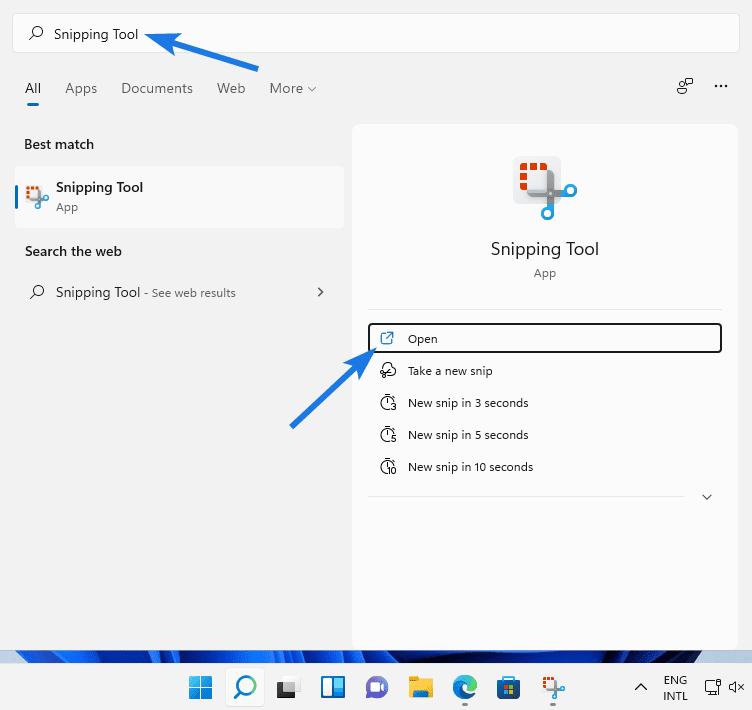
1. To launch the tool app, you need to search for ‘Snipping Tool‘ within the Windows Search or Start Menu and then choose the corresponding search result. Depending on the Windows Theme you set, the Snipping Tool will be shown.
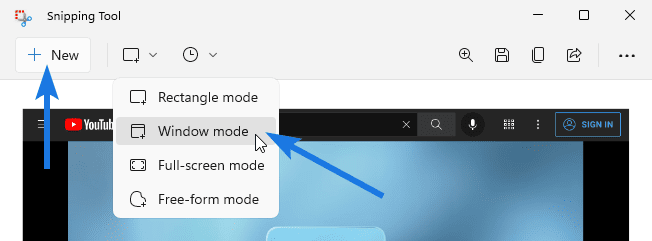
2. Now to snip a screen portion, click on the drop-down menu of ‘Snipping Mode’ and choose any of the four modes. After that, click the ‘New’ button when you want to capture the screenshot in the chosen mode.
3. How to Delay Snipping Time
In this tool, you get an option to delay the snipping time. This option lets you delay the process of capturing a screenshot after 3/5/10 seconds once you click on the ‘New’ button. If you intend to snip messages, pop-up windows, and progress bar then this functionality proves to be useful.
And here are the steps to do:-
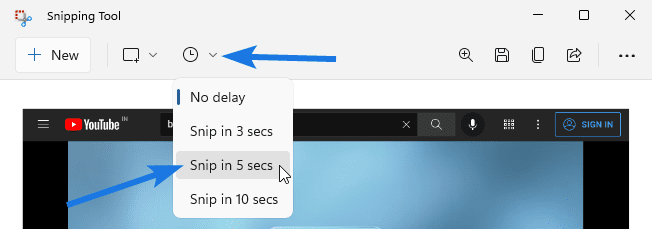
1. Select mode and click on the ‘Time before snip’ drop-down option. This option’s default value is ‘No delay’.
2. Now choose the duration after which you wish to capture the screenshot. Like there are three pre-defined options for time delays are ‘Snip in 3 secs’, ‘Snip in 5 secs’, and ‘Snip in 10 secs‘. So, select them according to your preference.
Note:- This functionality is not supported in Fullscreen mode.
4. How to Zoom, Save, Copy, Share, and Print Screenshots
In the upper right corner of the toolbar, options are available for save, share, copy, zoom, and print the screenshots you have captured.
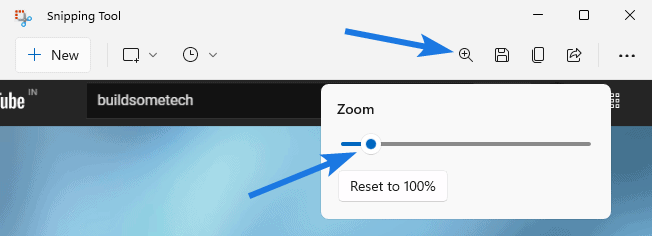
Zoom in a screenshot: Click the ‘Zoom’ icon and you can slide through a slider, you can zoom in and out of the image.
Save a screenshot: Screenshots can be saved in PNG, JPEG, or other formats. Click on the ‘Save as’ icon or hit Ctrl + S. Now give the file a name, in the ‘Save As’ window, select a format, and choose a proper location for saving it.

Copying screenshot to clipboard: Whenever you capture the snip, the screenshot gets automatically copied to the clipboard. However, if you plan to copy the annotated as well as edited screenshot on the clipboard then click on the ‘Copy’ icon beside the Save icon or hit Ctrl + C.

Share the screenshot: To share an image or screenshot with anybody else, click on the ‘Share’ icon and select whether you wish to share it through email or Bluetooth/Wi-Fi, or some other application being displayed.

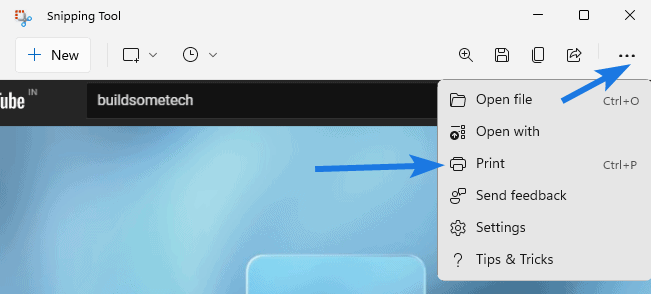
Print the screenshot: Click the three-dot menu button located at the top right corner of the tool. Now choose the ‘Print’ option. Subsequently, you can choose the printer connected to your device for printing the image.
How to Edit Screenshots using Snipping Tool in Windows 11
After you have captured the screenshot, the editing tools available in the app allows you to edit and annotate your screenshots. This tool serves you with different editing tools. Some of them are Highlighter, Ballpoint pen, Eraser, Protractor, Ruler, Touch Writing, etc.
But before all these features we will talk about the most basic and widely used feature of the Snipping Tool which is the Cropping feature.
Now let’s see how it works…
How to Crop Images or Screenshots
1. First, click on the ‘Crop‘ icon from the toolbar.
![]()
2. Now drag the white corners displayed on the screenshot to precisely select the area which you want to crop. After it’s done, click on the ‘Apply’ button and hit Enter.

And if you intend to cancel the crop then click on the ‘Cancel’ button or hit Esc.
Annotate Screenshots
1. It is possible to draw, write, or highlight across the screenshot by selecting the ‘Highlighter’ or ‘Ballpoint Pen’ option. You need to double-click on any of the icons so that it will open the color palette. And after that, select the size and color of the highlighter or pen.
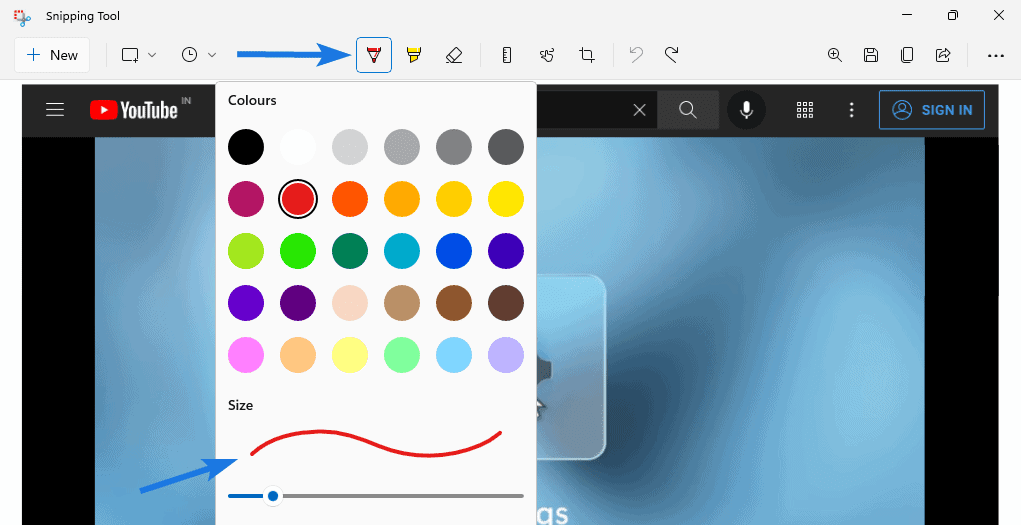
2. Using that tool, you can draw, highlight, and write through the tools available. And you can also use the Ballpoint pen by pressing Alt + B and use a highlighter by pressing Alt + H.

Erase Annotations in Screenshots
The Eraser Tool could be handy if you want to delete drawings or annotations from the snip. And it is also the second most widely used feature of the Snipping Tool.
1. Click on the ‘Erase’ icon and drag the cursor over the particular writings or strokes which you wish to erase.

2. If you want to delete all the annotations done on the snip then you need to double-click on the ‘Eraser’ icon and then select the ‘Erase all ink’ option.

How to Use the Ruler and Protractor
Snipping Tool also contains a Ruler and a Protractor allowing you to draw arches or straight lines on your images or screenshots in Windows 11.
First, we will see steps to use a Ruler:-
1. Click on the ‘Ruler’ button or you can double-click on the Ruler icon directly from the top toolbar and then select ‘Ruler’.

2. And after that, you will see a virtual ruler in the center of the Snipping window. Now If you want to move that ruler, click on the ruler and then drag it over the image with the help of a pen or mouse, or finger. Now you can use the ruler to draw straight lines or calculate something.

3. Now to rotate it, you can hover the mouse on the degree number (default value is 0°) in the center of the ruler. Now use your two fingers or use the mouse scroll wheel to rotate that ruler.

And If you want to discard the ruler, you need to click on the ‘Ruler’ icon shown on the toolbar and then select ‘Ruler’.
Now we will see steps to use a Protractor:-
1. Accessing the Protractor is also possible by clicking on the ‘Ruler’ icon. Alternatively, you can double-click on the ‘Ruler’ icon and then select ‘Protractor’. And after that, you will see a virtual protractor in the center of the Snipping window.

2. Now click on the protractor and then drag it to move it anywhere. And using this virtual protractor when you want to draw a Pie or Arc from a particular angle or measure some angles.

And resizing the protractor is also possible by scrolling the mouse scroll wheel located on the top of the protractor. Alternatively, you can use your two fingers to enlarge or shorten it.
Touch Writing
Here, we will show you how you can use the Touch Writing snipping tool in Windows 11. This feature was also available in the previous version of Windows which can be used via Snip and Sketch.
Now let’s see how to use it:-
Touch writing functionality helps you to write anything you wish over the snip. For that, click on the ‘Touch Writing’ icon located on the toolbar and then use touch to write something on the screenshot.

Generally, this functionality works well on a 2-in-1 device supporting a touch screen or a tablet. However, if you don’t have a touch screen device then you can use the mouse cursor for writing. Use ‘Alt + T‘ to toggle this tool.
Undo or Redo Screenshots Edits
This feature can be very useful while editing any image or screenshots because there are lots of times when we mistakenly edit them. And in that case, you can use the Undo or Redo features to reverse those changes.
Now let’s see how to use them:-
Undo the edits: Edits you did on the image or screenshot can be undone by clicking on the ‘Anticlockwise arrow’ shown on the menu bar. The other way is by pressing ‘Ctrl + Z‘.

Redo the edits: You could redo the changes you did on the screenshot by pressing ‘Ctrl + Y‘ or clicking on ‘Clockwise arrow’ on the toolbar.
Customize Windows 11 Snipping Tool Settings
If we look at the previous version of Snipping Tool then this time Microsoft has added lots of new features and customization settings. And here we will specifically talk about all those settings and which are more beneficial for all types of users and can help them in making this process easier.
Now let’s explore them one by one…
Quickly take Screenshots via Shortcut Keys
To quickly capture a screenshot through Snipping Tool, the prevalent method is to press ‘Win key + Shift + S‘. However, it may take a few seconds while you press all these keys simultaneously. You can also capture a screenshot faster by pressing the ‘PrtScn key‘.
And to open the screen snipping through the PrtScn key, firstly, you have to enable this shortcut within the Windows Settings.
And here are the steps to do:-
1. First, open the Snipping Tool and click on the three-dot menu button located at the upper right corner of the tool. And then select ‘Settings’ from the menu.
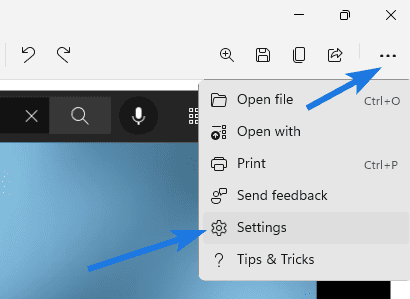
2. Now in the Snipping Tool Settings page, you need to click the ‘Change in settings’ button beneath the Shortcuts section.

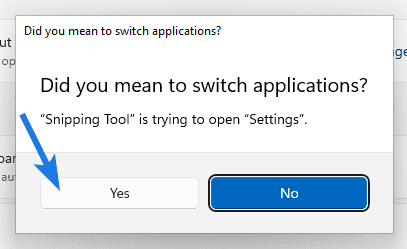
3. The aforementioned option asks you for confirmation to switch apps. Select ‘Yes’ from the dialog box.
4. After the above step, you will see Windows 11 Keyboard Settings opened under Accessibility. Now navigate down the Keyboard settings page till you find out the option to enable the Print screen shortcut. Now, click on the toggle beside ‘Use the Print screen button to open screen snipping’ if you want to enable the shortcut.
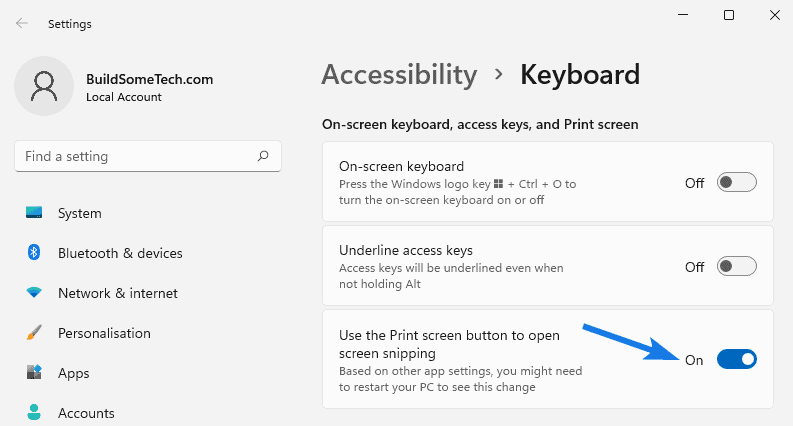
Note:- This option is present under the ‘On-screen keyboard, access keys, and Print Screen’ section.
5. After that, you may have to restart your PC to let this change be effective. After restarting your PC, press the PrtScn key that would open the screen snipping options at the top of the screen.

Other Snipping Settings
To personalize your snipping experience, you can access different other snipping settings. They are described briefly as below:-
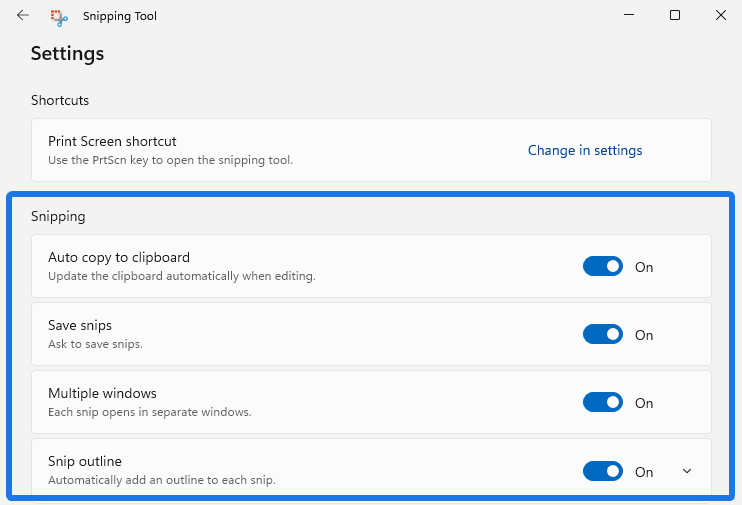
- Auto copy to clipboard: When you enable this option, it would automatically update the clipboard while you make changes to the screenshot.
- Save snips: When you turn on this toggle option, it asks you to save the screenshot before you close the snipping tool.
- Multiple windows: This setting helps you to open new snip in a separate window.
- Snip outline: When you enable this option, it would automatically add an outline to every screenshot. Also, you can change the size and color of the outline after clicking on downward arrow button besides the Snip outline toggle.
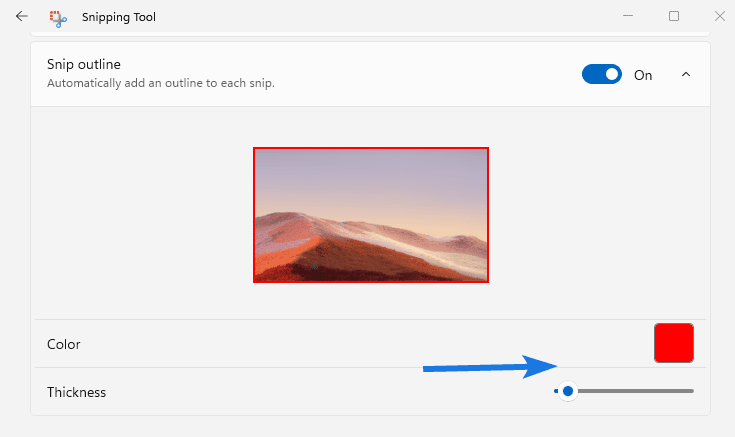
And when you click that button, the ‘Color and Thickness’ options will be shown. Now click on the color box to select your preferred color from the available color palette. Now use the slider to vary the outline’s thickness.
Change Snipping Tool Theme
Here, you can set the theme of the tool irrespective of what the Windows theme is ‘Dark Mode‘ or ‘Light Mode‘. And this can be done by simply going to the Snipping Tool settings.
And here are the steps to follows:-
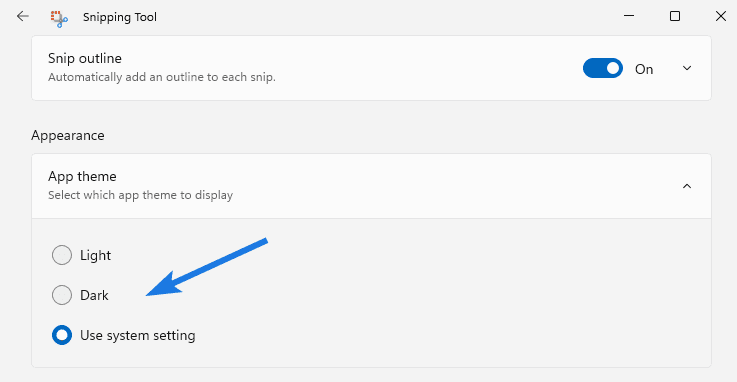
1. First, click on the ‘App Theme’ drop-down option under the Appearance section.
![]()
Note:- By default, this option is set to use the Window’s theme. If your Windows system utilizes a dark them, the tool too will appear in dark mode.
2. Now you can switch between ‘Light’ and ‘Dark’ mode and can also choose ‘System Setting’. After you modify the theme, restart the tool to notice the changes.
That’s it for now…
Conclusion
So, that’s all about the Snipping Tool which you can easily use to take screenshots and can also edit them according to your preference. Moreover, we have tried have to cover almost each and every feature of this tool which can be used to edit, crop, highlight, touch writing, etc.
Also, we will definitely gonna publish a detailed guide on Snip and Sketch.
Stay tuned for the next posts…
Feel free to share your thoughts via comments and also tell us about this post on How to Use Windows 11 Snipping Tool & Take a Screenshot.
If you liked this post, don’t forget to share.
