Is your Windows 11 Snipping Tool Not Working?
If yes then you are in the right place.
It has been almost a month since the stable release of this Windows OS. But still, there are so many bugs and issues that are occurring frequently.
Recently most of the users also reported on the Microsoft forum, that the “Snipping tool is not opening in Windows 11”.
And this discussion went way too long. ( Almost 400 replies on it )
Moreover, the default keyboard shortcut for screenshot ” Windows+Shift+S “was also not working and when launching it manually & then clicking on “+New” it was showing an error “This app can’t open.“
But don’t worry we have got the solution for this and now everything is working fine and this issue has been fixed.
So, let’s how it works…
Also Read: Windows 11 Review: Every Key Feature to Know
Table of Contents
Fix Windows 11 Snipping Tool Not Working [ 11+ Ways to Fix ]
Snipping Tool is one of the best tools to capture screenshots and edit them, developed by Microsoft. It is a native Windows app and therefore, this tool mostly works seamlessly. But recently this tool has faced some issues due to which it has stopped working.
And if we dive in further, this issue was mostly faced by users who have recently upgrade Windows 10 to 11. Also, if you are using a Windows 11 PC then you might have already faced this error which shows “This app can’t open. A problem with Windows is preventing Screen Snipping from opening. Refreshing your PC might help fix it.“

Apart from this, most of the users also tried different troubleshooting options like Resetting PC, Reinstalling, and Repairing. But nothing worked for them and they still facing that issue.
But now we have finally got the solution for this.
So, let’s see how to fix it.
1. Download and Install Windows 11 KB5008295 Update
Earlier, users were using quick ways to fix it but now Microsoft has officially released one cumulative update for fixing this issue. And now if we look at the actual reason for this not working issue then it was the Microsoft digital certificate the got expired on October 31, 2021.
And to fix this issue, Microsoft released KB5008295 Update which includes fixes for different tools & applications like Snipping Tool, Settings app, Start menu ( S mode only ), Touch Keyboard, Voice Typing, Emoji Panel, and many more.
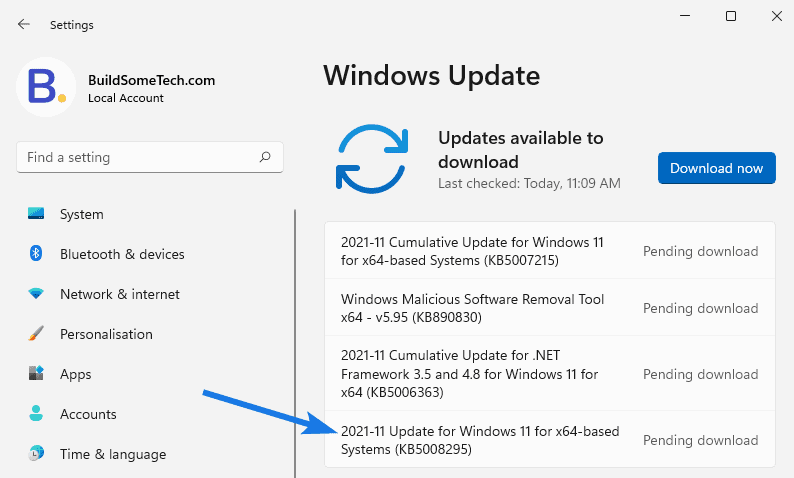
And to fix this issue just go to Settings > Windows Update > Check for updates. After that, you will see the KB500829 update, so download & install it and then Restart your PC.
Hopefully, your issue was fixed and that’s why I would suggest you to check out How to use Windows 11 Snipping Tool easily.
Note:- If you don’t want to download this update then you can also try uninstalling the KB5006674 update to fix this issue.
Otherwise, try the below-mentioned ways.
2. Change Date and Time
This fix is presented by the Microsoft Tech Community member named Ged_Donovan. To resolve the ‘Win+Shift+S‘ shortcut not working problem, alter the date within the Settings on your PC. Make sure to update the date to October 30, 2021. Next, you need to use the ‘Windows+ Shift+S‘ shortcut and check if you can take screenshots in Windows 11 with the new updated date.
shortcut to capture a screenshot and then update the date with the latest date.
And here are steps to follow:-
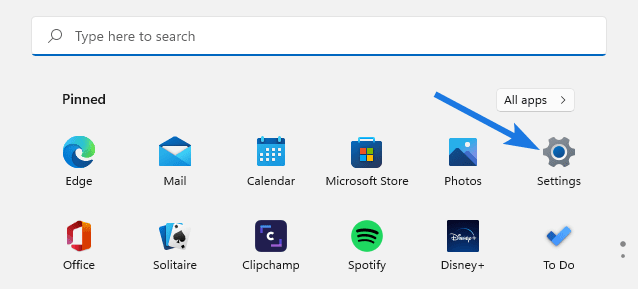
1. First, go to the start menu and then click on the Settings app.
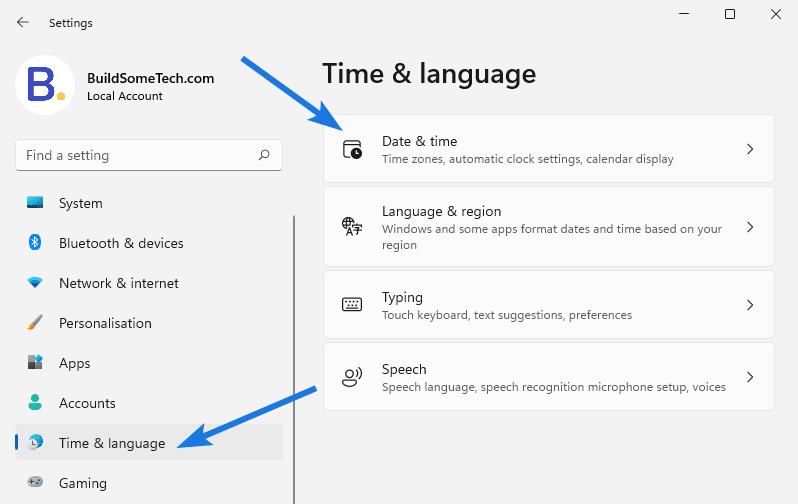
2. Go to the ‘Time & language’ section & after that click on ‘Date & time’.
3. From the ‘Set time automatically‘ option, you need to click on the toggle button on the right for turning it off.
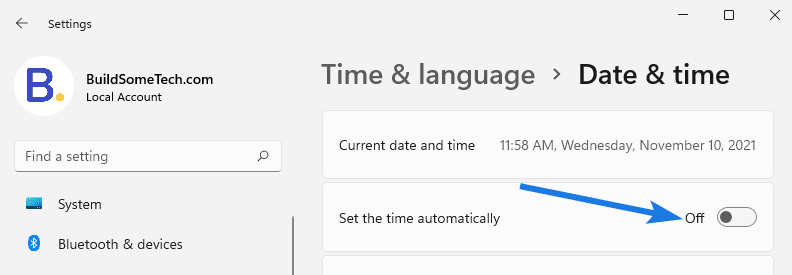
4. Now scroll down and click on ‘Change’ from the ‘Set the date and time manually’ option.

5. Alter the date to “30 October 2021” and then click ‘Change’ to save the date and time.
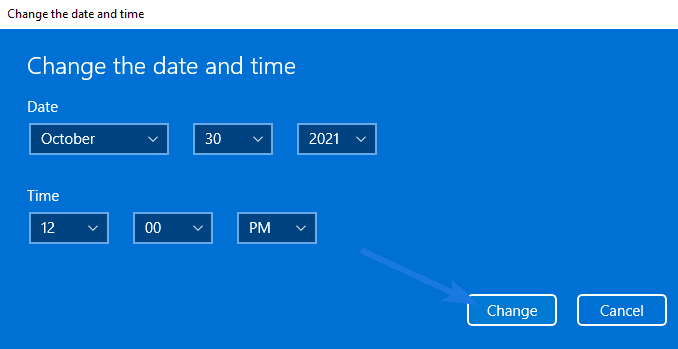
6. Now use the ‘Windows+Shift+S‘ screenshot shortcut and it will be working fine.

And after that, you can change them back to the original time, and here are the steps which you can follow.
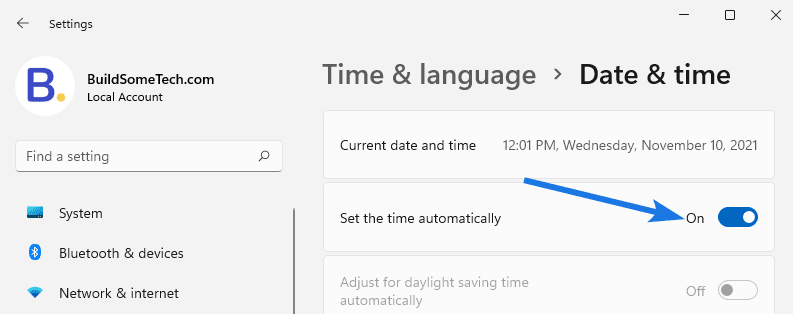
To change the date back to what was set automatically, open the Settings app. Now click on the ‘Time & language’ option and then click on the ‘Date & time’ option.

In the ‘Set time automatically‘ option, you need to click the toggle button on the right for turning it on.
3. Restart Snipping Tool Application
The Snipping Tool application might get an error during the launch. So, you can try to restart the app. Because in many errors like Taskbar Speaker Volume Icon Not Working in Windows 10 we have seen that restarting the application helps in fixing some crash issues.
And here are the steps to do:-
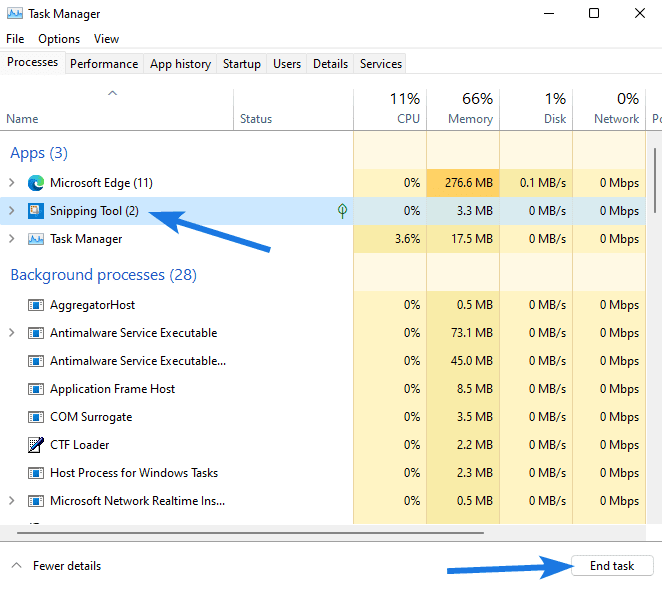
- Press ‘Ctrl+Shift+Esc‘ to open the Task Manager.
- In the ‘Process tab‘, choose the Snipping Tool app and then click on ‘End Task‘ button.
- After that, try to launch Snipping Tool to check if it works or not.
4. Use Older Version of Application
If you have lately updated from Windows 10, then the old version of Snipping Tool can be used. Because every Windows stores the previous OS installation files for the first 10 days so that if any user wants to go back to Windows 10 from Windows 11. And we can take this advantage by using the older version of Snipping Tool via Boot Driver.
And here are steps to follow:-
1. First, go to the given path: C:/Windows.old/Windows/System32/

2. Now search the ‘SnippingTool.exe’ in the current folder and then copy it.
3. After that, navigate to the given path: C:/ Windows/System32/ and then paste the copied file.

4. Similarly, go to this path: C:\ Windows.old\ Windows\System32\en-US\ and then search & copy the SnippingTool.exe.mui file.
5. Now, navigate to another path: C:\ Windows\System32\en-US\ and then paste the .mui copied file.
Note:- If you are prompted then you need to replace all the files.
After that, you can try opening the Snipping Tool and then click on ‘+New‘ to check if it’s working or not.
5. Enable Snipping Tool Background Permissions
One of the causes for the Snipping Tool not working is that the app does not have the necessary background permissions to run. Because this may be blocking the screenshot shortcut ‘Win+Shift+S‘ from capturing the screen. So, enabling this option can definitely help in running it.
So here are steps to follow:-
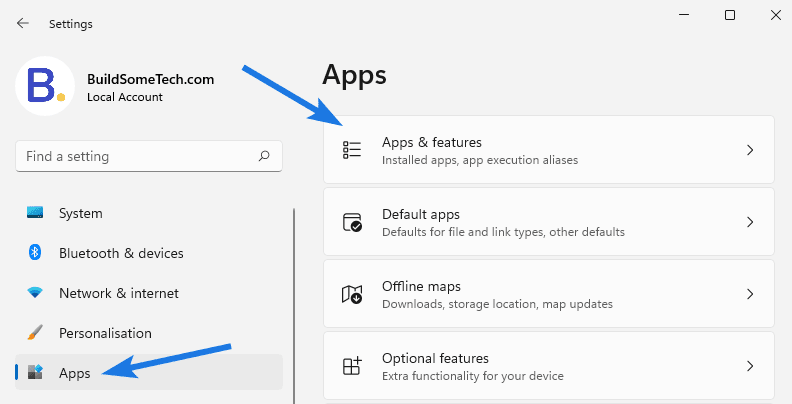
1. First, Press ‘Win + I‘ to open the Settings app.

2. Now go to the ‘Apps tab‘ on the left and then click on the ‘Apps & features‘ option.
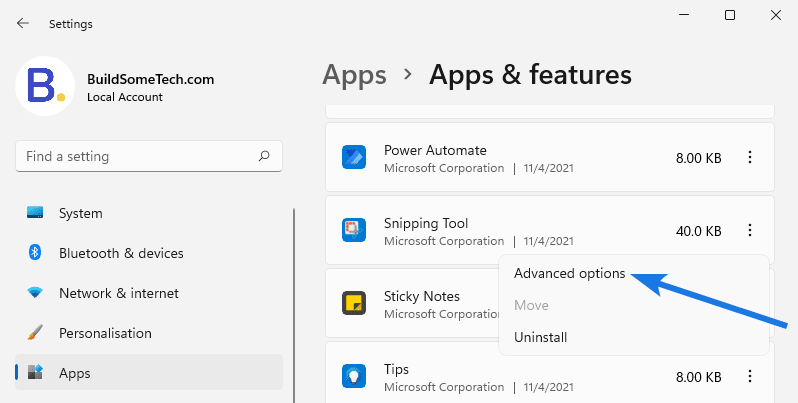
3. After that, search for Snipping Tool in the App list and then click on 3 dots and then select Advanced options to open.
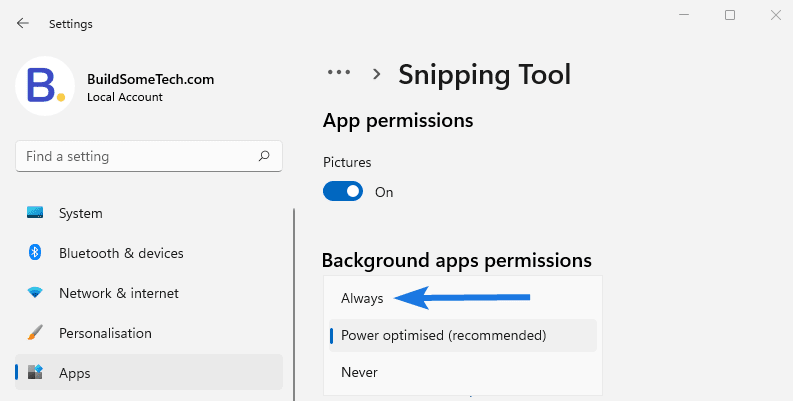
4. Now under the ‘Background apps permissions‘ section, choose Always from the drop-down menu.
And then close the Settings app and open the Snipping Tool from the Windows 11 Start menu.
6. Check if Clipboard History is Enabled
Clipboard history enables the Windows operating system to remember every image, element, and text that is copied to your clipboard. Snipping Tool depends on its keyboard shortcut for copying screenshots to the clipboard. So, if the history is disabled, it can create a problem.
And here are the steps to enable it:-
1. First, open the Settings app with the ‘Windows + I‘ shortcut.

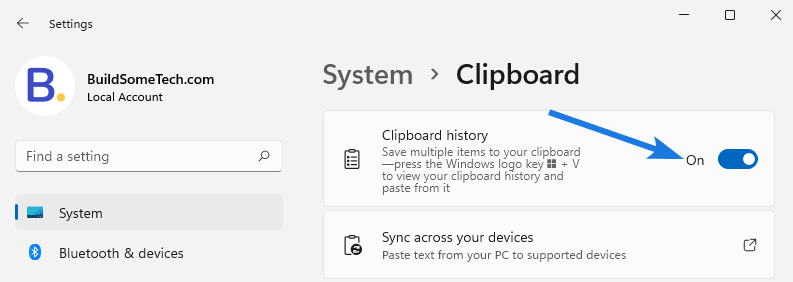
2. Now on the right-hand side section, click on the Clipboard tab.

3. Now enable the toggle for ‘Clipboard history’. Once it’s enabled, it is recommended to restart your PC and then use the Snipping Tool.
7. Rest or Repair the Application
Applications on Windows may encounter errors occasionally. And in that case, the best option is to reset or repair using Windows 11 settings. Similarly, we can use both these options for Snipping Tool for repairing the app files or resetting the settings.
And here are the steps to do:-
1. First, press ‘Windows + I‘ to open the Settings app.

2. Now click on the ‘Apps tab‘ and then go to the ‘Apps & features‘ option.

3. After that, find the Snipping Tool in the App list, then click on 3 dots & then select Advanced options to open.

4. Now scroll down and then click on ‘Terminate‘ for terminating this app and its related processes.

5. After that, click on the Repair button. Once repairing is done, try launching the Snipping Tool.

And if it’s still not working then try the Reset option, which will delete all the app’s data and make it like a newly installed app.

Although, the Repair is much better than the Reset option but sometimes there are some incorrect settings that cause issues like “Windows 11 Snipping Tool Not Working” and many more.
8. Run SFC Scan & DISM Check via Command Prompt
Running SFC scan and DISM Check ensures that all your systems files are appropriately configured as well as installed on your PC. Also, this will check if Snipping Tool files are corrupted or not and will fix them automatically with default settings.
And here are the steps to execute them:-
1. First, search for ‘CMD‘ and then click on ‘Run as administrator‘.
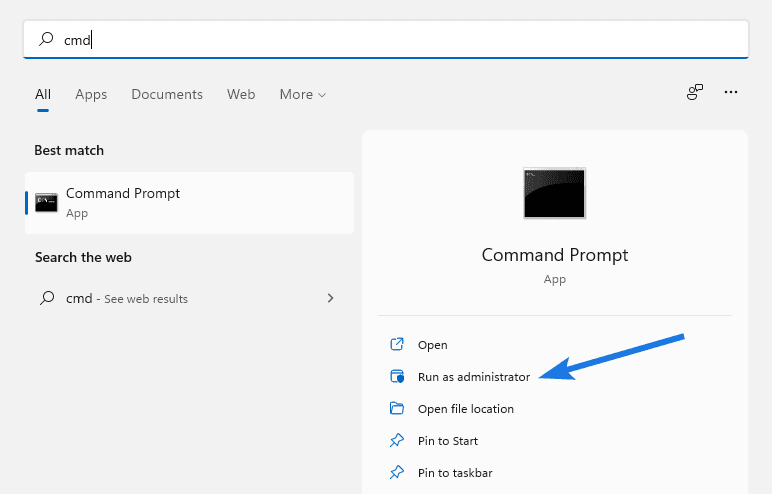
2. Now type ‘ sfc /scannow ‘ command in the Run dialog box & hit Enter.

3. After that, type the DSIM check command ‘ DISM.exe /Online /Cleanup-image /Restorehealth ‘ and then hit Enter to run.

9. Reinstalling Snipping Tool
Although, the above fix works really great but if they don’t work for you then this is another great option. Yes, reinstalling most of the apps helps in fixing these issues and hopefully, this will also work with Snipping Tool.
So let’s see how to do it:-
1. First, search for ‘PowerShell‘ and then click on ‘Run as administrator‘.
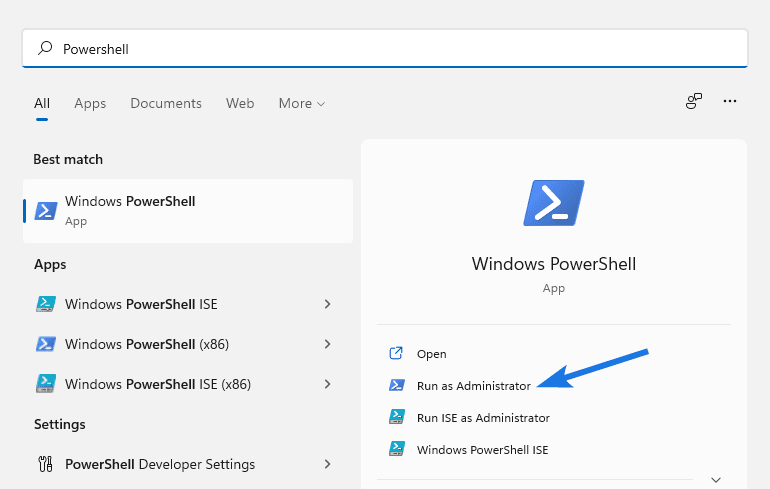
2. Now type the given command and then Enter to run. ( This command will remove the Snipping Tool from your PC )
Command:- get-appxpackage Microsoft.ScreenSketch | remove-appxpackage

3. After that, run another command to install it again.
Command:-
Get-AppXPackage Microsoft.ScreenSketch -AllUsers | Foreach {Add-AppxPackage -DisableDevelopmentMode -Register “$($_.InstallLocation)\AppXManifest.xml”}

4. Once the app is installed, close the PowerShell and then launch the Snip & Sketch.
Note:- You can also download Windows 11 Snipping Tool from the given link and can easily install it by double-clicking on it.
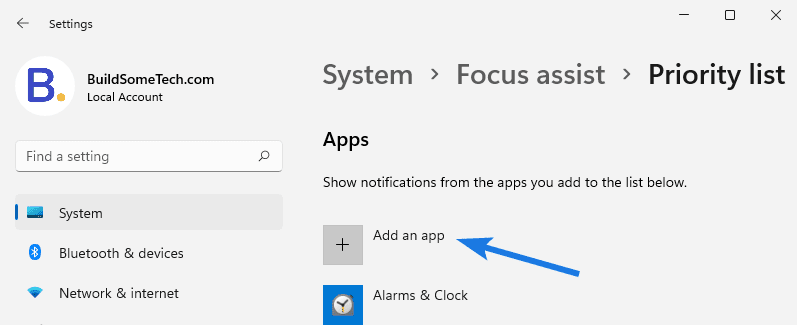
10. Disable Focus Assist
Focus Assist filters out undesired notifications on PC. If you are not getting notifications after capturing a screenshot, you can disable the Focus Assist from the Action Center. Now if the issue gets solved, you can add the Snipping Tool app into the priority list so that you can use it when Focus Assist is enabled.
And here are the steps to do:-
1. First, go to the start menu & search for ‘focus assist‘ & then hit Enter.
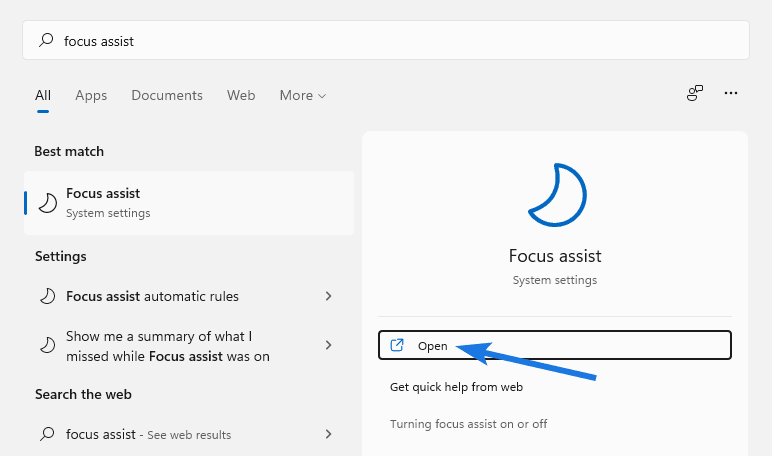
2. Now click on the ‘Customize priority list‘ option.
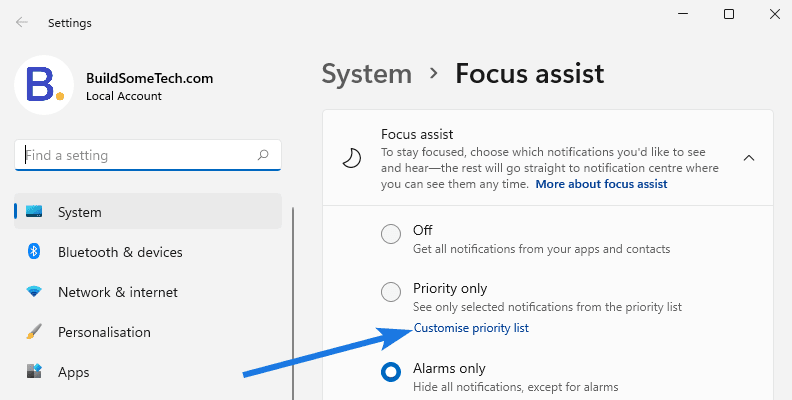
3. After that under the Apps section, click on the ‘Add an app‘ button and then encompass Snipping Tool into your priority list.
11. Windows App Troubleshooter
Windows Troubleshooter is a great utility that helps you to identify and resolve minor app issues. And this utility is also available in Windows 11 and we can use this to fix any issues of Snipping Tool.
And here are the steps to do:-
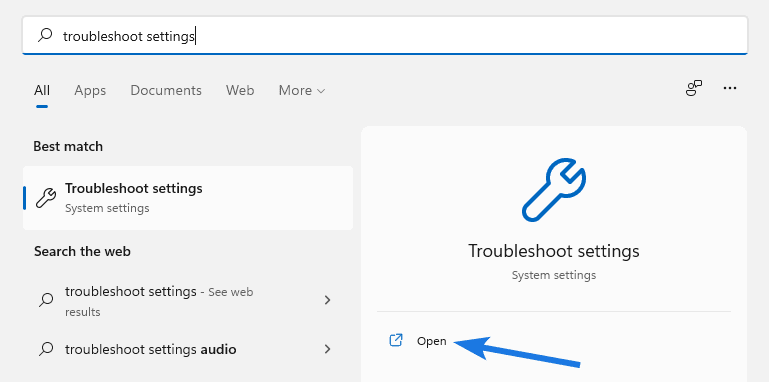
1. First, go to the start menu & then search for ‘troubleshoot settings‘ & hit Enter.
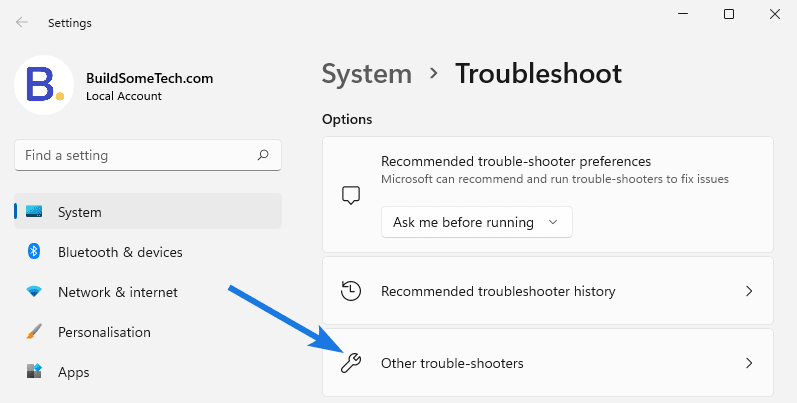
2. Now on the right-hand side, click on the Other troubleshooters option.
3. After that, scroll down & search for ‘Windows Store Apps‘ and then click on the Run button.
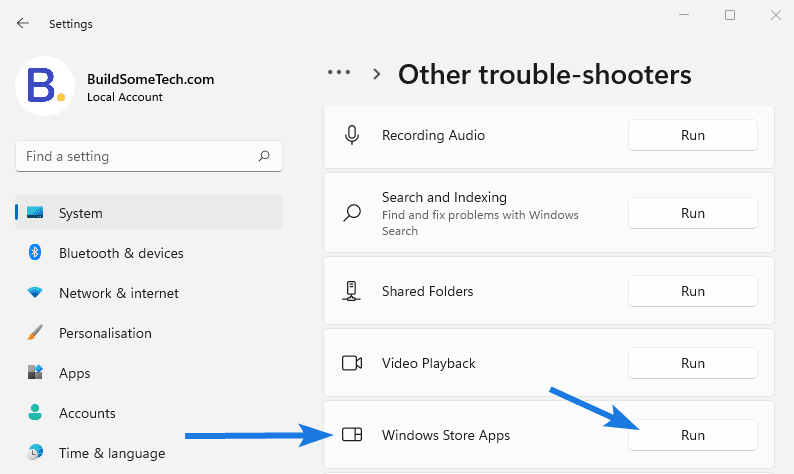
Once the troubleshooting process ends, you need to check if the Snipping Tool is working or not.
Bonus:- Reset your PC
If any of the above methods don’t work, this is the last thing you can do to fix this issue. Because resetting your PC helps in erasing all your data and settings that may be causing any error in applications. And that’s why Microsoft also recommended this option if Windows 11 Snipping Tool is not opening or working.
And here are the steps to follow:-
1. First, press ‘Windows+I‘ and then click on ‘Windows Update‘.
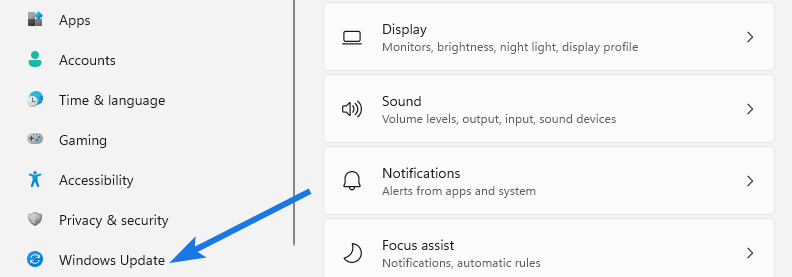
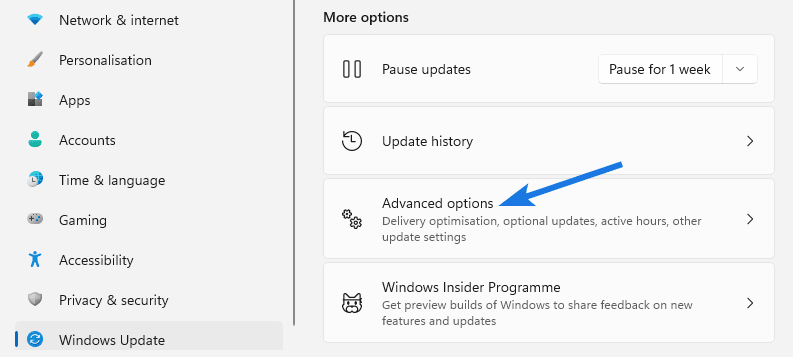
2. Now click on the Advanced options ( Delivery optimization, optional updates, active hours, other update settings )
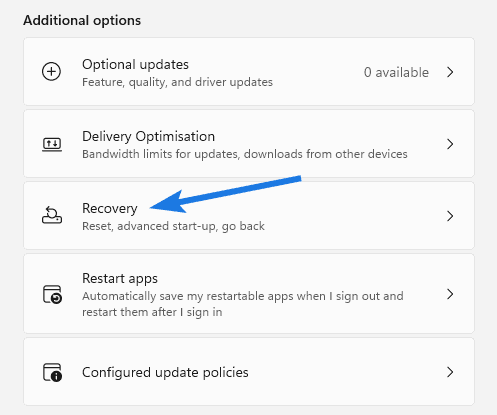
3. After that under the Additional options section, click on the ‘Recovery‘ option.
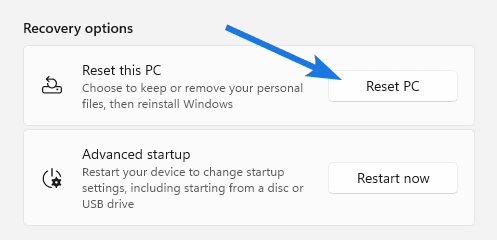
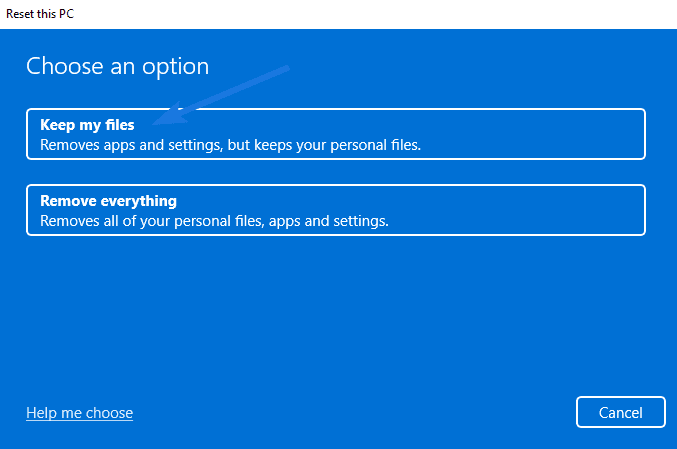
4. Now under Recovery options, click on Reset PC ( Reset this PC ).
5. After that, click on the ‘Keep my files‘ option. ( Remove apps and settings, but keeps your personal files )
That’s it for now…
Conclusion
So, that’s how you can easily solve issues like Snipping Tool not working on Windows 11. Although, this works really great but this time Microsoft forgot the renew the digital certificate of the Snip and Sketch app and that’s why this error was occurring. But now it’s fixed.
Apart from this, you can also other alternatives like Snagit and ShareX for taking screenshots and screen capturing.
Stay tuned for the next posts…
Feel free to share your thoughts via comments and also tell us about this post on Windows 11 Snipping Tool Not Working [ 11+ Ways to Fix ].
If you liked this post, don’t forget to share.
