Want to Bypass Windows 11 Secure Boot?
If yes then you are in the right place.
In the previous post, I have already shared about What is TPM 2.0 and How to Fix Module Errors. [ Intel & AMD Based CPUs]
Nowadays, Everyone is struggling with the new Windows 11 requirements that are required for installing it.
Although, Microsoft has done all this for improving security & privacy. But many of us are not liking it.
Because most of the users are unable to use it on their PC or Laptop and experiencing errors like “This PC can’t run Windows 11“.
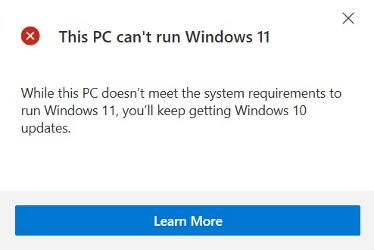
And I have seen many users searching for terms like “How to install Windows 11 without TPM and Secure Boot“.
But don’t worry we have found a way to bypass this.
Let’s see how it works…
Also, check out WhyNotWin11- PC Health Check Alternative.
Table of Contents
How to Bypass Windows 11 Secure Boot & TMP 2.0 [Fixed]
![Windows 11 Secure Boot Bypass TMP 2.0 Windows 11 Secure Boot Bypass & TMP 2.0 [Fixed]](https://www.buildsometech.com/wp-content/uploads/2021/07/Windows-11-Secure-Boot-Bypass-TMP-2.0-Fixed.png)
But before begin let’s get some more info about this.
Although, It is very easy to bypass if you are using a “UEFI BIOS Mode” Laptop or PC. Just you have to go to BIOS settings and then enable the “Secure Boot” option and then the “TPM 2.0” option.
In Intel-based CPUs, TPM settings are named as Platform Trust Technology (PTT) and in AMD-based CPUs, it is named as AMD fTPM settings. So be careful while enabling them.
And if you are not sure, then you can use the PC Health Check App.
Also according to me, all the Motherboards or CPUs that are manufactured in the last 4-5 years will definitely have these “TPM Chips” and “Secure Boot Mode” on their board.
And if you are using an old PC or Laptop then it might have “Legacy BIOS Mode” in which installing Windows 11 is like impossible. Because in older computers, there is no option to enable “TPM 2.0” & “Secure Boot“.
But thanks to our Windows community for giving this quick hack.
So let’s get started…
Method 1: Bypass Secure Boot and TPM 2.0 Check in Windows 11 using Registry Editor

In this method, I will show you how to bypass Secure Boot and TPM 2.0 requirements in Windows 11 by editing some registry files.
I know it sounds a little weird but don’t worry they are totally safe.
And the best part is that I have also used them.
So let’s follow this step by step guide.
1. First, Go to Start Menu and search for “RUN” & then hit Enter. Now type “regedit” command and then press Enter.
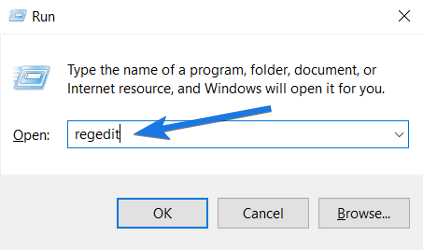
Quick Tip:- You can also use the shortcut keys “Windows Key + R” for the same.
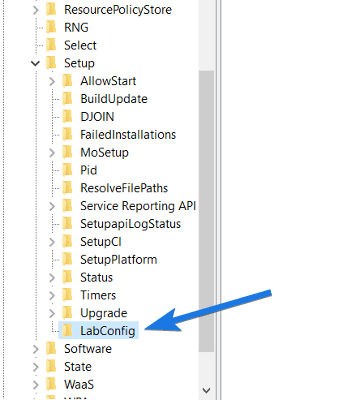
2. After that the Registry Editor will open up & then navigate to the given path. ” Computer\HKEY_LOCAL_MACHINE\SYSTEM\Setup “
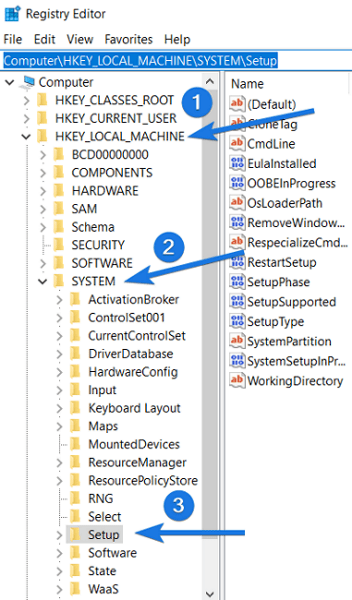
3. Once you are in the Setup folder, now Right-click there & then select “New” and then choose the “Key” option.
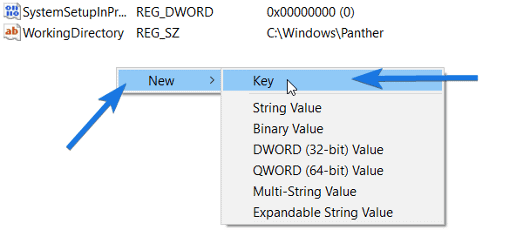
4. After that a new Registry Key file will be added under the Upgrade folder. So rename it as “LabConfig“. (Important for Windows 11 Upgrade)
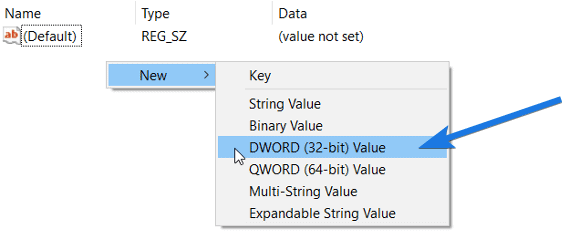
5. Now on the right-hand side section, you will find a file named Default. But here we have to create a new “DWORD” registry file. So, again right-click there and then select “New” & then choose the “DWORD (32-bit) Value” option.
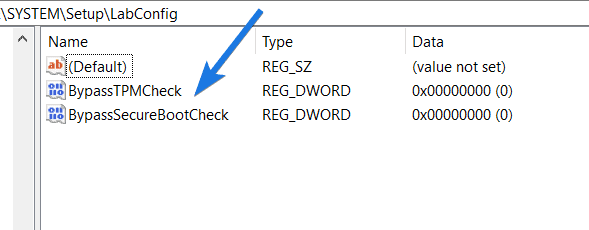
6. Once the file is created, now rename it to “BypassTPMCheck”. And Similarly, now create another “DWORD” registry file and then rename it to “BypassSecureBootCheck“. Once both the files are created, it will look like this shown in the picture.
7. Now double-click on the “BypassTPMCheck” key file that you have created in the previous step. And then change its “Value data” to “ 1 ” and then click on the OK button.
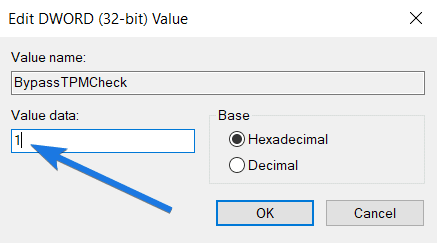
Note:- Please make sure that the “Base” value is set to “Hexadecimal“.
8. After that double click on the “BypassSecureBootCheck” key file and then change its “Value data” to ” 1 ” and then click on the OK button.
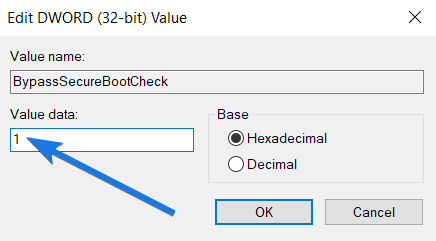
At last, close the Registry Editor and then Restart your PC. So, that all these settings are saved.
Note:- After saving all these settings, you can also try for getting Insider Preview Update through Windows Insider Program.
And done! You have successfully bypassed the Windows 11 TPM 2.0 check and also the Secure Boot check requirements.
Now let’s move to the next method.
Method 2: Bypass TPM 2.0 and Secure Boot Check by Modifying Windows 11 ISO File

Although, the above method is 100% working & genuine. But if you are still facing any error then it may be because of “Legacy BIOS“.
But don’t worry this quick guide will definitely help you.
This method is all about how you can easily install Windows 11 without TPM 2.0 and Secure Boot check requirements.
So let’s get started…
And for this, you must have all the below mentioned things.
- Windows 11 ISO Image File
- Windows 10 Bootable USB Drive
- A working Windows 10 computer
- USB Flash Drive of at least 8 GB
Once you have all the things, you can move further.
Now follow this step by step guide…
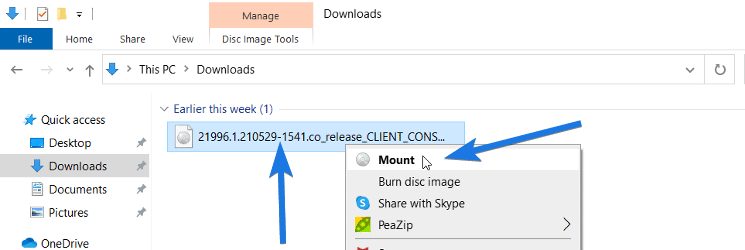
1. First, Go to This PC and then navigate to the Windows 11 ISO Image File. After that right-click on the ISO File and then select the Mount option. ( And if you don’t have the ISO file then you can download it from the given link )
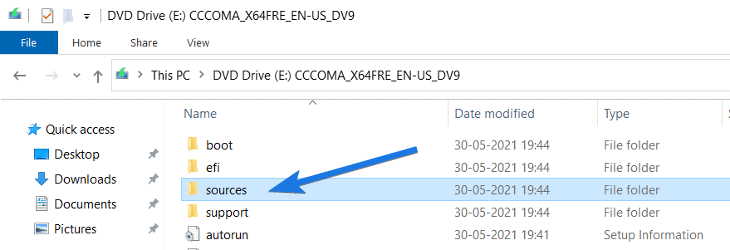
2. Now, Open the mounted Windows 11 ISO File and then search for the “sources” folder and then open it.
3. Now in the “sources” folder, search for the “install.wim” file and then copy it. You can also use the ” Ctrl + C ” shortcut keys to copy the file.

4. After that, insert your Windows 10 Bootable Drive into your PC and then Go to This PC & then open the “sources” folder of Windows 10 USB.
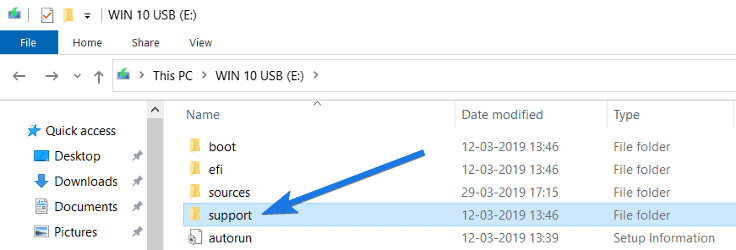
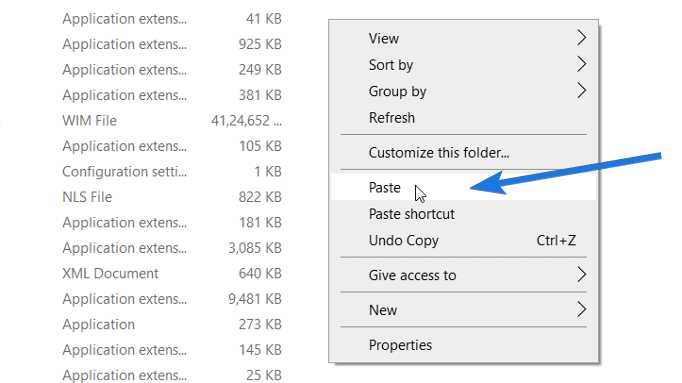
5. At last, paste the “install.wim” file that you have copied earlier from the Windows 11 ISO File into the “sources” folder of Win 10 USB. You can also use the ” Ctrl + V ” shortcut keys to paste the file.
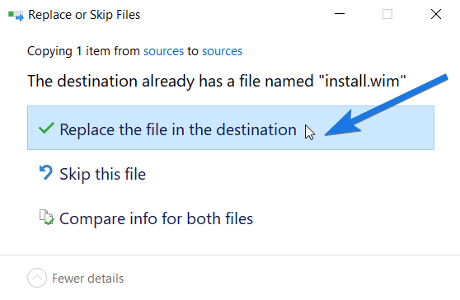
After that, it will ask for “Replace the file in the destination“. So click on that. Now it will start copying the file to the “sources” folder and once it’s done. Now you can easily use this Windows 10 USB to install windows 11 on your computer or laptop.
And the best part is that now you can easily boot Windows 11 from USB without any TPM check or Secure Boot check. Also, it will bypass all the system requirements whether you are using “Legacy BIOS” or “UEFI BIOS” firmware for your system.
And Done! On the internet, you may find other methods to fix these types of issues but the above-mentioned two methods have a 99% success rate.
Now let’s move to the next part…
Some Other Ways to Fix TPM & Secure Boot Errors
Here we have listed all the other which people are trying to bypass or fix these kinds of errors. Everyone is trying their own way and if it’s not working then they are trying to use two methods or mixing them together.
Also, check out how I installed Windows 11 using Virtualbox.
And till now, only the Registry method mentioned above has worked for so many users. So to save your time we have mentioned some of the methods below which may help you if the above two methods are not working.
- Using OfflineInsiderEnroll scripts to enroll in Dev Channel: Some users are saying that using these scripts can help you. But I really don’t recommend them because its better to get updates from official source.
- Deleting Setup Config File “setupconfig.ini” from Windows root folder.
- Converting Windows 11 install.wim to Install.esd from the ISO File using command prompt.
- Replacing appraiserrs.dll like we have in the above section.
- Creating new Windows 11 Image by editing & using Windows 10 files and then converting Windows files to ISO file back.
Although, these methods are not that trusted but you can give them a try if you are still unable to fix these errors on your system.
That’s it for now…
Conclusion
So that’s how you can easily bypass TPM 2.0 error and can enable Secure Boot mode on your PC to install Windows 11 without these system requirements. Also, we have tried to cover each and everything in this post which can help you in fixing these types of issues.
Also, if you are struggling with the “Secure Boot state unsupported Fix” error then also this can post can help you.
Stay tuned for the next post…
Feel free to share your thoughts via comments & also tell us if you know any better way on How to Bypass Windows 11 Secure Boot & TMP 2.0 Check [Fixed].
Don’t forget to share this post.

Hello if I do the first step will there be any problem with my PC? After restart, everything will be fine right ?
Hello Druva,
No, there will be no problem at all because all these methods are safe and proven. Many Windows experts are using these quick registry hacks.
Thanks 🙂
When I copy the install.wim file to the windows 10 drive it says the file is too big it’s 4.5 gb and there’s 27 gb left in the partition is there any way of fixing this
Hello Michael,
For fixing this issue, you need to convert this USB drive from FAT32 to NTFS and then you will be able to copy files bigger than 4GB.
Thanks 🙂
Use the Microsoft media creation tool to download the iso and then use RUFUS to write to USB and make sure the partition is NTFS before you flash 😉