Want to know how to turn on TPM 2.0 in BIOS?
If yes then you are in the right place.
It has been almost 3 months when Microsoft released its first Windows 11 build via dev and beta channel.
But most of the users are still struggling in “Enabling TPM 2.0 Chip“.
Although, Microsoft has also provided PC Health Check App for making this process easier but It doesn’t tell you how to turn it on.
But don’t worry we have got the solution for this.
In this post, I will show you how to turn on TPM 2.0 in BIOS Motherboard of all the major companies like Asus, MSI, Gigabyte, and ASRock.
So, let’s see how it works…
Table of Contents
What is TPM 2.0 Chip?

TPM 2.0 chip basically stands for Trusted Platform Module 2.0 Chip. It is a standard for the encryption process, of course, secure encryption. The first version of TPM was made by a group of tech giants like HP, IBM, Sony, Microsoft, etc. The whole process was going on from 1999 to 2003. These giants want to set a standard and specs for computers according to their hardware. TPM 2.0 is the latest version and before this TPM 1.2 version was used. It was launched back in 2011.
The main feature of this chip is to decrypt and encrypt keys at a very high speed. TPM 2.0 may not be enabled on your PC as default. By following the below steps you can check the status of TPM on your PC.
So, let’s move further…
How to Check TPM 2.0 Status for Windows 11
Your computer may or may not support TPM 2.0 but if it fulfills the requirement of Windows 11 then it may support TPM 2.0 too. It depends on your motherboard whether it has a TPM chip or not.
Follow the below steps for checking status :-
1. Press Windows+R keys, this will open the Run window.
2. Now, type tpm.msc and press Enter.
3. Now, you will see either of these two messages on your screen, first TPM is ready to use and second Compatible TPM cannot be found.
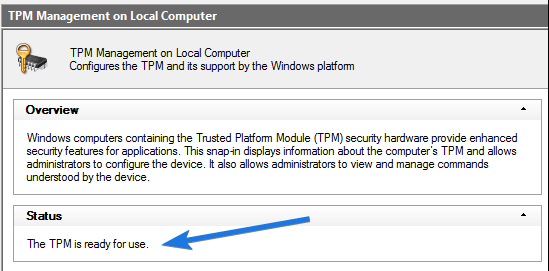
If your PC has the TPM chip but it is not activated then don’t worry we are here for you. Below are some methods for enabling the TPM 2.0.
How to Turn On TPM in Windows 10 Settings
If you are a Windows 10 user and thinking to upgrade to Windows 11 then you must have to follow all these requirements. In this method, I will tell you about the steps to follow for turning on TPM 2.0 in settings.
And here are these steps to follow:-
1. Open Settings on your PC.
2. Click on the Update & Security option.
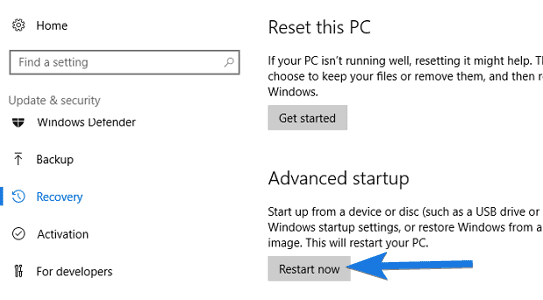
3. Now, go to the recovery option and you will see a ‘Restart Now’ button. Click on it.
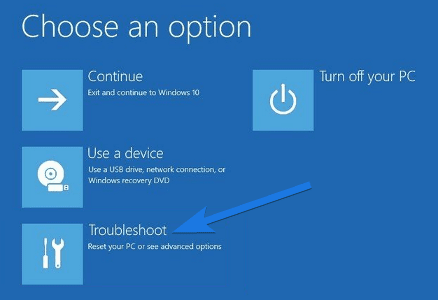
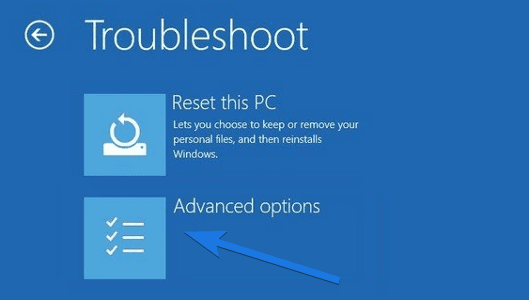
4. A blue window with some options will appear, so click on the Troubleshoot option.
5. After that click on Advanced options.
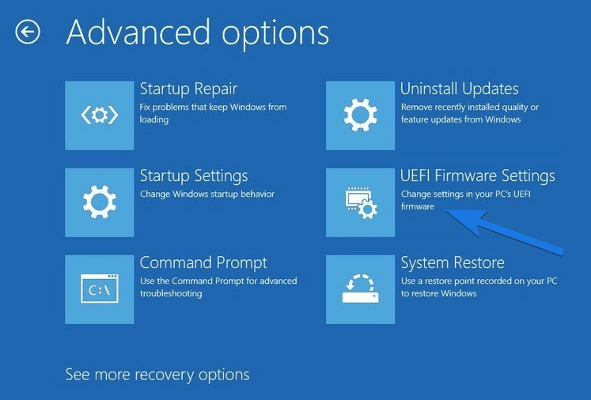
6. Click on the UEFI Firmware Settings and then click on Restart.
7. Now, select the TPM settings configuration and enable it. Restart your computer and wait for some time.
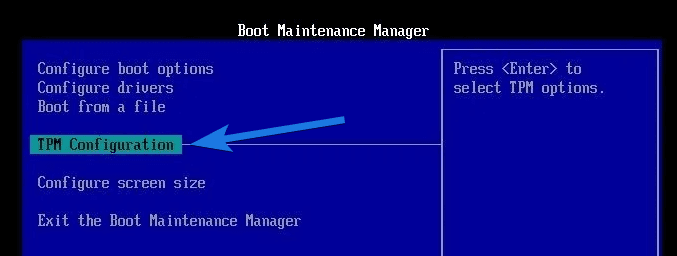
And that’s how you can get into BIOS via Windows 10 settings. And now check your tpm status again and it will be working fine. And if not, then check out this post on how to bypass tpm 2.0 and secure boot.
Now let’s move to the next part…
How to Turn On TPM 2.0 in BIOS [ Asus, MSI, Gigabyte, ASRock ]

Although, turning on TPM settings in Motherboard’s BIOS is pretty easy but I have seen many users are struggling with this. It’s not about being technical or tech savvy but this time everyone is facing such issues. But If you want to install Windows 11 on your PC then these settings are must to be enabled or turned on.
Apart from this, first we will tell you how to turn on tpm in any BIOS. This means that these settings are global and can generally work on any motherboard manufacturer or modules like Intel, HP, Dell, Asus, MSI, Gigabyte, ASRock, and many more.
Now just follow the steps & you will be in Boot Maintenance Manager.
1. Restart your computer and then keep on pressing the dedicated key like F2, F12, or F10, etc. ( Every company has a different key )
2. Now, this will open the boot mode.
3. Now, look for the Security Settings option and open it.
4. You will see a TPM settings option, so enable it and save settings.
5. At last, Restart your computer PC.
Although, these settings really work fine with Intel, Dell, and HP motherboards. But if this doesn’t help much then we have provided a dedicated guide for all the other motherboard companies.
So, let’s dive in further…
Turn on TPM 2.0 in Asus BIOS

Using this method you can easily enable TPM in your Asus motherboard BIOS with Intel and AMD Processors. And you just have to follow the given steps below:-
- Enter BIOS and click on the Delete button. Your computer will start to boot.
- Now, press the F7 key to enter advanced mode.
- You will see the ‘AMD fTPM configuration’ option.
- Change the TPM Device Selection to TPM firmware. OR you can just Select the AMD CPU fTPM and enable it in advance mode. Save the changes and restart your computer.
Note:- These steps are only for AMD users. And if you are an Intel user then, just find Advanced PCH-FW configuration and enable the PTT option.
Turn on TPM 2.0 in MSI BIOS

By following these steps you can easily enable TPM in your MSI motherboard BIOS with Intel and AMD Processors. Now follow this step-by-step guide carefully:-
- Go to the BIOS settings and click on the Delete button. Your computer will reboot itself, wait for the process to complete.
- You will see some options on your screen, press the F7 key (advance mode).
- Click on the settings menu now and then select the security option.
- You will see a ‘device security support’, enable it.
- Now, set the AMD fTPM to the third option in the panel and then Restart your computer.
Note:- These steps are only for AMD users. And if you are a Intel user then, just find Advanced PCH-FW configuration and enable the PTT option.
And now check your TPM should be enabled and recognized by Windows 11 operating system for installation.
Turn on TPM 2.0 in Gigabyte BIOS

Using this method you can easily enable TPM in your Gigabyte motherboard BIOS with Intel and AMD Processors. And you just have to follow the given steps below:-
- Open BIOS settings and click on the ‘delete’ option. Wait for your system to enter the boot mode, you will see some options on the screen now.
- Press the F7 key to enter advanced mode.
- Click on the settings now.
- Now, choose the miscellaneous button.
- Look for the AMD CPU fTPM option and enable it.
- Save the changes made and restart your computer.
Note:- These steps are only for AMD users. And if you are a Intel user then, just find Advanced PCH-FW configuration and enable the PTT option.
Turn on TPM 2.0 in ASRock BIOS

By following these steps you can easily enable TPM in your ASRock motherboard BIOS with Intel and AMD Processors. Now follow this step-by-step guide carefully:-
- Go to the BIOS settings and click on the F2 and delete button. Your computer will start the boot.
- Press the F2 key for entering the advanced mode.
- You will see a popup box now, Choose the AMD fTPM option.
- Save it and reboot the computer again to BIOS.
- Enter the advance mode by pressing the F2 key. Now, you will see a trusted computing option at the top, click on it.
- Now, look for security device support and then enable it.
- If you can’t see a TPM 2.0 device now then save the changes and restart your system.
Note:- These steps are only for AMD users. And if you are a Intel user then, just find Advanced PCH-FW configuration and enable the PTT option.
And now I hope this will help you in fixing your TPM and if they are then I would suggest you to use Windows 11 update Assistant tool for upgrading your PC or Laptop.
Some FAQs
How do I enable TPM in BIOS?
If you want to enable TPM or TPM 2.0 in BIOS then follow these steps:-
1. Restart your system.
2. Use the BIOS key to get into the settings.
3. Now search for TPM configuration and enable it.
4. After that, save and exit the menu.
Can I add TPM 2.0 to my computer?
Yes, you can manually add TPM 2.0 to your computer or PC but I would not recommend it to do. Apart from that, if your system is 4-5 years old then it might already have the Trusted Platform Module 2.0 chip.
How do I know if TPM 2.0 is enabled?
If you want to check if the TPM 2.0 chip is enabled or not then follow these quick steps:-
1. Go to the Start menu and open Run window.
2. Now use tpm.msc command & then hit Enter.
3. Now you will see the status as “TPM is ready to use” if it is enabled.
How do I enable TPM 2.0 and secure boot in BIOS?
Enabling TPM 2.0 and Secure boot in BIOS is almost similar to changing any other BIOS settings. For TPM you can follow the above steps and to enable secure boot check this detailed guide.
That’s it for now…
Conclusion
So, that’s how you can easily turn on or enable the TPM settings by using your motherboard BIOS. In case, if your PC does not has the TPM chip then you can check out our latest post on how to bypass Windows 11 Requirements.
Also, we have tried to cover all the major motherboard companies and if we have left any of them, please let us know.
Stay tuned for the next post…
Feel free to share your thoughts via comments and also tell us if you know any better sources on How to Turn On TPM 2.0 in BIOS [ Asus, MSI, Gigabyte, ASRock ].
If you liked this post, don’t forget to share.
