Want to take screenshot in Windows 11?
If yes, then you are in the right place.
Nowadays, taking screenshots has become a very basic requirement for everyone. Whether you are a student, project manager, freelancer, or working in an office.
And in this pandemic situation, the need for this has risen to a great extent.
And as we already know that the new Windows OS is here, that’s why I would recommend you to learn how to take screenshots on Windows 11 on your Laptop, Computer, or PC.
Because this will help you to easily capture your screen even if you have upgraded to Windows 11.
Although, the process is almost the same as Windows 10 but due to the new user interface some users might face difficulties in it.
So let’s see how this post helps…
Also Read: How to Use Windows 11 Snipping Tool.
Table of Contents
7 Best Ways to Take Screenshot in Windows 11 in 2021
But before we dive in further, I want to give you a quick overview.
In the above section, I have already told you that you may find some ways or methods similar to Windows 10, 7, or 8. But that’s not all, we have also mentioned all the other possible ways that you can use to capture any screenshot on your Windows 11 PC.
Not only this, but we have also mentioned some quick hacks using the PrtSc key which can be easily used for taking screenshots of any specific area or the entire screen. Moreover, the Snip & Sketch is similar to the previous version but we have also added some great third-party apps for screen capturing.
So without further ado, let’s get started.
How to Take Screenshot In Windows 11 Using Snipping Tool

I know that there are so many other ways to capture screenshots on Windows 11 instead of only using the Snipping Tool.
But I am only sharing this first because this is the most widely used tool among all windows users. And that’s why it would be easier for all users to use it efficiently on the latest Windows OS.
And if you don’t know much about this tool then here is a quick guide.
Snipping Tool is a great Windows utility provided by Microsoft to take screenshots or snapshots from your PC screen. And it’s pretty easy to use, just you have to follow the given steps:-
1. Go to Search Icon present in the Windows 11 Start Menu and then search for Snipping Tool & press Enter.
![]()
2. Now the Snipping Tool will open up & then select the Mode of Selection and then click on the New button.
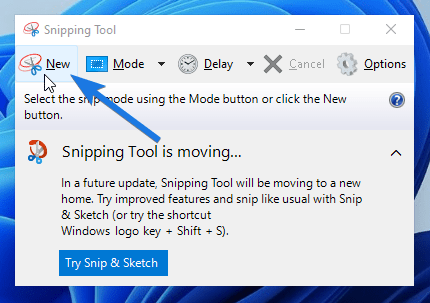
Here are some different Modes which you can choose like Full-screen, Free-form, Rectangular & Window Snip.
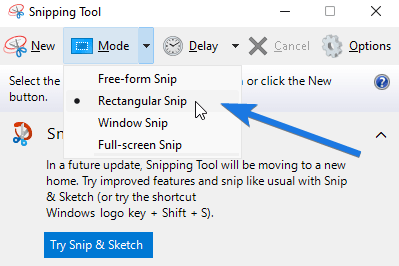
3. Now select the Desired Area which you want to capture as a screenshot.
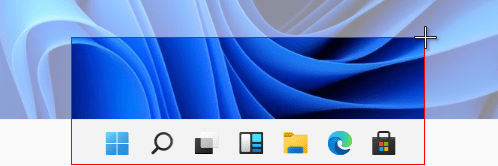
4. After that, it will open up in a New Window and then click on File & then click on Save As option. ( You can also press Ctrl+S shortcut key )
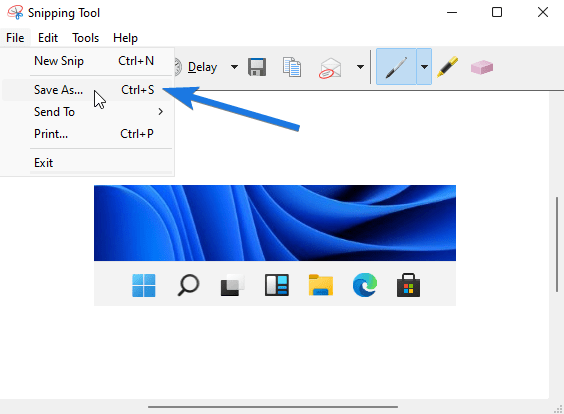
Now your screenshot will be saved as an image file & the best part is that you can also choose between different formats like PNG, JPEG, GIF while saving it.
So that’s all about taking screenshots with snipping tool, now let’s move to some quick hacks using keyboard shortcut keys.
Use Print Screen Key
I would say this is the quickest way to capture screenshots in Windows 11 or any other Windows OS. Just you have to press the “Print Screen” key which is also known as PrtSc, PrtScr, and PrtScn & done.

Basically, this print screen key helps you to copy the entire screen of your Windows PC to the Clipboard. And then to convert it into a screenshot image, you need to paste it into the Paint or 3D Paint app & then save it as a PNG or JPEG image file.
Note:- It is very easy to find the “Prt Sc” key but on some keyboards, you may also need to press the “fn + Prt Sc” keys at the same time.
Use Alt + Print Screen Shortcut Key
This way is almost the same as the previous one, just you have to use one more key with it. So, press “Alt + Print Screen” simultaneously and this will help you capture a screenshot of the active window.

Although, this method is almost the same but the biggest advantage of using these shortcut keys is that it copies a screenshot of an active window instead of taking the entire full screen. Similar to the previous one, you need to paste it into the Paint or 3D Paint app & then save it.
Quick Tip:- To make this process faster you can also use the “Ctrl + V” shortcut keys to paste screenshots from the clipboard.
Use Windows + Print Screen Shortcut Key
However, both the above keyboard shortcuts are pretty fast to capture Windows 11 screenshots. But one thing which I didn’t like is that we have to open the Paint App and then paste it & then save it.

But if you press the “Windows key + Prt Sc” shortcut keys simultaneously, you can easily fix this. Because pressing these keys will allow you to capture these screenshots and then automatically save them as a PNG image format. And you can find all these captured screenshots in the “Pictures” folder of your PC.
Note:- In some keyboards, you may need to press “Windows key + fn + Prt Sc” simultaneously for doing the same.
That’s all about the keyboard shortcuts, now I will share a method where you can easily take screenshots on Windows 11 without using a keyboard.
How to Take a Screenshot on Windows 11 Using Snip and Sketch App

Although, all the above methods work really great but if you want some additional features to edit screenshots & make them more attractive then the Snip and Sketch App will help you.
Snip & Sketch is an application to capture snapshots or screenshots which is provided by Microsoft Windows. It is also known as the advanced version of the Snipping Tool. However, it is not much popular as compared to the snipping tool because it was mainly introduced with Windows 10.
However, you can easily use this by just pressing the “Windows + Shift + S” shortcut keys. But here I will share a simple trick which you can use if your keyboard is not working or want to take screenshots without using keyboard.
So, just follow these steps:-
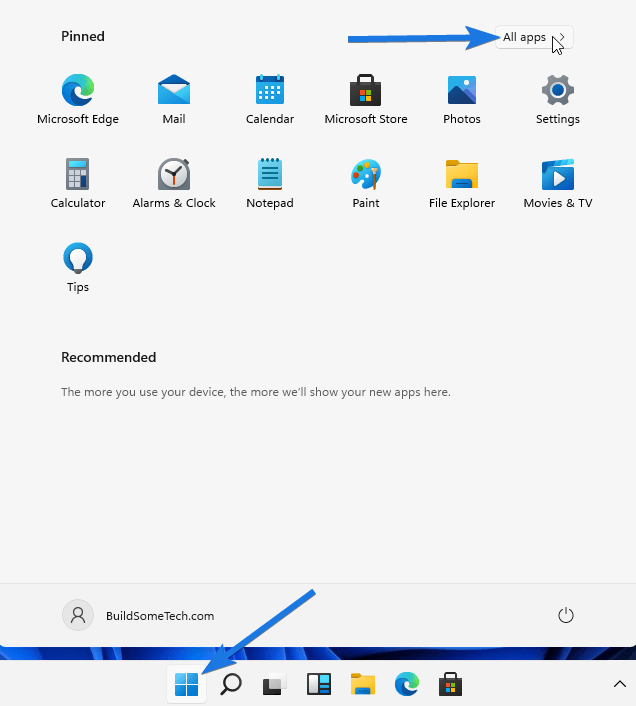
1. Go to Start Menu and then click on All apps on the top-right corner.
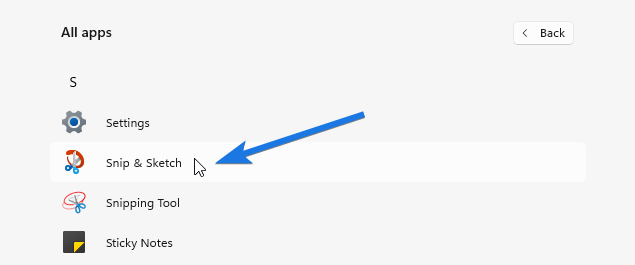
And then scroll down all the apps & there in the S section you will find a Snip & Sketch app, so click on that.
2. Now the Snip & Sketch app dialog box will open up and then click on the New option.
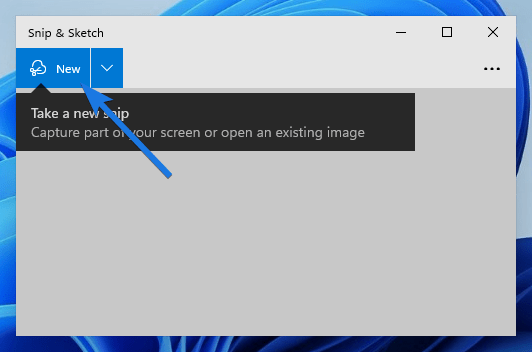
Now your screen will be dimmed, showing all the available options like Rectangular, Freeform, Fullscreen, Window screenshot.
3. After that, select the desired Snip shape and then select the region which you want to capture as a screenshot.

4. At last, the Snip & Sketch app will open showing all the available features for editing the screenshots, so use them accordingly and then click on the Save icon to save it as an image file.
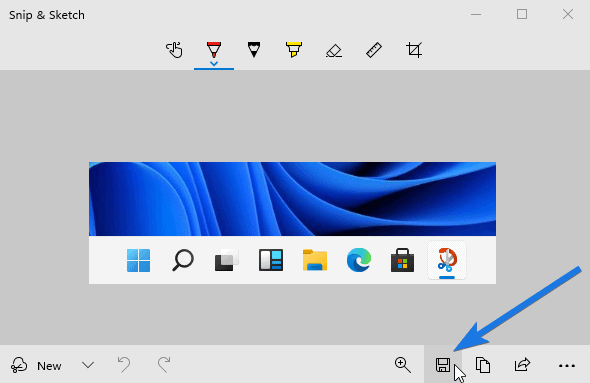
Quick Hack:- You can also enable the “Prt Scr” key to directly launch the Snip and Sketch app by changing Accessibility Settings > Keyboard.
How to Use Xbox Game Bar for Taking Screenshots

Although, Windows 11 was released by Microsoft on 24th June but if we look at the previous updates, Xbox Game Bar was already given in the Windows 10 updates.
Xbox Game Bar is an app developed for PC gamers to easily record, screen capture & share all the screenshots or videos with their team members instantly without using any third-party app.
And if you don’t know how to use it, then follow the given steps:-
To take a screenshot in Windows 11, press “Windows + G” to launch the Xbox Game Bar app & then click on the “Capture icon“.

After that, the Capture dailog box will open up, so click on the “Camera icon” & then your screenshot will be auto saved.
![]()
And this would be definitely a game-changer for all PC gamers as Microsoft has done so much work on improving the gaming performance of this new Windows OS.
And if you don’t believe then check out this post on Is Windows 11 Faster than Windows 10?
Using third party Screenshot Apps
Although I always prefer using the in-built Windows app for any task but to use more additional features they are not enough. And that’s why the demand for third-party apps is increasing enormously.
Here I am going to share some best free screenshot apps for Windows PC which you can easily use to take some awesome screenshots.
ShareX ( Always Recommended )

ShareX is one of my favorite tools when it comes to capturing any screenshot on my Windows PC. One thing which I really like about this tool is that it is easy to use and has lots of features.
Here are some features which I would like to mention:-
- 100% FREE
- Screen & Video Capture
- Lots of Shapes, Icons, Cliparts
- Blur and Pixelate Feature
- Image Editor to edit screenshots, resize, crop, & add visual effects.
- Screen Recording & also supports GIFs
- Automatic Upload to Imgur, Google Drive, Photobucket, etc.
Some Other tools
Here are some other tools which you can use for taking screenshots in Windows 11.
Now let’s check out some bonus stuff.
Bonus: Best Chrome Screenshot Extensions

Although, you can easily use all the above ways to take screenshots on your Google Chrome browser. But still, if you want a specific chrome extension or you are using a Chromebook Chrome OS then check out the given below extensions.
Here we have mentioned some Best Screenshot & Screen Recorder.
- Awesome
- Nimbus
- LightShot
- Fireshot
- GoFullPage Screenshot
Some FAQs
How do you take a screenshot on Windows?
Taking screenshots on Windows is pretty easy, just you have to use the Print Screen Key with different combinations of keys. Like “PrtScrn”, “Alt + PrtScn”, “Windows Key + PrtScn” or you can also use ” FN key” with them.
How do I quickly take a screenshot on a PC?
To take screenshots quickly on a PC, just you have to press Windows Key + Print Screen & then the screenshot will be automatically saved to the Pictures folder. You can also find Print Screen Key named PrtScn or PrtScrn.
How do I take a screenshot instantly in Windows?
Taking screenshots instantly in Windows is easy, just press the “Alt + PrtScn” & then it will automatically capture the screenshot of the active window. And then using Paint or Image editor you can easily save this screenshot as a PNG or JPEG image.
How do I take a screenshot on my computer keyboard?
You can use various ways to take screenshots on your computer using your keyboard. But the easiest one is “Windows Key + Print Screen” or “Windows Key + Fn + Print Screen” because it autosaves the screenshot by only using the keyboard.
That’s it for now…
Conclusion
So that’s all about taking screenshots & snapshots on your latest Windows 11 operating system. In this post, we have tried to cover almost every type of screen capturing apps, extension, or tool. And you can easily use them on any laptop brands like Dell, HP, Lenovo, Asus, etc.
Also, all the above-mentioned methods are valid for all Windows OS like Windows 10, 8, 7, etc.
Feel free to share your thoughts via comments & also tell us if you want to suggest any other best ways on How To Take Screenshot in Windows 11.
If you liked this post, don’t forget to share.
