Want to Install Windows Subsystem for Android?
If yes then you are in the right place.
Microsoft has recently released the Android apps support for Windows 11.
But currently, it is only available for the Insider Preview Program users via a beta channel.
Moreover, this update is only released for the US ( United States ) users which means outside that region you won’t be able to install it.
But don’t worry we have a solution for this. And it’s pretty easy to fix this issue, just you have to follow the steps.
In this post, I will show you how easily you can get & install Windows Subsystem for android ( WSA ) on your Windows 11 PC / laptop.
So without further ado, let’s get started…
Also Read:- Amazon App Store Windows 11 Download.
Table of Contents
How to Install Windows Subsystem for Android in Windows 11
However, Windows Subsystem for Android ( WSA ) is only available for US ( United States ) users only. And for that, they also need to enroll in the Windows Insider Program and get updates from the beta channel.
And if you fulfill both the above requirements then no worry, you can easily install this WSA from Microsoft store within a few clicks. But if you are from some other region then you need to follow the below-mentioned steps and manually install it on your PC.
So, let’s see how it works…
1. Minimum Requirements
But before we begin, here are some minimum requirements which are required for running Windows Subsystem for Android and Amazon Appstore on any PC or laptop.
- Processor: Intel Core i3 8th Gen, AMD Ryzen 3000, Qualcomm Snapdragon 8c or above
- RAM ( Memory ): 8GB ( 16GB recommended )
- OS: Windows 10 version or higher
- Architecture: ARM, ARM64, x64, x86
- Updated Microsoft Store app version
Source:- Microsoft.com
Now let’s move further…
2. Virtualization Must be Enabled
Although, android OS on PC looks really cool to everyone. But have ever you thought that how they are doing it and which technology they are using. It’s virtualization, which enables us to run multiple OS simultaneously on a single machine. And that’s why for running WSA we also require this feature.
So, let’s see how to enable it on Windows 11:-
- First, go to Start Menu.
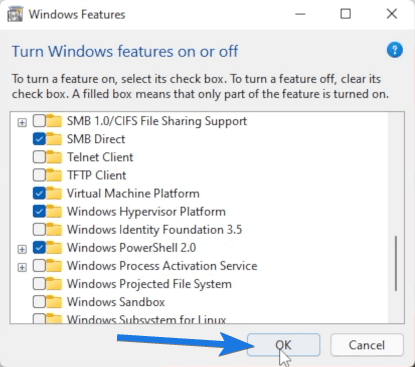
- Now search for Turn Windows features on or off & then hit Enter.
- After that, enable the Virtual Machine Platform and Windows Hypervisor Platform option & then click OK.
- At last, click on Restart now.
3. Enroll Windows Insider Program [ Beta Channel ]
Once you enabled virtualization, the next step is to enroll in the Windows Insider Program via Beta Channel. And if you have already enrolled then that’s great, you can move further. But if you haven’t then you can follow the below-mentioned steps.
- First Go to Settings and then go to Windows Update.
- After that, go to Windows Insider Program option.
- Now click on Get started button & then link your Microsoft account.
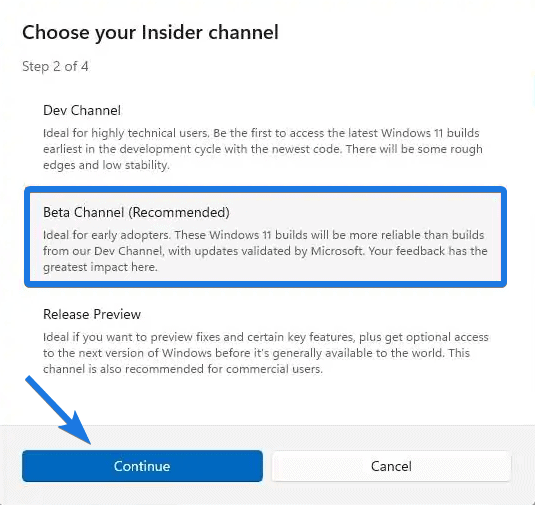
- Now select the Insider Channel as Beta Channel (Recommended) and then click on Continue button.
- At last, restart or reboot your PC / laptop.
And if you are struggling in this process, then you can check out this detailed guide on How to Get Windows 11 Early Access where I showed all the steps in detail.
Now let’s move further…
4. Change Country or region [ Optional ]
If you are from the US ( United States ) then that’s great, you don’t have to do these settings. But if you belong to some other region then you must follow these settings.
And here are steps to change in Windows 11:-
- First, Go to Settings.
- Now go to Time & language and then click on Language & region.
- Now scroll down and then under Region section, change Country or region to United States.
- At last, open Microsoft Store & then Sign out from it and then again Sign in with your Microsoft account.

And after following all these steps your country or region will be changed to the United States and you will get all new updates.
Now let’s move further…
5. Install Windows Subsystem for Android from Microsoft Store
Basically, there are two ways to install Windows Subsystem for Android, first is by installing Amazon AppStore will automatically install WSA and the second one is by installing Windows Subsystem for Android with Amazon Appstore which installs both of them in one go.
Now let’s see the first way:-
Installing Amazon AppStore
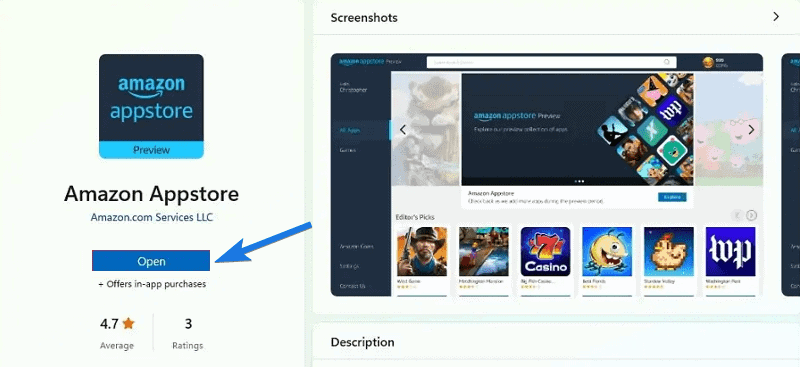
- First, open Microsoft Store.
- Now search for Amazon Appstore or simply click on the link.
- After that, click on Install button and then Open it.
Now you have successfully installed Amazon AppStore from the official Microsoft Store. And using this, you can easily run android apps on Windows 11 PC. But if you are facing any issues while installing it. you can follow the next way.
Now let’s see the second way:-
Installing Windows Subsystem for Android with Amazon Appstore
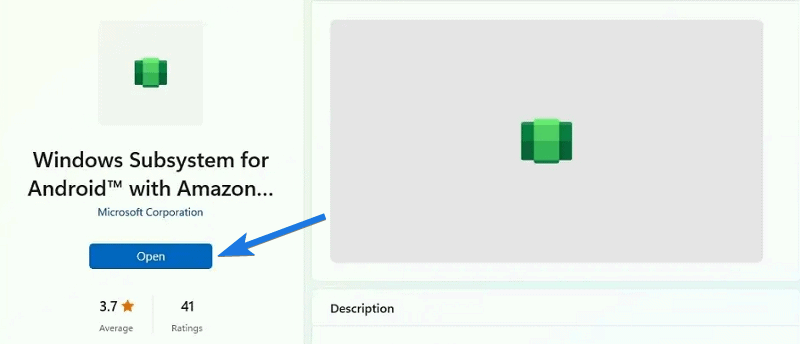
- First, open Microsoft Store.
- Now search for Windows Subsystem for Android with Amazon AppStore or simply click on the link.
- After that, click on Install button and then Open it.
And Done! Now both Windows Subsystem for Android and Amazon Appstore is installed on your Windows 11 PC. But if you are still facing any issues then the only option left is to do a force installation.
Now let’s move further…
Manual Installation using PowerShell [ Windows 11 ]
Although, Installing Windows Subsystem for Android or WSA from Microsoft Store is a pretty easy task but if they doesn’t work fo you then you can forcefully install it by doing manual installation using PowerShell.
And here are the steps to follow in Windows 11:-
1. First, download Windows Subsystem for Android from the given link.
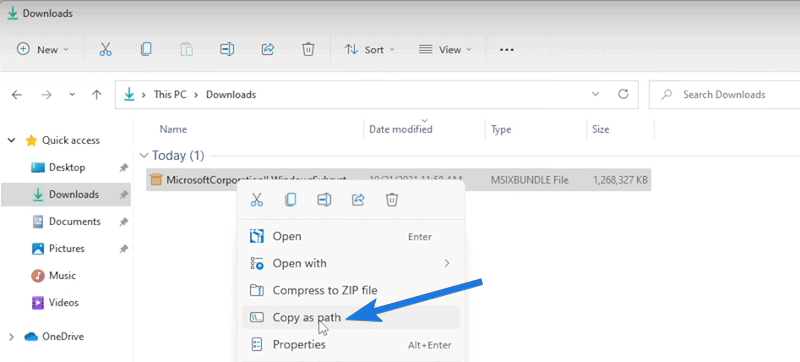
2. After the file is downloaded, Go to the download folder and then right-click on it and select copy as path option.
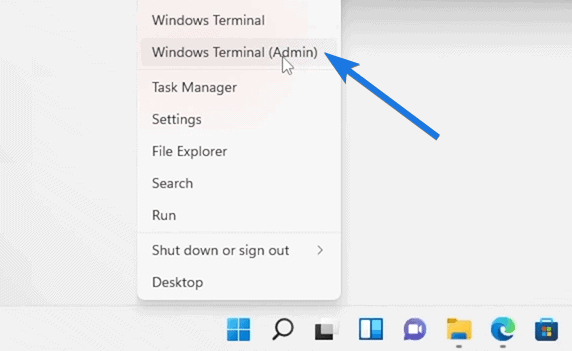
3. Now right-click on the Start Menu and then select Windows Terminal (Admin) option.
4. Now type the given command with the path of the .msixbundle and then press Enter.
Command:- Add-AppxPackage -Path

5. After that, wait for few minutes till installation process completes.

And Done! Now go to Start Menu and there you will see Windows Subsystem for Android™, so click on it and start running android apps on your Windows 11 PC / laptop.
That’s it for now…
Conclusion
So, that’s all about installing Windows 11 Subsystem for Android and Amazon Appstore on your computer. Moreover, we have tried to cover each and everything related to this WSA subsystem and how you can use it on your system or machine.
Also, if you face any issues like “this app will not work on your device” then please let us know.
Stay tuned for next post…
Feel free to share your thoughts via comments and also tell us about this post on How to Install Windows Subsystem for Android in Windows 11.
If you liked this post, don’t forget to share.
