Want to download Tiny11 Builder?
If yes, then this post is definitely for you.
One of the most common reasons why people still prefer Windows 10 over the latest version 11 is that, it is highly bloated.
While it is possible to debloat Windows 11 after the installation but this process can be very time-consuming.
But what if there was a way to create your own lite edition or a pre-debloated version of the ISO file with some easy steps? That’s where this “Tiny11Builder” comes in to help you.
And the best part, it can easily work on low-end PCs with minimum system requirements. Furthermore, you can also get rid of Secure Boot and TPM 2.0 errors, which were the main problems of this operating system.
So without further ado, let’s get started…
Table of Contents
What is Tiny11 Builder?
Tiny11 Builder is a script that is commonly used to create a stripped-down version of Windows 11. It is developed by NTDEV and can be used as a tool to remove useless bloatware and junk files from the original ISO image file. Basically, this helps us to make our operating system light so that it can run on devices with lower specifications which are mostly unsupported by the latest operating system.
Moreover, the debloated version created by this tool can also bypass Secure Boot, TPM, and other requirements which allows us to work with low RAM capacity or older systems. Apart from that, you can also remove unnecessary widgets and apps ( Microsoft Edge, Cortana, OneDrive, Quick Assist, Office Hub, Your Phone, Media Players, etc.) to make your system lightweight, so that it can run smoothly.
How to use Tiny 11 Builder?

Before using this app, it’s better to know which version it supports like the latest one is 22621.2361 ( Windows 11 23H2 ), and it is fully compatible with this build version. So, this means that you can easily trim down this image without any issues.
But if you feel that this process of creation will take more time, then you can also download the tiny 11 22h2 ISO from here, which is officially provided by NTDEV. Or if you are interested in creating your own light version with your preferred apps like Microsoft Teams or more, then use the given steps.
Note:- If you are still unsure of this third-party tool, you can install it on a virtual machine first then get your hands on it, and then install it on your main system.
1. Download Tiny11 Builder & ISO File
First, you need to get the ISO file of Windows 11 from this link which gives you multiple links for different versions. Besides that, you can also get it from the official Microsoft website without worrying about whether it’s genuine or not. Also, make sure that you save the correct version & architecture ( x64 ) of the file.
Once done, the next step is to download the Tiny 11 Builder from the NTDEV’s GitHub Page. The file size of this script is around 100 KB and can easily run on a system having 4GB of RAM.
2. Mount ISO Image File
The second step is mounting an ISO on your device. I know it is very easy to do but if you don’t know then follow the given steps. You can also use third-party apps to Mount but we prefer the default Microsoft tools for it.
- Open the File Explorer.
- Go to the directory where the Windows 11 ISO was downloaded.
- Now right-click on the ISO file and then select the “Mount” option. If you got a security warning from Windows, then don’t worry it’s totally fine.
- After that, navigate to “This PC” in the file explorer and you will see the ISO image mounting there. You can check it by opening the drive if it is properly working or not.
Note:- Please note down the “Virtual Drive Letter” where the ISO was mounted.
3. How to Make Windows 11 Lite using Tiny 11 Builder
However, there is nothing in this process that can go wrong but make sure to follow all the steps carefully as it involves some delicate commands.
1. First, locate the “Tiny11 Builder” zip file that was downloaded earlier and then extract it into a new folder.
2. Now open the folder, right-click on the “tiny11 creator.bat” file, and then select the “Run as administrator” option.
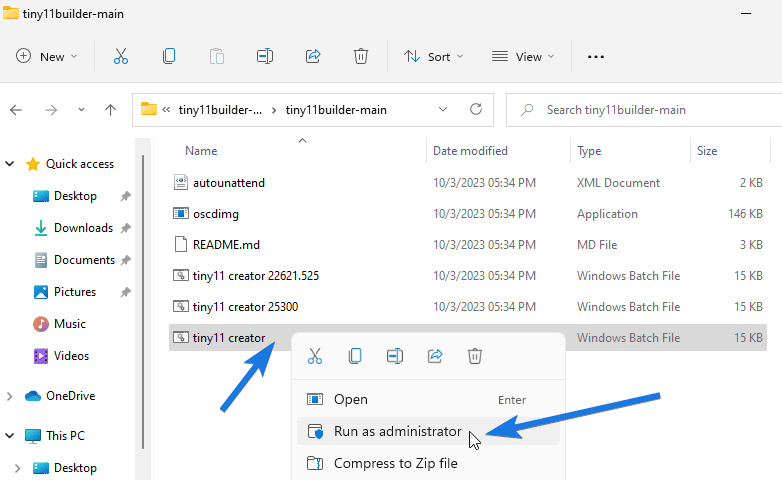
Note:- If you want to use it for specific builds such as 22621.525 and 25300 then use the specific bat file from the folder.
3. After that, a command prompt dialog box will open up. Now type the “Drive Letter” that you noted above, where the ISO file was mounted, and then hit the Enter button.

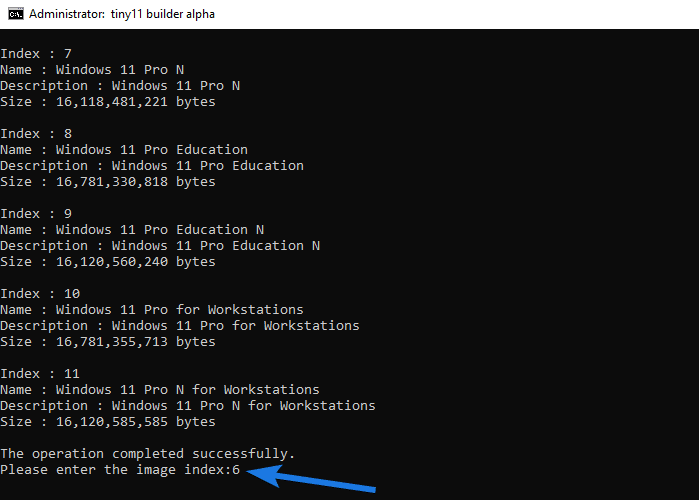
4. Now it will start copying the files from the drive and once done, it will display all the different versions from it with the index numbers. After that, type the “Index Number” of the version that you want to debloat and then hit the Enter button.
5. After that, the script will start debloating the ISO Image files by removing all the unnecessary apps, bloatware, system requirements, and more.
6. Once the ISO creation is done, you can close the command prompt by pressing any key from your keyboard.
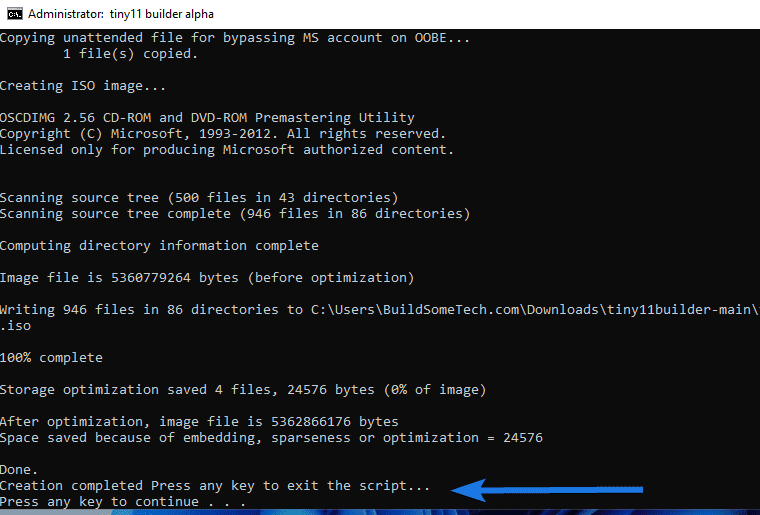
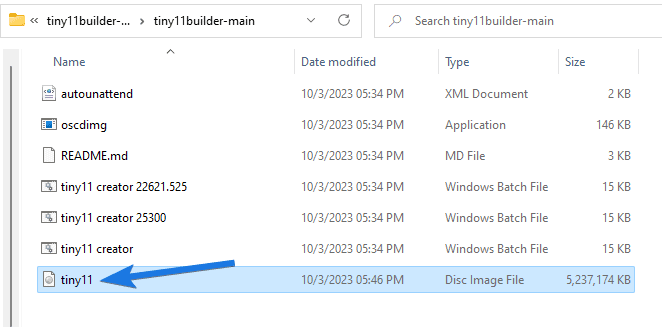
Note:- You will find the newly created “tiny11.iso” in the same folder from where you launched the tiny11 builder .bat script file in starting.
A Brief Overview of Tiny11 Installation
Although, the installation process of tiny ISO is almost similar to the normal Windows 11 but still here, I have given a brief overview here. Also, to make a bootable USB you will need a media creation tool like Rufus.
- Download and Install Rufus.
- Open the Rufus tool and then select the “USB flash drive” that you want to use as a bootable device.
- Click on the “SELECT” button and then select the “Tiny 11 ISO” image.
- Make sure that the Partition scheme, Target system, and other preferences are correctly configured.
- Now click on the “Start” button.
Once the bootable USB is created, you can proceed with the installation. You will notice that many of the default components are missing, such as pinned icons and most of the pre-installed apps. However, the bootloader or the Welcome screen will be the same but you may find very less apps because to make it lightweight all the bloatware is deleted which takes up space and resources unnecessarily.
Also, if you look into the Local disk “C: Drive” you will see that tiny11 only takes up 8 GB of Space whereas the normal Windows 11 takes around 20GB of space on the hard drive, after installation. ( It’s a significant difference )
That’s it for now…
Conclusion
So, that’s how you can easily create your own custom ISO image using the Tiny 11 Builder, which is slim in size, less cluttered, and free from unnecessary bloatware. Also, if you are looking for some of the other lightest versions of Windows 11 then you can try the Ghost Spectre edition.
Furthermore, this tool works with all the different versions such as Home, Basic, Pro, Education, Server, and Enterprise.
Stay tuned for the latest posts…
Feel free to share your thoughts via comments and also tell us about this post on Tiny11 Builder Download and How to Make Your Windows 11 Light.
If you liked this post, don’t forget to share it.
