How to Install Windows 10 From USB Flash Drive?
If you are searching for this, then you definitely gonna love this post.
Earlier, we used to have lots of options for installing any new operating system on our Laptops and Computer PC.
But nowadays, most companies like Dell and HP do not even include any CD or DVD drives on their devices.
Because of this, the majority of users are shifting to USB drives.
And that’s why in one of our latest posts, I have also installed Windows 11 using USB and it is working really great.
Apart from that, I have also seen many users are still facing issues with the installation part of Windows 10 and have failed to set up it properly.
But don’t worry, we have created this special guide for you.
So, without further ado, let’s get started…
Table of Contents
How to Install Windows 10 From USB Flash Drive [ Complete Tutorial ]
But before we dive in further, here is a quick overview.
Basically, this tutorial is divided into two parts. First, we will prepare for the media creation and then we will move to the installation part.
And for that, you need to fulfill some prerequisites.
- A USB Flash Drive or Pendrive ( 8GB or greater )
- A Bootable USB Tool for the creation part.
- Windows 10 ISO File ( Microsoft Link or Download Link )
And if you don’t have an ISO file, then you can easily create ISO from your DVD or you can also download it from the given link.
Once you have all the things, you can easily install Windows 10 from a USB drive using this detailed step by step guide with pictures.
Note:- Please make sure that your device is 70-80% charged if you are installing it on a laptop, notebook, or tablet.
Now let’s get started…
1. Create Bootable USB Installer

If you are installing this operating system on a new PC then I would suggest you to arrange another already working PC, so that you easily create Windows 10 bootable USB from ISO by following the given steps in this article. Where we have used two different tools for the creation of USB, one is Media Creation Tool and the second one is Rufus.
Note:- Don’t forget that creating a bootable USB will format or erase all your data present on the pen drive.
2. Configure BIOS Settings
Once your bootable device, the next step is to boot from this USB drive and for that, you need to configure your BIOS Settings. Now insert the USB that you have created in Step 1 and then Restart your Computer or Laptop. After that, while it is getting started, press the Boot Menu Key or BIOS Key flashing on your screen.
Some common BIOS keys are Esc, Del, F1, F2, F11 & F12 and if they don’t work for you then you can search on the internet according to your motherboard manufacturer.
Now once you are in the BIOS Settings, go to the Boot Menu section and change the Boot Order priority from the hard drive / hard disk to the USB flash drive as 1st priority, save the BIOS settings, and then Exit.
Bonus Tip:- You can also use the F10 Key to simply save and exit the BIOS settings.
3. Starting Windows 10 Installation
Once the Boot Order is successfully changed to USB Flash Drive, now Restart your CPU and then you will a message “Press any key to boot from CD/DVD…“, so press any key at that time. ( I prefer using arrow keys )
After that, the setup will start booting and loading the Windows 10 installation files from the bootable USB.

Note:- The major benefit of using a USB stick is that it loads all files very fast and makes the setup process easygoing.
4. Installing Windows 10 Setup
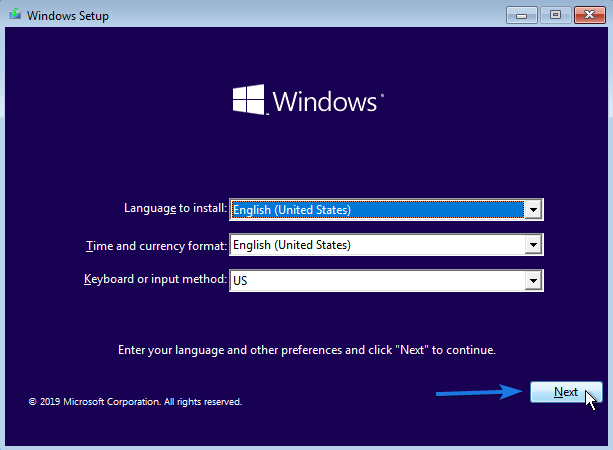
Now select the Language to install, Time and currency format, and Keyboard or input method according to your preference, click on the Next button.
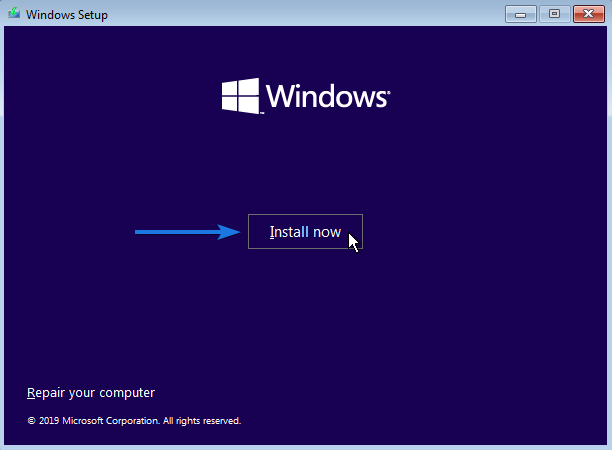
After that, click on the Install now button and then wait for a few minutes while the Windows setup moves to the next screen.
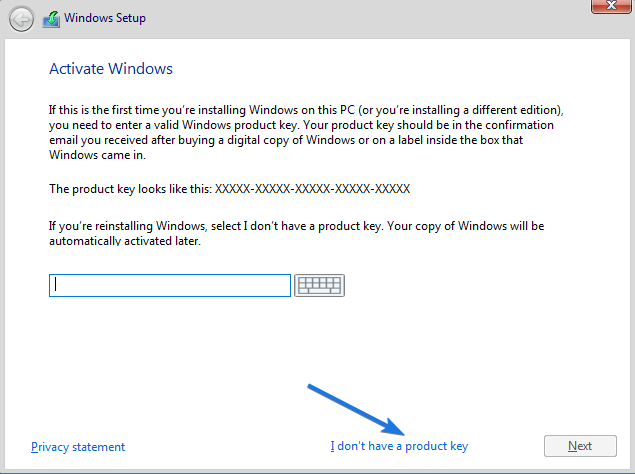
Now it will ask for the “Product Key to Activate Windows” and if you have it then type in there or simply click on I don’t have a product key link.
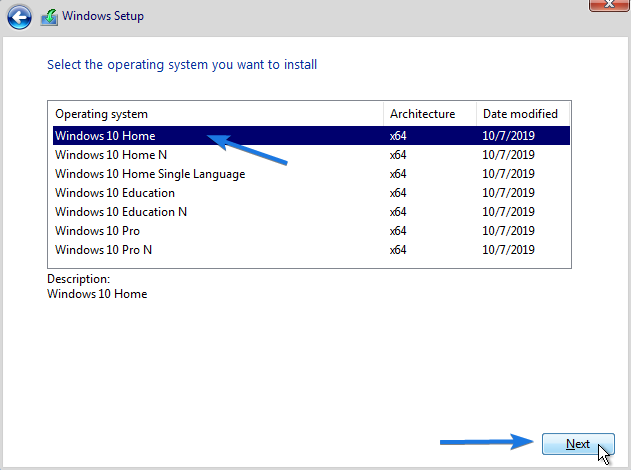
And then it will ask you to “Select the operating system you want to install“, so select any of them and then click on the Next button. ( Like I have selected the Windows 10 Home 64 Bit version )
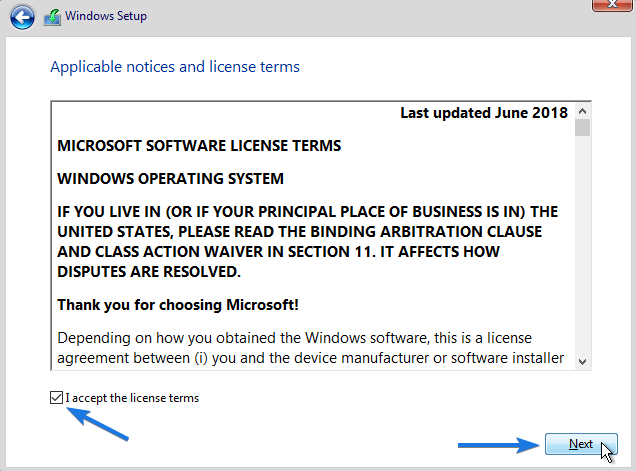
Now it will show the Microsoft Software License Terms and conditions, If you want to read them then you can do. If not, then simply scroll down and enable the checkbox of I accept the license terms, click on the Next button.
5. Type of Windows Installation
Now here you have to choose the type of installation you want to do. If you want to keep all your files, settings and programs then choose the Upgrade option. And if you are thinking of “how to fresh install Windows 10” then click on the Custom (advanced) option.
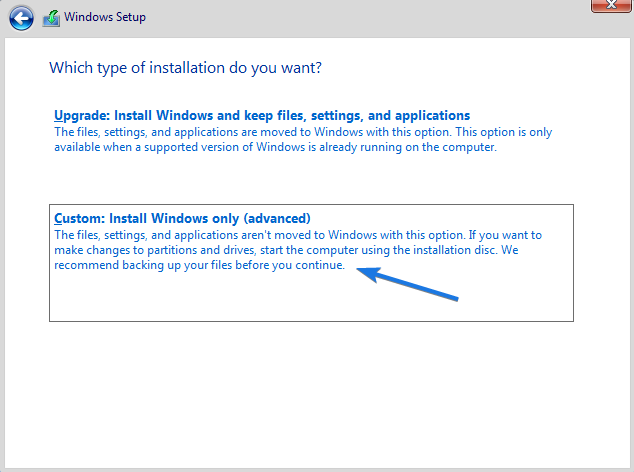
Note:- Fresh install or clean install, both are similar installation that helps you to Wipe all your old Windows operating system file. ( which is a better option if you are doing it on a new PC )
6. Drive / Disk Partitioning
In this part, you need to select the disk partition where you want to install Windows from USB and also make it a primary boot partition. Here, you will also see all other partitions which were created for the old operating system. And If you want to use them, then you can do it now or you can also create new partitions later by using the AOMEI Partition Assistant tool.
However, I don’t recommend creating new partitions as it will only consume your time. But if these partitions really matter to you, then go to the Drive options (advanced) and then click on the New button & enter your partition size in MB (Megabytes). Also, if you are not sure about the size then I would suggest you to check out this post on how big is Windows 10.
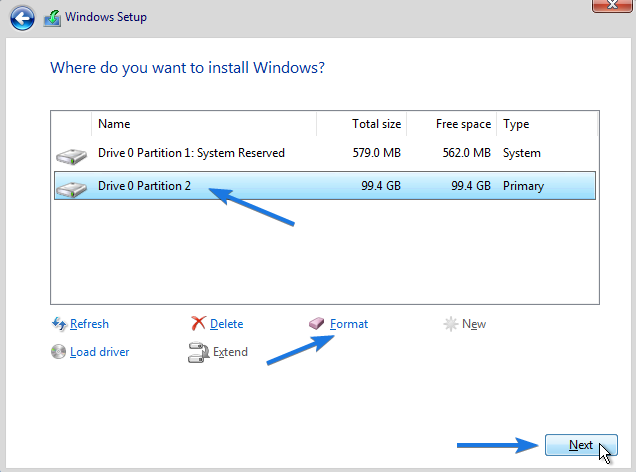
Once the partitions are ready, now select the partition and then click on the Format option & then click on the Next button.
7. Installing and Copying Windows Files
Now, wait for 8-10 minutes while the setup is copying Windows files and getting files ready for installation.
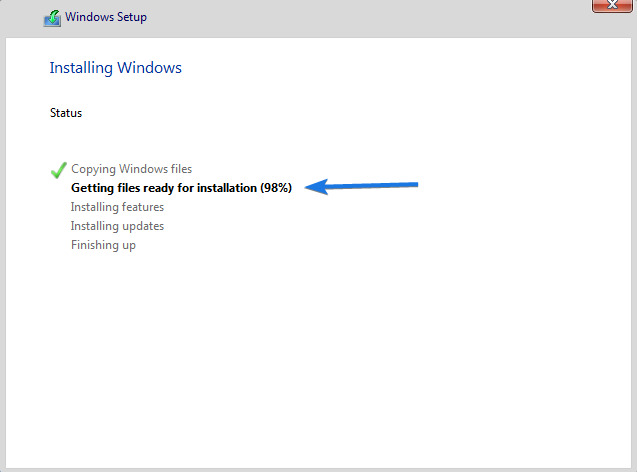
Once all the files are copied and installing features & updates are done. It will automatically Restart or Reboot the PC and after that, you will see a message “Getting devices ready“.

Good job! Now Windows 10 has been successfully installed on your hard drive but you are still left with the preferences part, so let’s move to it.
8. Win10 Basic Preferences
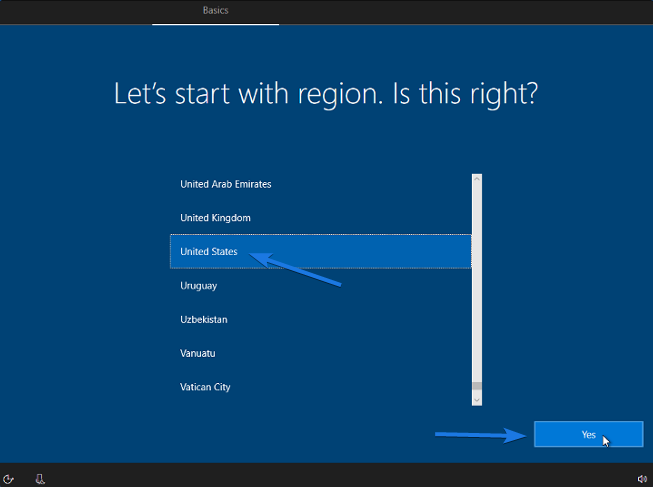
Now once your device is ready, you move to the preferences part. So, select the Region as the United States or you can also select according to the region where you live and then click on the Yes button. Also, if you are in a hurry then you can also pause here and can resume it again because this will some more time. And if you want to know the exact time then check out our informative post on how long does it take to install Windows 10.
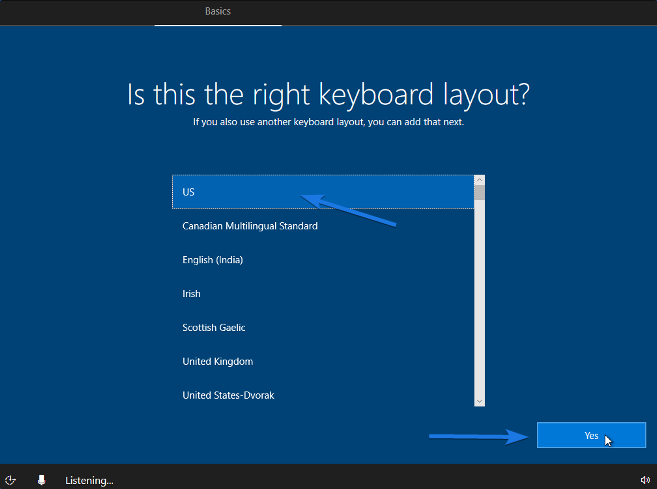
After that, select the right keyboard layout as US or English (India) and then click on the Yes button.
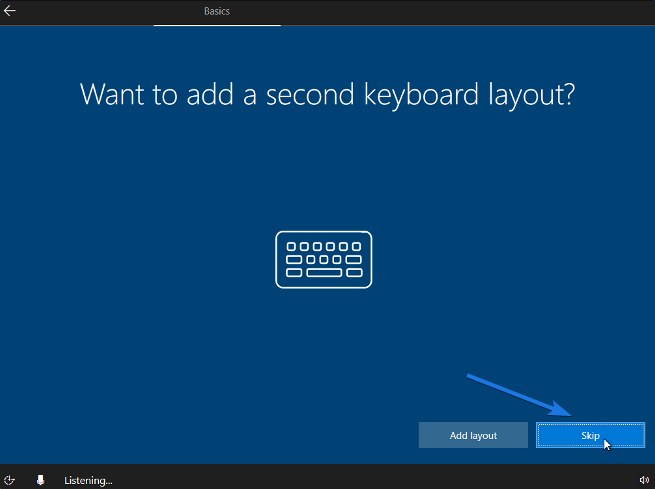
And if you want to add a second keyboard layout, then click on Add layout or simply click on Skip.
9. Creating a User Account & Password
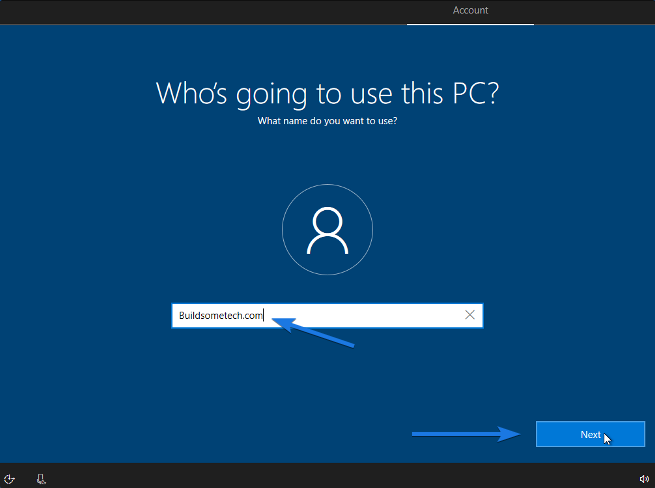
On the next screen, it will ask “Who’s going to use this PC?”. So, type in the User Account Name and then click on Next.
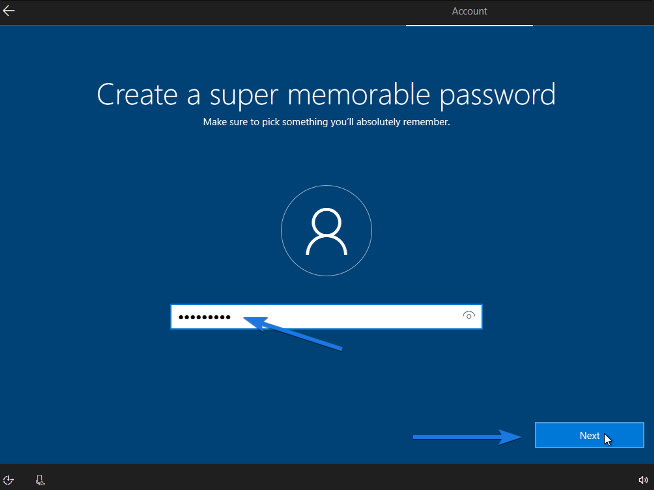
Now create a super memorable password for the User Account and then click on Next.
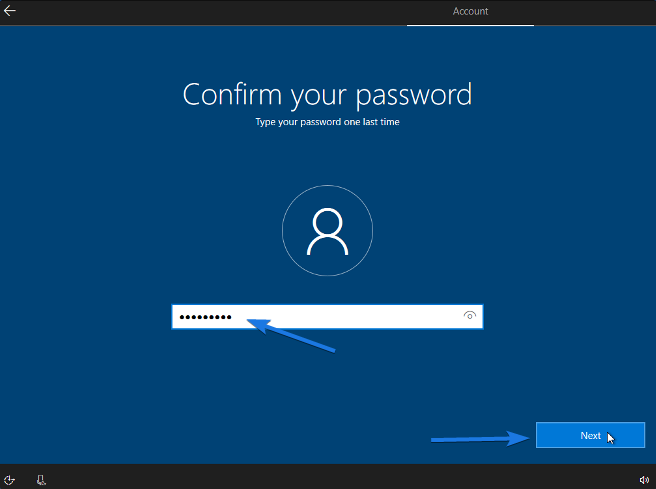
And then confirm your Windows password and then click on Next.
After that, it will ask to create security questions for this account. So choose them wisely which you can remember and then click on Next.
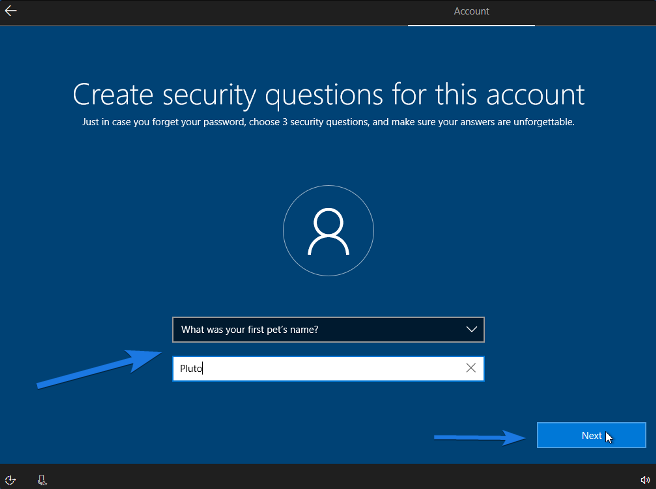
Note:- If anytime you don’t remember the password, these questions will help you or you can also reset forgotten Windows 10 password by following these steps.
10. Finalizing Windows 10 Settings
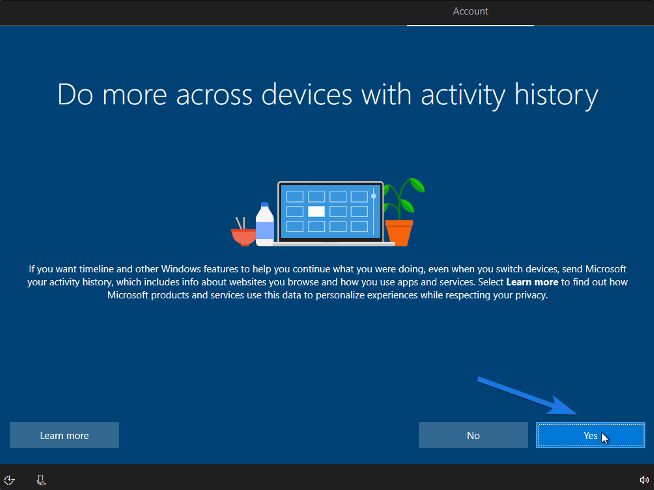
Now on the next screen, it will ask for “Do more across devices with activity history” which is a Timeline feature. This helps you keep a track record of the apps and websites you visit on a daily basis which is a good option. So click on Yes if you want to use it.
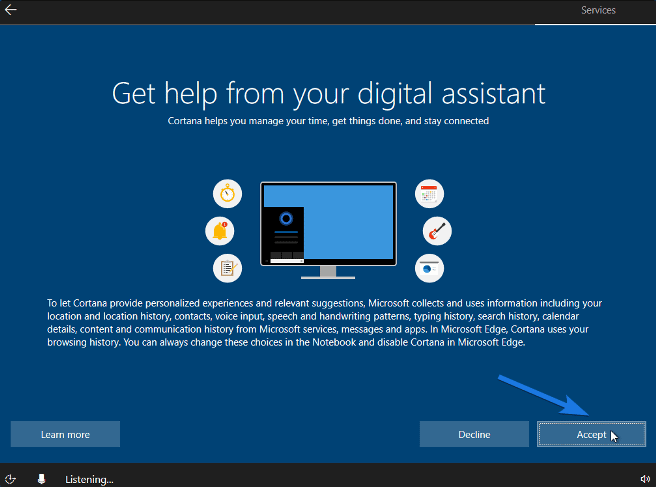
After that, it will ask you to “Get help from your digital assistant” which is also known as the Cortana feature. This basically works as the Google Assistant and Siri for windows users. So click on Accept.
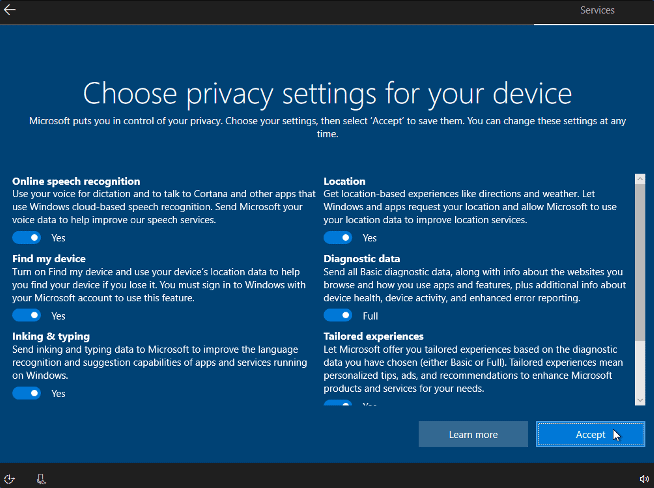
And at last “Choose privacy settings for your device” for features like online speech recognition, location & Find my device. So, choose them wisely and then click on Accept.
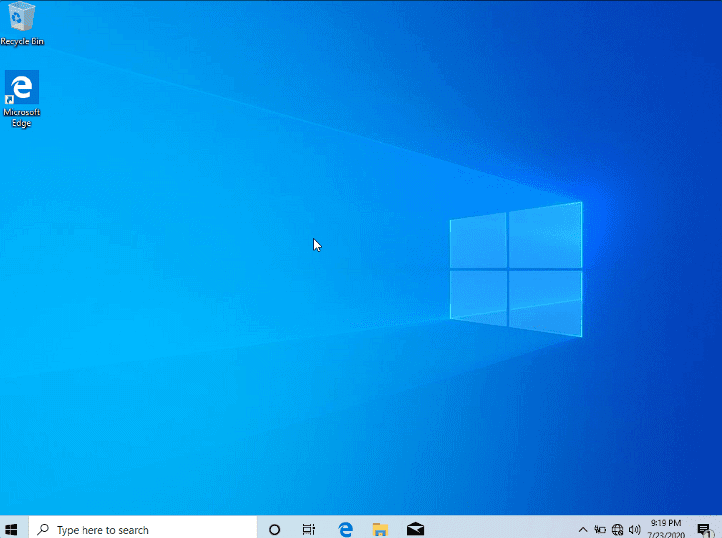
And Done! After a few minutes, all your settings will be saved and you will see your Windows 10 running on your PC.
Windows 10 System Requirements
Although, this version of Windows does not have any additional system or hardware requirements like TPM 2.0 or Secure Boot but still some user faces issue while installing it and this can be a reason for that.
Apart from that, we have also checked some requirements by installing Windows 10 on VirtualBox and it really runs very well with 1GB RAM also. But still, if any issue is coming then here is the list of requirements.
- Latest Operating System: Windows 7 SP1 ( If you are upgrading )
- CPU / Processor: 1GHz or faster processor.
- Storage Space: 30 GB is the minimum free space.
- RAM: 2 GB for 64-bit and 1 GB for 32-bit
- Graphics Card: DirectX 9 or later
- Screen Resolution: 800 x 600 display
That’s it for now…
Conclusion
So, that’s how you can easily do a clean install of Windows 10 using a USB drive on your laptop or computer PC. Moreover, this step by step guide is valid for both 32bit and 64bit versions and also for laptops like Dell, Hp, Asus, and more.
So, what are you waiting for, go ahead and use this awesome installation guide for setting it up now?
Stay tuned for the latest posts…
Feel free to share your thoughts via comments and also tell us if you about this post on How to Install Windows 10 From USB Flash Drive [ Complete Tutorial ].
If you liked this post, don’t forget to share it.

So useful