Is your Windows 11 Start Menu Not Working?
If yes then this post is definitely for you.
Back in Oct 2021, When Microsoft released its latest Windows OS, the majority of users really liked the new menu and its design.
And that’s why I also shared much about the Start Menu hacks and the customization options like moving it to the left.
Although, it was pretty good and I also really liked it.
But after some time, many users started facing issues like Start Menu not opening, Stuck, or maybe it’s frozen.
Users tried every possible way to open it with a mouse, keyboard, on-screen keyboard, and also by using Windows 11 in tablet Mode.
But don’t worry, we have got some working fixes.
So, without further ado, let’s get started…
Table of Contents
How to Fix Windows 11 Start Menu Not Working [ 11+ Ways to Fix ]
However, it’s pretty normal to face any issue or bug in a new operating system. But what really sucks is when we are unable to fix it and something stops working when we are doing some important work.
And if look at this problem then you will see that after clicking on the Start Menu icon, it looks like it is opened but nothing pops up. Moreover, for some users, this issue got automatically fixed after updating the drivers and quitting Windows Insider Program. ( But it’s not the actual solution for this )
Apart from this, I have also seen users are confused that it is the start menu or the search bar which is not working. In that case, you can also refer to our detailed post on it when it’s live.
But if you are totally sure about them, then you can follow the below-mentioned methods one by one and check which works for you.
So, let’s see how to fix this issue…
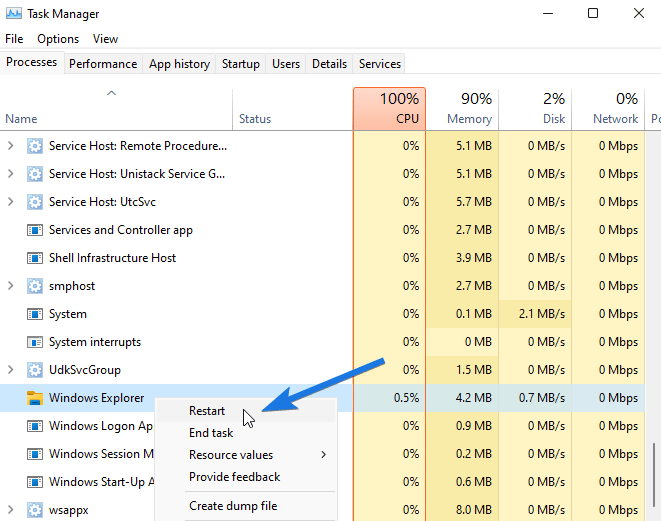
1. Restart Windows Explorer
Windows Explorer is used for opening any kind of file on your computer and it is also responsible for the start menu and taskbar functions. So, there could be a possibility that windows explorer might not be working properly. In that case, restarting it may help you in fixing this issue. And this method is not specifically for the start menu but can also help you to fix issues like taskbar won’t hide in fullscreen.
And here are the steps to follow:-
- Press ‘Ctrl+Shift+Esc‘ to open the Task Manager.
- Now go to ‘Processes tab‘ & search for Windows Explorer process.
- After that, select it and then click on Restart button.
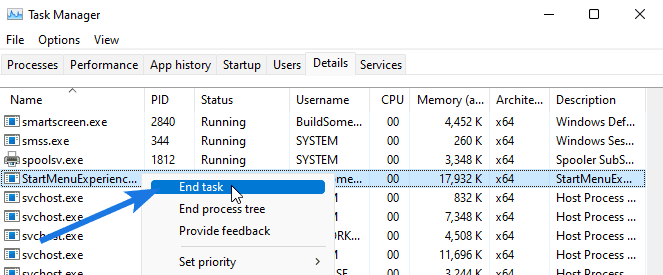
2. Restart Start Menu Background Services
Everyone knows that there are hundreds of background services and processes which are responsible for running all applications on your PC. Likewise, there is one important start menu service that helps to run it properly. Since some users have also reported that the Start Menu is not loading at the startup. So, there might be some chances that its background service is having some loading issues and in that case, restarting it can help us.
And here are the steps to follow:-
- Press ‘Ctrl+Shift+Esc‘ to open the Task Manager.
- Now go to ‘Details tab‘ and then scroll down & search for StartMenuExperienceHost.exe service.
- After that, right-click on it and then select End task.
3. Restart Your Computer
At this moment, you might be thinking that all these 3 methods are almost similar. But trust me, these are the safest and easiest ones that can help you to fix Windows 11 start menu not working issue. If you are facing any kind of issues on your machine, restarting your computer is always recommended as it provides a fresh start to the machine. Sometimes, there is very much load on a device, and because of which you may face such working issues.
And here are the steps to follow:-
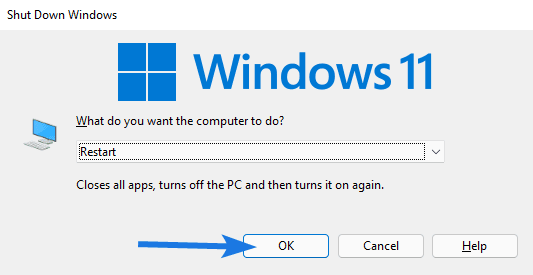
- First, go to your ‘Desktop Screen‘.
- Now press ‘Alt + F4‘ shortcut keys.
- After that, ‘Shut Down Windows‘ dialog box will open up, now click on the drop-down menu and select ‘Restart‘ & then hit OK.
4. Use Start Menu Troubleshooter App
Although, Microsoft released Windows 11 with a new supportive application like PC Health Check App. But on the other side, they also removed support for some useful apps like Cortana, Paint 3D, Meet Now, and sadly the Start Menu troubleshooter app also.
Basically, this troubleshooter app was developed for Windows 10 operating system when one feature update crashed the Start Menu. And to fix all those issues this app was provided by Microsoft and now it’s retired.
But you can still use it by following the below-mentioned steps:-
1. First, download and install Start Menu Troubleshooter App on your Windows 11 from the given link.
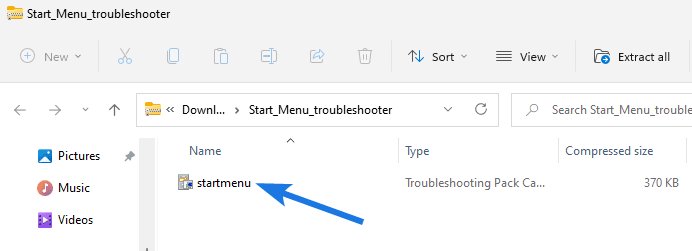
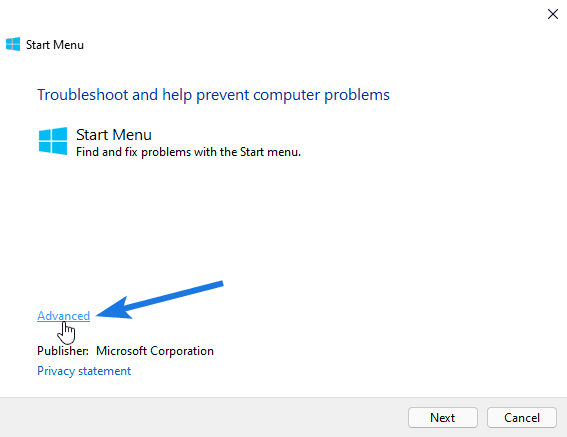
2. Now run the application and then click on the Advanced link.
3. At last, enable the ‘Apply repairs automatically‘ checkbox & then click on the Next button.
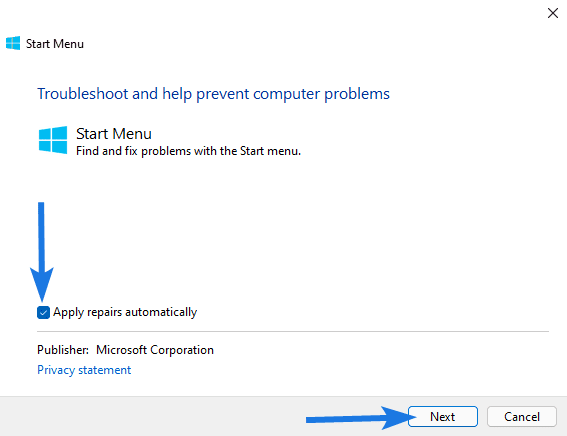
After that, it will start finding issues with the Start menu & then fix them accordingly. Once it’s done, restart your PC & then check if it’s working or not.
Otherwise, try the below-mentioned methods…
5. Re-Register Start Menu in Windows 11
In many cases, I have seen that re-registering application really helps in fixing issues. But one thing which I didn’t like about this method is using Windows PowerShell and entering commands in it. Here we will re-register the shell experience packages which is basically responsible for all Windows interface and also for the Start menu.
And here are the steps to follow:-
- First, press ‘Windows key + X‘ shortcut keys.
- Now select the ‘Windows Terminal (Admin)‘ option.
- After that, copy the given command and then paste it in the terminal & then press Enter.
Command: Get-appxpackage -all *shellexperience* -packagetype bundle |% {add-appxpackage -register -disabledevelopmentmode ($_.installlocation + “\appxmetadata\appxbundlemanifest.xml”)}

Note:- If you have executed the steps mentioned in Method 5, then I suggest you to Rebuild Search Index by following the steps mentioned in Method 9.
6. Check For System Updates
Microsoft usually provides system updates for fixing bugs & other issues. Since this version of the operating system is new, I would recommend you to keep your system up to date. And if your Start menu is not working on Windows 11 then I suggest you to check for updates. Because in the previous case when the Snipping tool was not working, that issue only got fixed after getting the cumulative update.
And here are the steps to follow:-
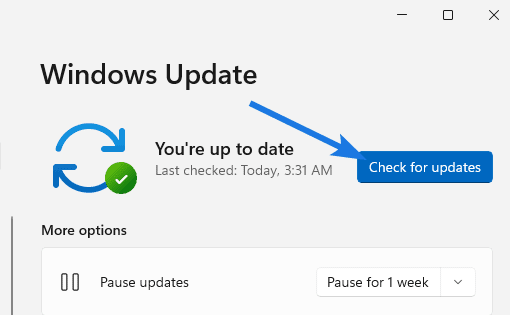
- First, press ‘Windows + I‘ shortcut keys. ( To open Settings app )
- Now, go to the ‘Windows Update‘ section.
- At last, click on Check for updates.
7. Remove Start Menu Tweaks & Apps
I know tweaking your desktop to look cool is really fun. But not always all time, because sometimes they may cause compatibility issues with your system. And in that case, you have to remove those start menu tweaks and third-party apps installed on your PC. Like in one of my previous articles, I shared how to get Windows 10 Start menu in Windows 11 by adding some Start_ShowClassicMode files. And if you have also added some tweak files then I would suggest you to remove them immediately.
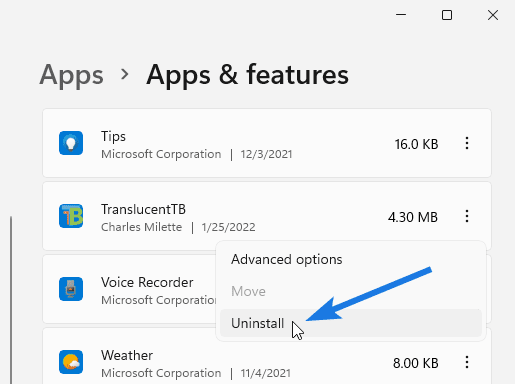
Moreover, some user also uses third-party apps like TranslucentTB and TaskbarX to make their taskbar transparent. And same goes with them also, they need to remove them.
And here are the steps to follow:-
- First, press ‘Windows + I‘ shortcut keys.
- Now, go to Apps section & then click on Apps & features.
- After that, search for the installed application and then click on 3-dot button and then select the Uninstall option.
8. Sign in using Local Admin Account
Have you ever felt that Microsoft is trying to integrate all their Windows and its services with their Microsoft Account? And the worst part is that you can’t even install Windows 11 on your PC without having a Microsoft account. And in that case, if your account is not working properly it might also cause an issue with the Start menu. So to fix it, you will have to sign out of your Microsoft account and sign in with a Local Admin Account.
And here are steps to follow:-
- First, go to Settings by pressing ‘Windows + I‘ shortcut keys.
- Now go to ‘Accounts‘ section from the left-hand side menu.
- Now in ‘Your info‘ section & under ‘Account Settings‘, click on the ‘Sign in with a local account instead‘ option.
- At last, complete the process by giving username and password for the local account your are creating.

9. Rebuild Search Index
Earlier I told you that, there are many users who really got confused if it’s the Search Bar or the Start menu which is not working. And that’s only because, they both are very closely related or somewhat integrated also. In that situation, if the search index gets corrupted then it may also affect the Start menu functions. And to avoid this situation we need to rebuild the Search Index so that it can fetch and show search results fast.
And here are steps to follow:-
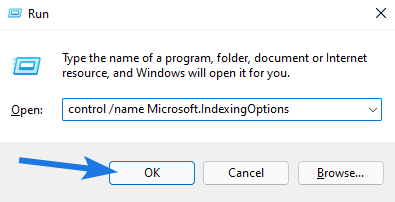
1. First, open the Run box by pressing the ‘Windows +R‘ keys.
2. Now type the given command and then click OK.
Command: control /name Microsoft.IndexingOptions
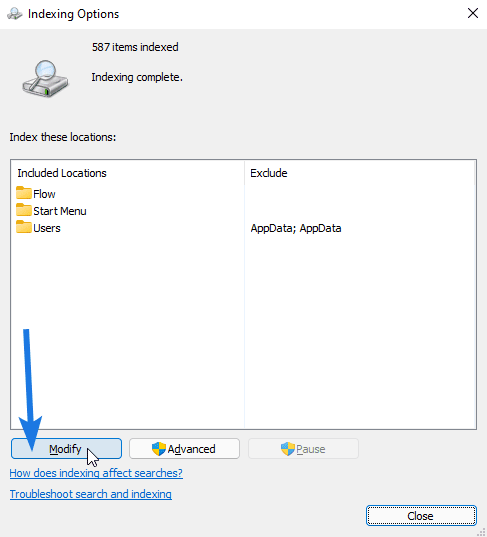
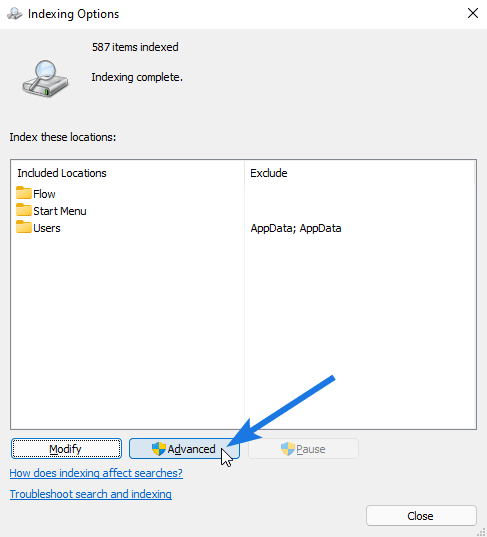
3. After that, the Indexing Options dialog box will open up, so now click on the Modify button.
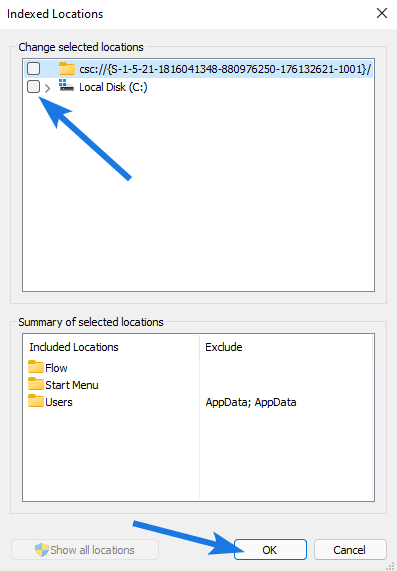
4. Now the Indexed Locations dialog box will open up, then click on Show all locations option.
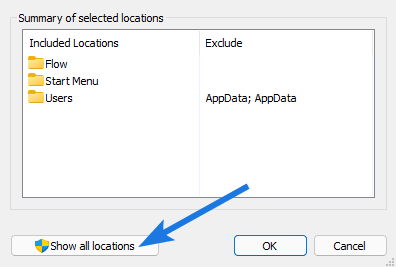
5. And then uncheck all the locations & click the OK button.
6. After that, you will be back to the Indexing Options dialog box and then click on the Advanced button.
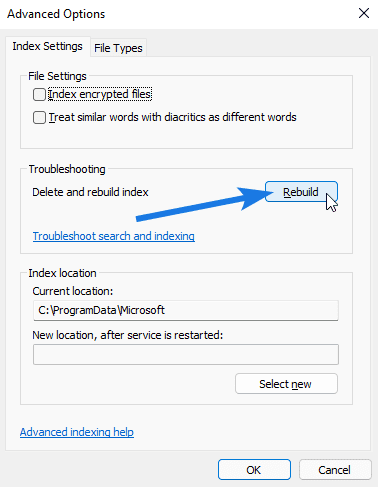
7. At last, the Indexing Options dialog box will open up, and then under the Troubleshooting section, click on the Rebuild button.
Once it’s rebuilt, Restart your PC and check if your Windows 11 start menu not working issue is fixed or not.
10. Reset Your PC
If any of the above methods don’t work for you, then resetting your PC can help you in this. I am grateful that Microsoft has given this option because after using this your is again set to default settings. Not only this but Reset this PC also helps you in fixing lots of bugs and optimizing your computer’s speed. Moreover, I would suggest you to backup all your important data before resetting your PC.
And here are steps to follow:-
1. First, go to Settings by pressing the ‘Windows + I‘ shortcut keys.
2. Now, go to the System section & then click on the Recovery option.
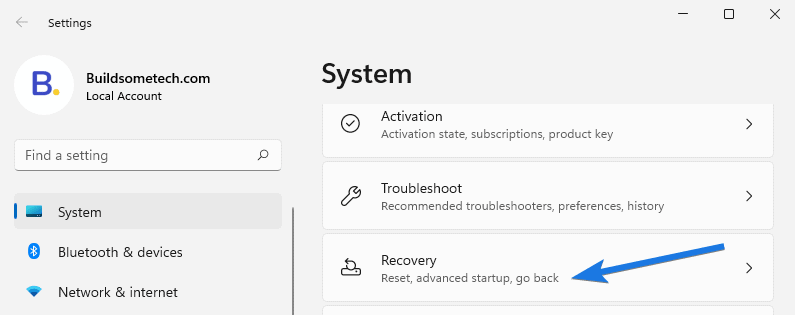
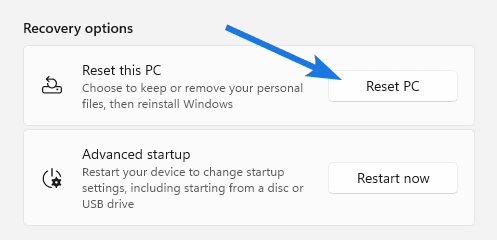
3. After that under the Recovery options section, click on the Reset PC button.
4. Now, the Reset this PC dialog box will open up, and then click on the Keep my files option.
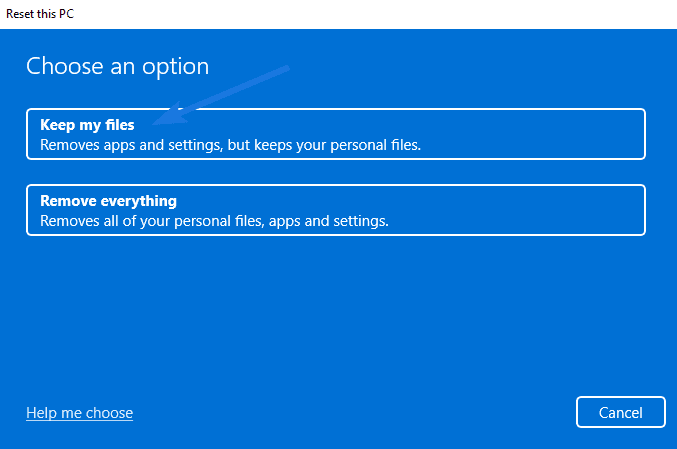
5. At last, click on the Next button & then finally click on the Reset button.
Now your PC will automatically Restart and after that, it will take a few minutes to complete this resetting process.
11. Update Your PC Drivers
In the starting section, I have already mentioned that not updating your PC drivers can also cause some issues but here we will discuss it in more detail. And many users have also reported that they have fixed their start menu issues by updating drivers like Graphics Driver, DBUtil Removal Utility, and Intel Management Engine Interface Driver. In that case, you can also try to update your cFosSpeed Driver because maybe it is causing a compatibility issue with Start Menu as well as the taskbar.
And here are the steps to follow:-
1. First, press the ‘Windows + I‘ shortcut keys.
2. Now search for ‘Device Manager‘ and then click on that.
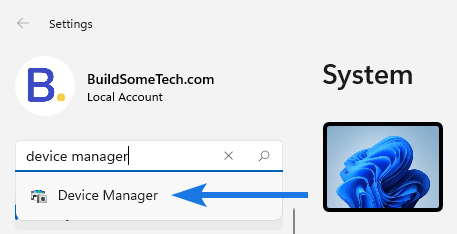
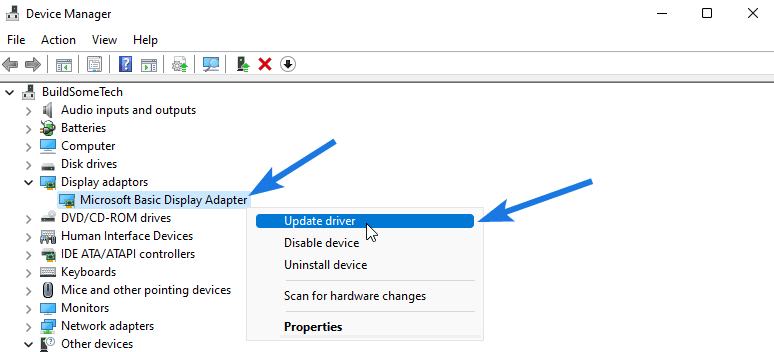
3. After that, go to ‘Display adapters‘ and double-click on it.

4. Now, right-click on the installed ‘Graphics Driver‘ and then select the ‘Update driver‘ option.
5. At last, click on the ‘Search automatically for drivers‘ option.
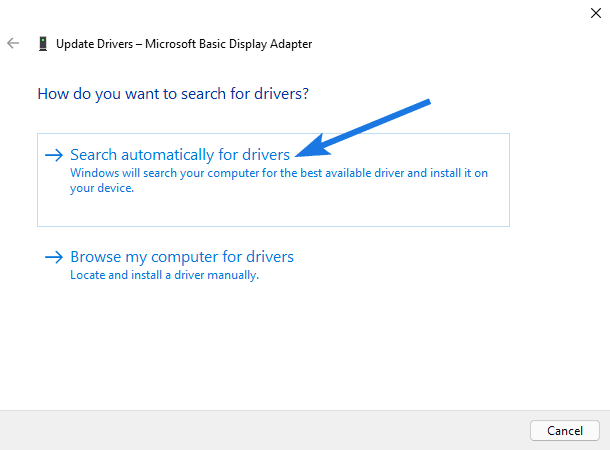
Once your drivers are updated, Reboot your PC and check if your issue is resolved or not. Above, I have only shown the process of updating the Graphics driver but you can also update other drivers too.
12. Restart Iris Service
Like other users, if you also enrolled in the Insider program to get Windows 11 early access then I would suggest you to leave it now. Because this program mainly provides beta updates like Build 22449 which may contain bugs and fixes. And if these bugs are not fixed on time, then they can easily cause issues with the services like Iris Service and also with the Start menu and taskbar.
In case that, we have to delete the registry files of the Iris service and then reinstall it by following the below-mentioned steps.
Although, we can easily open the command prompt by pressing ‘Ctrl + Shift + Enter’ or by ‘Windows + S’. But since both shortcut keys and the Start menu are not working in Windows 11, that’s why we will use some other way.
1. First, press the ‘Ctrl+Shift+Esc‘ shortcut keys.
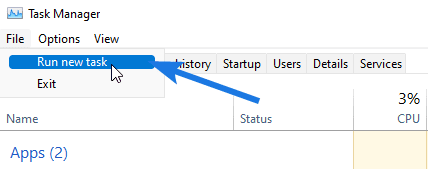
2. After that, Task Manager will open and then click on File & then select ‘Run new task‘ option.
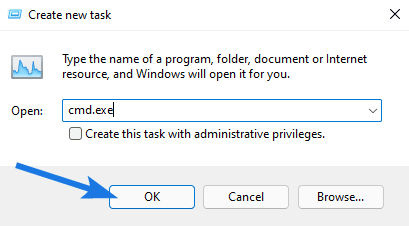
3. Now in the Open field, type ‘cmd.exe‘ and then click OK.
4. At last Command Prompt will open up, so now copy-paste the command and then press Enter.
Command: reg delete HKCU\SOFTWARE\Microsoft\Windows\CurrentVersion\IrisService /f && shutdown -r -t 0

Note:- Please save your work before running these commands because after that your PC will automatically restart.
13. Run Windows 11 in Safe Mode
Safe Mode is that mode of Windows that helps you to run your operating system with basic features. Moreover, no third-party applications can be used while running this mode which means we can easily check if any third-party app is causing any issue with the Start menu or not. There are many ways of running your Windows 11 in Safe Mode but here we will only tell you the easiest one.
And here are the steps to follow:-
1. First, press the ‘Windows + I‘ shortcut keys.
2. Now on the right-hand side section, scroll down and go to the Recovery section.

3. Now under Recovery options, click on the Restart now button which is right to the Advanced startup tab.
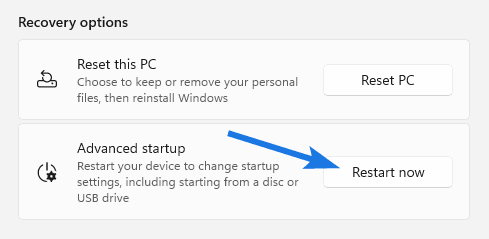
4. After that it will ask for confirmation, so click Restart now button again.
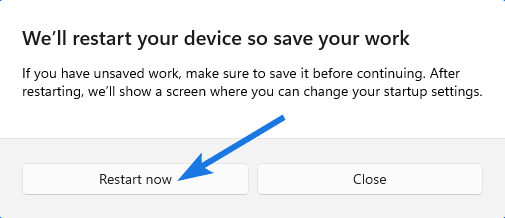
5. Now your PC will boot in the Recovery mode and then click on the ‘Troubleshoot‘ option.
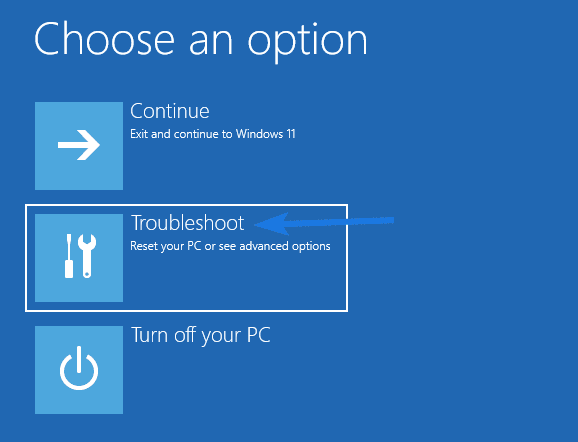
6. Now go to the ‘Advanced options‘ section.
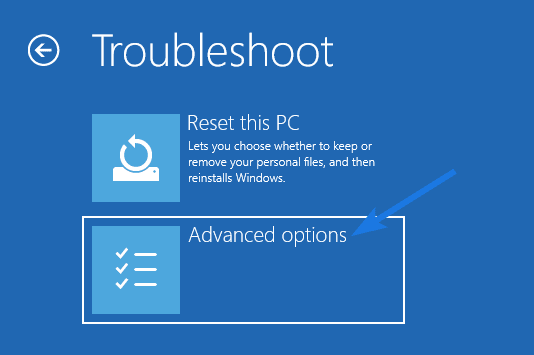
7. After that, go to the ‘Startup Settings‘ section.
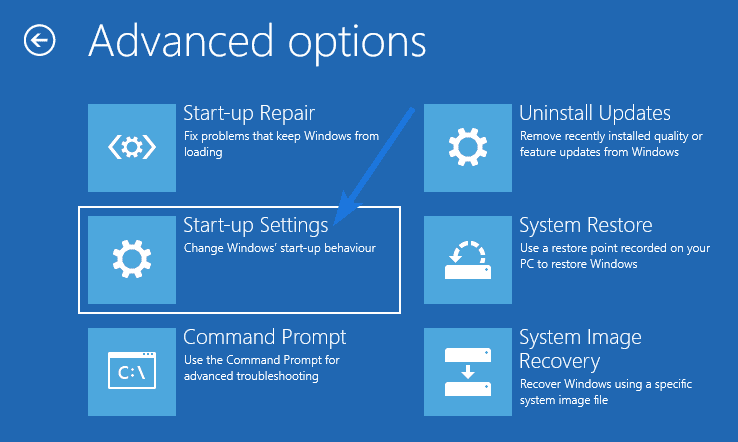
8. Now, the ‘Start-up Settings‘ will open up and then click on the Restart button.
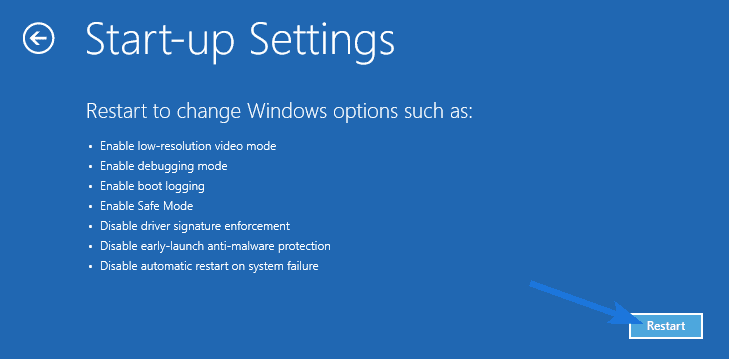
9. At last, press the ‘F4 key‘ to start your PC in Safe Mode.
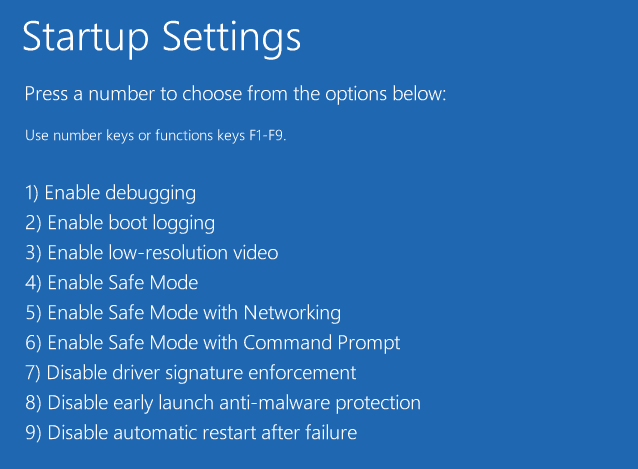
Now your PC will boot in Safe Mode, now check if the Start menu is working or not. And if it works then try to remove those third-party apps which you think might be causing an issue.
14. Roll back to Windows 10
If after using all of the above methods, you are still facing the bug then you should roll back to Windows 10. Windows 11 is surely the updated and better version but if you are facing bugs and not able to solve them, it is recommended that you should revert to the older version of Windows. Moreover, you can only use this method if you haven’t used Windows 11 for more than 10 days. And you don’t have to download anything, just follow the below steps and you will be back on your Windows 10.
And here are the steps to follow:-
1. First, press the ‘Windows + I‘ shortcut keys to open Settings.
2. Now go to the System section and then click the Recovery tab.

3. Now under Recovery options, click on the ‘Go back‘ button.
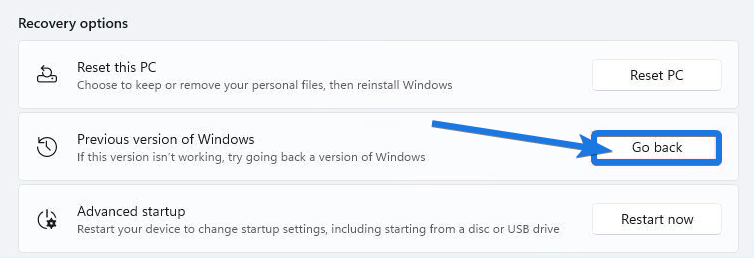
4. After that, follow the on-screen instruction accordingly.
Note:- You can also refer to the above link for an in-depth post on rolling back to Windows 10.
15. Uninstall Update KB5004300
Although, in the above steps I have mentioned that updating can help you in fixing this issue but I have seen some users have reported that their Windows 11 Start menu working after update ‘KB5004300‘. So in that case, uninstalling this update can easily help you to fix this issue. However, there are very less chances that you will lose your data in this uninstallation process but we recommend you to backup your data.
And here are the steps to follow:-
1. First, go to Settings by pressing the ‘Windows + I‘ shortcut keys.
2. Now navigate to the ‘Windows Update‘ section.

3. After that, go to the ‘Update history‘ section and then go to ‘Uninstall updates‘ settings.
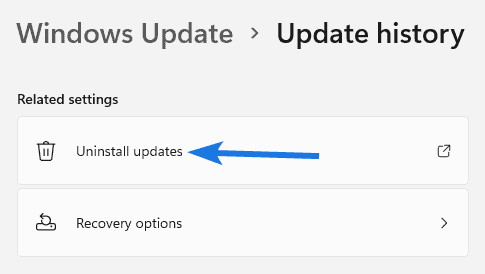
4. Now control panel will open, so right-click on the ‘KB5004300‘ update and then click on Uninstall.
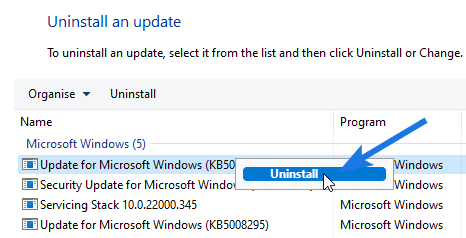
5. At last, Restart your PC.
16. Check for Viruses or Malware
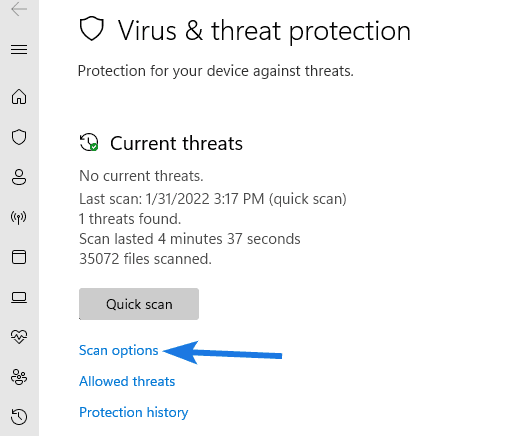
Now if you have already tried all the above methods then I would suggest you to check for viruses or malware. Because sometimes they also block useful processes thinking of them as a virus and can also cause issues with the Start menu. And to fix this issue, we will run a quick scan by using Windows Defender.
And here are the steps to follow:-
1. First, press the ‘Windows + I‘ shortcut keys to open Settings.
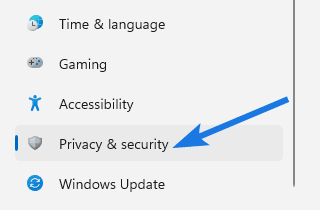
2. Now from the left-hand side, go to the ‘Privacy & security‘ section.
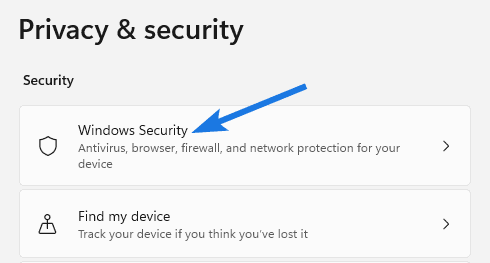
3. After that under the security section, click on the ‘Windows Security‘ tab.
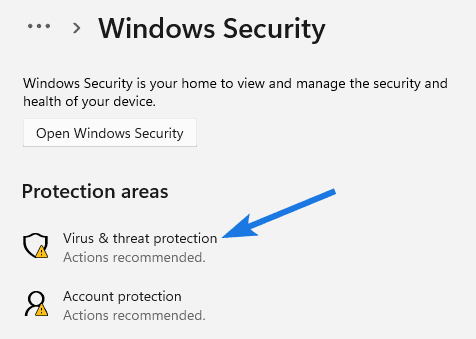
4. Now under the Protection areas section, click on the ‘Virus & threat protection‘ option.
5. Now you can go for Quick scan or simply click on ‘Scan options‘.
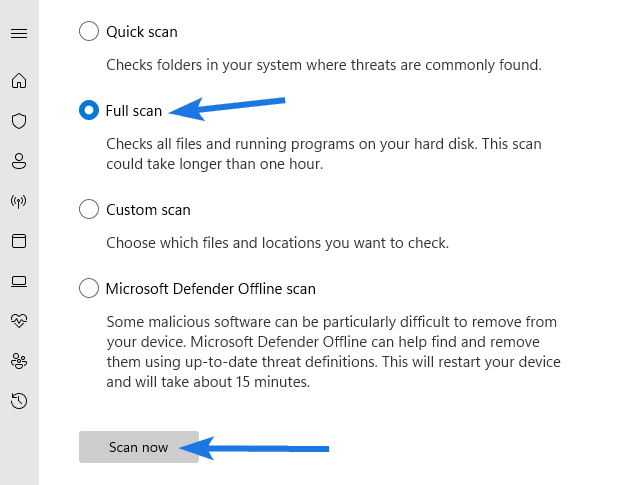
6. At last, select the Full scan option and then click on the ‘Scan now‘ button.
Note:- If this issue still doesn’t fix, then I suggest you to disable your Antivirus Program. Maybe it is causing a compatibility issue with Windows 11.
17. Restore Windows
Restoring Windows means that you will restore your Windows OS when it was working completely fine. And it’s done by using backups, Windows usually take a backup of the entire system at frequent intervals. Furthermore, these backups are also known as Restore Points which helps us in restoring our windows at a specific point in time.
And here are the steps to follow…
1. First, go to Settings by pressing the ‘Windows + I‘ shortcut keys.
2. Now go to the System section, scroll down and then go to the Recovery section.

3. Now under Recovery options, click on the Restart now button for the Advanced startup process.

4. After that it will ask for confirmation, so click Restart now button.

5. Now your PC will boot in the Recovery mode and then click on the ‘Troubleshoot‘ option.

6. Now navigate to the ‘Advanced options‘ section.

7. After that, go to the ‘System Restore‘ section.
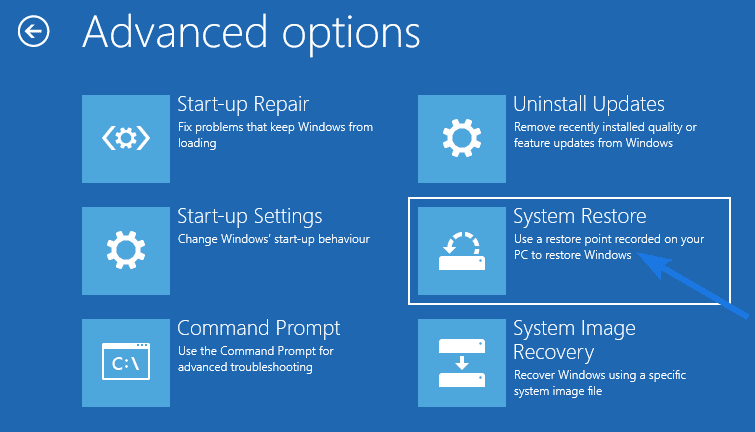
8. At last the Restore system files and settings dialog box will open up, so now select the specific ‘Restore point‘ & follow the instructions.
That’s it for now…
Conclusion
So, that is about how you can easily fix your Start menu if it’s not responding or working. Also, you can use these methods if your menu or taskbar is frozen, not opening accordingly.
Moreover, we have tried to discuss each and everything in this post and will be updating it soon when anything comes up.
Stay tuned for the next posts…
Feel free to share your thoughts via comments and also tell us about this post on Windows 11 Start Menu Not Working [ 17 Ways to Fix ].
If you liked this post, don’t forget to share it.
