How to Install Windows 11 on Unsupported Hardware PC?
If you are searching for the same question, then you are in the right place.
Microsoft has recently released its latest OS with a lot of hype and plenty of people are eager to install this Windows 11 on their system.
Also, it is possible that your computer may not comply with the latest hardware requirements for installing it.
And this is because Windows 11 OS comes with very strict system requirements for running on any unsupported PC.
One of its strict requirements is TPM 2.0 and Secure Boot which made a mess. And that’s why Microsoft has officially recommended some ways for unsupported processors and CPUs which we will be discussing later.
So without further ado, let’s get started…
Table of Contents
How to Install Windows 11 on Unsupported hardware PC [ 5 Methods ]

All the below-mentioned methods are effective and suggested by many Windows experts. All these methods work really great with Windows 11 official version and I have personally used them for running on my old unsupported hardware PC’s.
Also, if you have recently bought a new laptop or computer then you don’t have to worry. Because in most of the cases, users just need to turn on the TPM 2.0 from their BIOS settings.
Moreover, I would suggest you to check your Windows 11 compatibility one more time by running the PC Health Check app provided by Microsoft. And if the app shows that the PC is supported then an upgrade is easy. But if it denies then you should definitely try the below-mentioned methods.
So, let’s dive in further…
1. Bypass Windows 11 Requirements Checks [ TPM & CPU ]
This first method requires that there must be at least TPM 1.2 supported on your PC. Else, you cannot bypass the TPM requirement for running this operating system. So, if your PC supports TPM 1.2 then the steps below will help you in installing Windows 11 on an unsupported CPU or PC.
Now follow the given steps below:-
1. Open the Run prompt using Win+R.
2. In the search dialog box, type ‘Regedit and press the ‘Enter’ button.
3. Now, navigate to this path: HKEY_LOCAL_MACHINE\SYSTEM\Setup\MoSetup
4. Now right-click on the ‘MoSetup’ and then go to ‘New’. From there, select ‘DWORD (32-bit) value’.
5. In this step, you need to name this value as ‘AllowUpgradesWithUnsupportedTPMOrCPU’.

6. Double-click that value and set it to ‘1’.
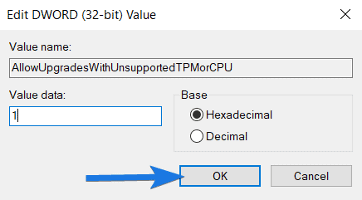
7. Click on the ‘OK button.
8. Now exit the ‘Registry Editor’ & then restart your computer.
Optional:- Click on F9, F12, Delete, or any other selected key to start the boot manager.
And Done! Now you can continue the installation procedure and if you want a detailed guide on bypassing Windows 11 requirements with images then check out the given source.
Now let’s move to the next method…
2. Install Windows 11 directly from ISO File
This method lets you install Windows 11 directly from an ISO file by running the setup.exe file. Apart from this, you also get two options based on your choices whether to store your personal files and apps or not. And if you intend to obtain Windows 11 in form of a fresh installation in absence of any old files then you can select the ‘Nothing’ option.
Now follow the given steps below:-
1. Firstly, download the Windows 11 ISO file from the given link.
2. Once the file is downloaded, now double-click on it to mount.
3. After that, open the mounted ISO file and then double-click on the ‘setup.exe‘ file and then click on the ‘Accept’ button.
4. In this step, you need to choose any one of the 3 options i.e. ‘Keep personal files only’, ‘Keep personal files and apps, or ‘Nothing’.
5. Now click on the ‘Next‘ button. If a warning message is shown, click on the ‘Accept’ button.
6. At last, click on the ‘Install’ button and allow the installation to finish.
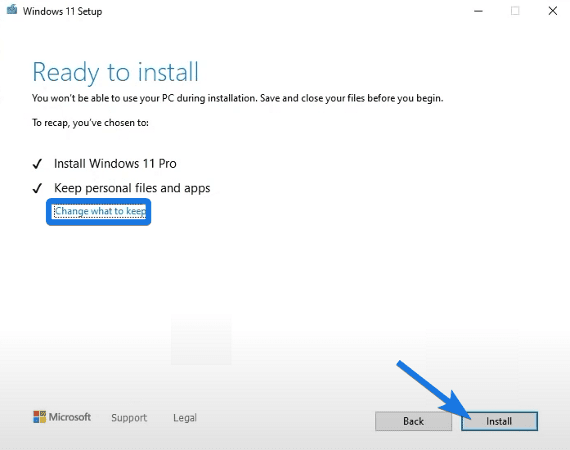
Note:- Your computer may restart a few times to complete the installation.
Now let’s move to the next method…
3. Bypass TPM, Secure Boot, CPU Checks via Registry Editor
The initial steps of this method are somewhat identical to the steps discussed in the first method. It involves naming the key in the registry editor and creating other relevant keys. After following the below steps, you can proceed to the next section for the installation of Windows 11 on unsupported hardware.
1. Open the Run box through Windows + R shortcut key.
2. Now type ‘Regedit‘ and then press the ‘Enter’ button.
3. After that ‘Registry Editor’ will open up, now you need to navigate to the below path: Computer\HKEY_LOCAL_MACHINE\SYSTEM\Setup
4. Now right-click the Setup folder and choose a key from the ‘New’ option and then give this key a name as ‘LabConfig’.
5. Now in the ‘LabConfig’ folder, right-click anywhere and then select ‘DWORD(32-bit) value’ from the ‘New‘ option.
6. Now, rename that key as ‘BypassTPMCheck’. Identically, make other keys and name them as ‘BypassSecureBootCheck’ and ‘BypassCPUCheck’, respectively.
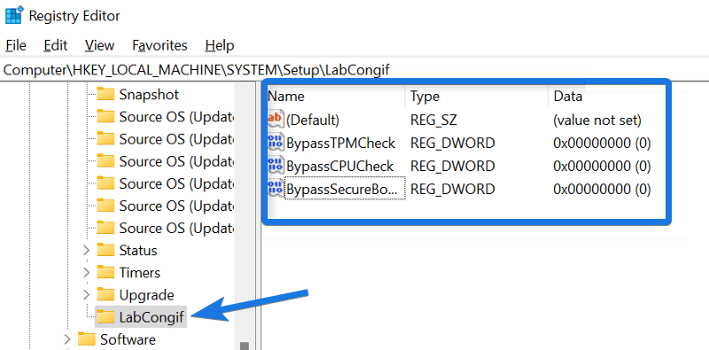
7. After that, you have to open the newly created keys and then change its Value data from 0 to 1.
8. At last, close the ‘Registry Editor’ and then Restart your PC.
And Done! For a detailed guide on this, you can also checkout how to install Windows 11 without TPM.
Now let’s move to the next method…
4. Clean Installation via Bootable USB Drive
In this method, it is advisable that you install Windows 11 operating system in another partition. The idea behind this is to make sure you don’t lose your existing OS. Subsequently, if Windows 11 doesn’t function properly, you would have your earlier operating system accessible for use.
Now, follow these steps to perform the clean installation:-
1. Plug in the Windows 11 Bootable USB Drive to your computer.
2. Now restart your PC and then boot using the Bootable USB drive.
3. In this step, you will see the Windows 11 Installation setup.
4. Now, choose the Language, Time, Keyboard, and then click on ‘Next’.
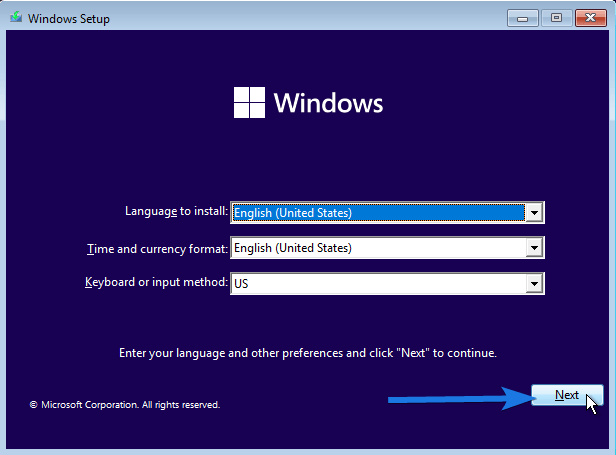
5. Now, click the ‘Install’ button If you are prompted for ‘Activate Windows’, click the ‘I don’t have a product key link.
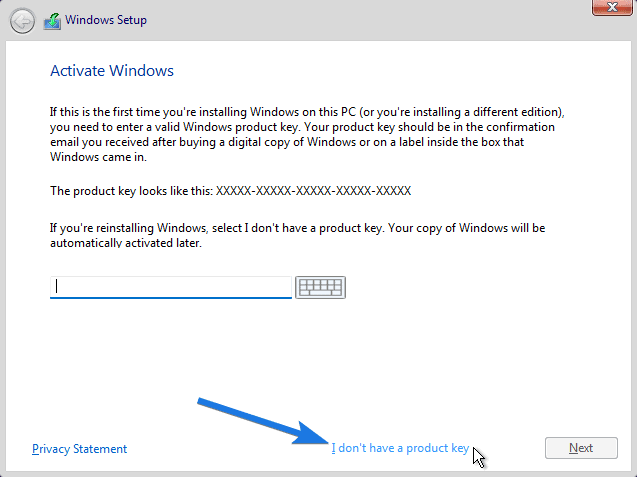
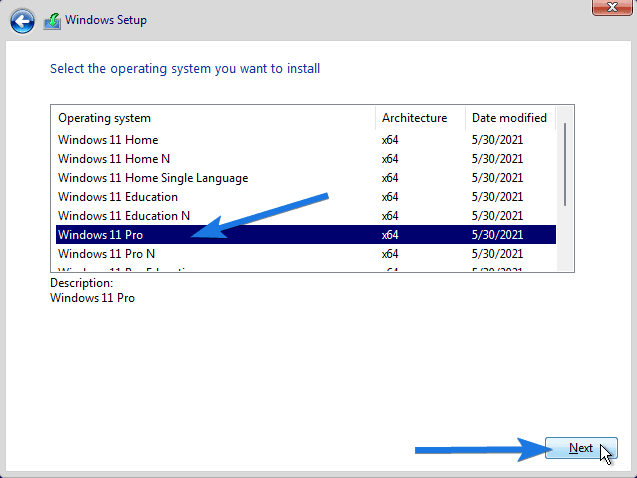
6. In this step, you have to choose the edition of the Windows you wish to have. So, choose Windows 11 Home or Pro.
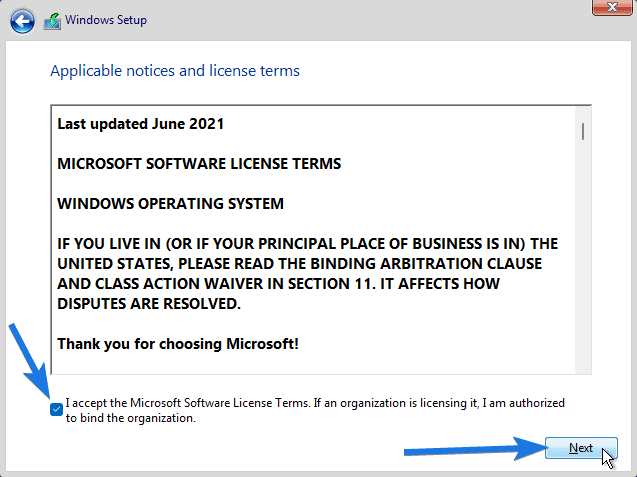
7. Now, check the ‘I accept the license terms‘ option & then click on Next.
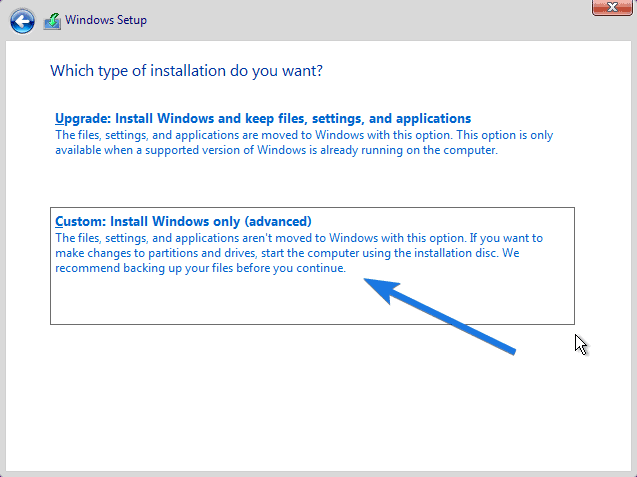
8. Choose the ‘Custom: Install Windows only (advanced)’ option.
9. Choose the ‘Partition’ where you wish to have Windows 11 installed.
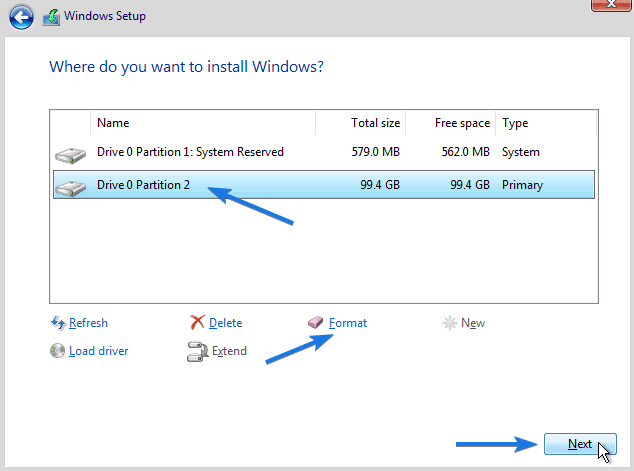
10. Click on ‘Format’ to format the partition and then click on the ‘Next’ button to begin the installation procedure.
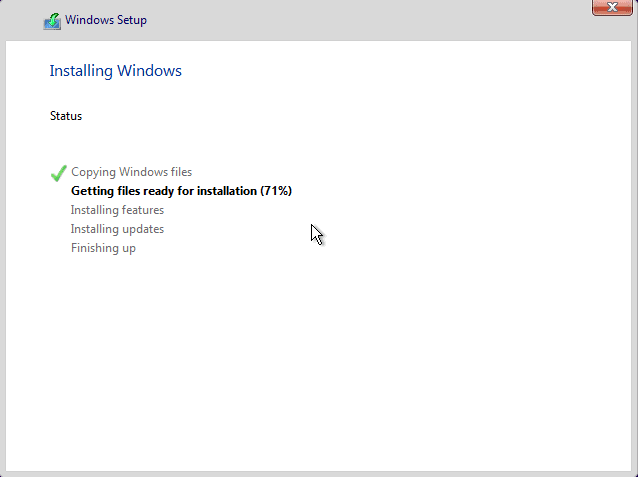
At last, finish the Windows settings and then finish the installation procedure. Moreover, you can also check out how to activate Windows 11 for free without any product key.
Now let’s move to the next method…
5. Manually Enroll in Dev Channel for Windows 11 Upgrade
This method involves manually enrolling in the Dev Channel through Registry Editor and then downloading the OfflineInsiderEnrollScript. Once downloaded, you can run the script to install Windows 11 OS on an unsupported PC.
Enroll in Dev Channel via Registry Editor
Similar to the above guides we can also use the Registry Editor for enrolling the dev channel and can get all the further updates. Although, in one of my previous posts I have already shared a detailed guide on how to get Windows 11 early access via an insider program.
But here we will be using the Registry editor for doing the same process, so let’s follow this step by step guide:-
1. Open the Run box through Windows + R shortcut key.
2. Type ‘Regedit‘ and press Enter button.
3. You will see the first option as ‘Registry Editor‘. Click that to open it. If any permission is prompted, confirm them.
4. After Registry Editor is open, navigate to the following path: HKEY_LOCAL_MACHINE\SOFTWARE\Microsoft\WindowsSelfHost\Applicability.
5. This step involves creating or changing a few values as below:-
- If there is ‘BranchName’, you need to double-click on it and type Dev in the value field.
- If there is ‘ContentType’, you need to double-click on it and type Mainline within the value field.
- If there is ‘Ring’, you need to double-click on it and type External.
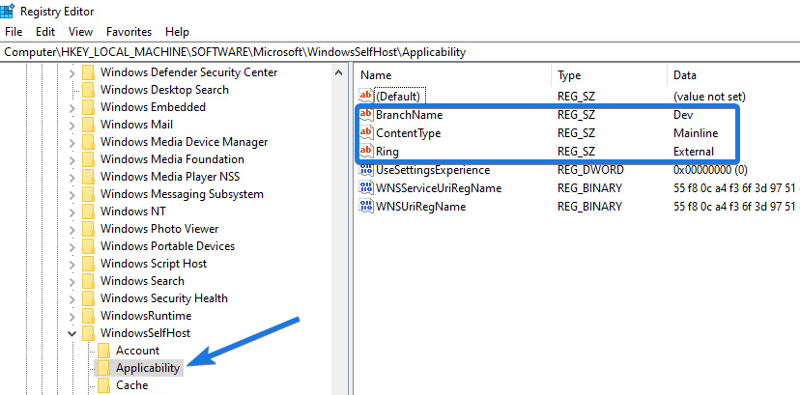
Note:- If any of these values are absent, confirm that you are correctly enrolled in the Insider Program and retry.
6. Now reboot your computer and then follow the below path: Settings > Update & security > Windows Insider Program
7. After following the above path, you will enter the ‘Dev Preview ring’.
8. Now you can go to settings and then check for updates and then you will get the latest Windows 11 preview update.
Enroll in Dev Channel via Script
However, the above process is pretty easy but if you are not comfortable with the registry editor or with its files then you can simply run this script for enrolling in the Dev Channel.
Now follow the given steps below:-
1. First, go to the Github page where the OfflineInsiderEnroll script is being hosted.
2. Now right-click the ‘Raw’ button & then select ‘Save link as’. After that, choose a location for download and then click on ‘Save’ to download.
3. Once the script is downloaded, right-click on it and then select Run as administrator and allow the permissions.
4. After that, the script will start running via ‘Command Prompt‘ and you will see different options.
5. Select option-1: Enroll to Dev Channel. Type “1” and then press Enter.
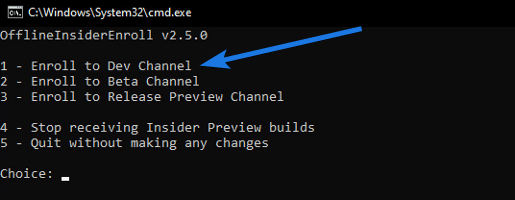
6. Now the script will run and then inform you when it’s done. And then press any key to shut down the command prompt.
7. Now go to Windows Settings > Update & security > Windows Insider Program.
8. At last, click on Check for updates and you will see options that allow you to upgrade to Windows 11.
Some FAQs
Can you install Windows 11 with unsupported CPU?
Yes, you can easily install Windows 11 on unsupported CPU or processor but Microsoft doesn’t recommend it fully because of security risks and other problems.
Can you get Windows 11 on an unsupported device?
Yes, it’s pretty easy to get Windows 11 on unsupported devices like laptops, computers, or PC. Just you have to follow the hacks given in this article.
How do I bypass the CPU requirements in Windows 11?
If you want to bypass the CPU requirements of Windows 11 then you can use the registry file “AllowUpgradesWithUnsupportedTPMOrCPU” or you can also use the WinPass11 Guided Installer.
Can I install Windows 11 without TPM?
Installing Windows 11 without having TPM on your system is very easy. Just you have to make some changes to registry files or you can also create a new file “BypassTPMCheck” for this.
That’s it for now…
Conclusion
So that’s how by following the above methods you can easily install Windows 11 on any old unsupported PC, Processor, CPU, or any other hardware. Although, your PC doesn’t meet the minimum specifications but it’s still possible for running this new operating system.
Also, I would suggest you to check out Is My Computer Compatible with Windows 11?
Stay tuned for the next posts…
Feel free to share your thoughts via comments and also tell us if you know any better sources on How to Install Windows 11 on Unsupported Hardware PC.
If you liked this post, don’t forget to share…
